
How to Migrate Exchange Server 2013 to 2019 Part-2
This article is part 2 of the multi-part article from Migrating Exchange Server 2013 to 2019.
We left off at the stage where the Exchange Server 2019 was installed on Exchange 2013 organization. This article will demonstrate how we stopped in Part 1 of the Migrating Exchange Server 2013 to 2019.
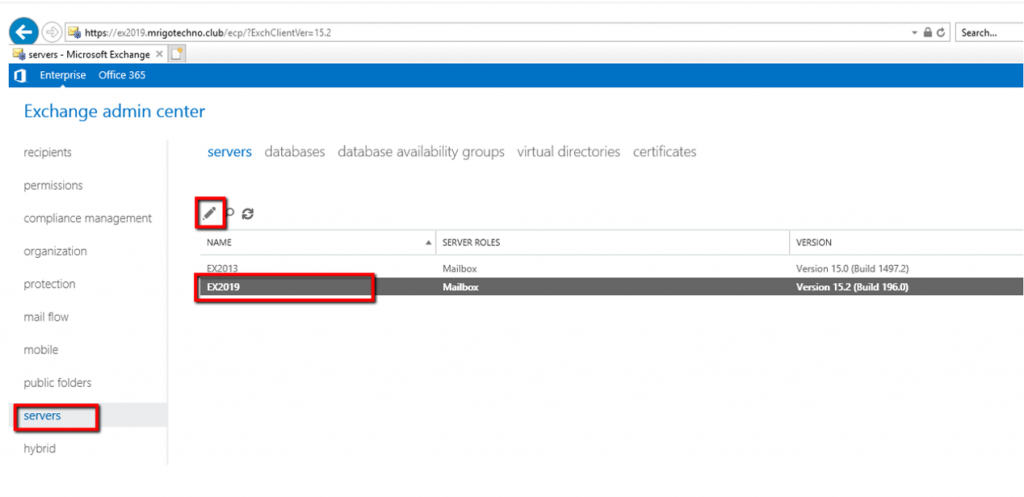
After the Exchange server 2019 installation, we can log in and check the Exchange Control Panel (ECP) to ensure installation is completed without and issues. To login to the Exchange Server ECP on Exchange Server 2019 server, type the following URL on the web browser. You would see the URL extension mentioning the exchange version to avoid ECP opens Exchange Server 2013 control panel as the administrator mailbox is still in exchange server 2013.
https://ex2019.mrigotechno.club/ecp?ExchClientVer=15.2

Configure Outlook Anywhere on server settings
We have completed the exchange 2019 server’s installation, and now we can configure it to co-exist with the Exchange Server 2013. We begin this by configuring outlook anywhere. The Outlook Anywhere configuration can be modified at the server configuration shown below.
Login to ECP and select servers in the left navigation, and on the servers list, select the one with Exchange 2019 Server name and click the edit button on the top.
Select Outlook Anywhere from the left side navigation on the server settings and update the internal and external server FQDN and save the settings.

Configure Virtual directories of Exchange 2019 Servers
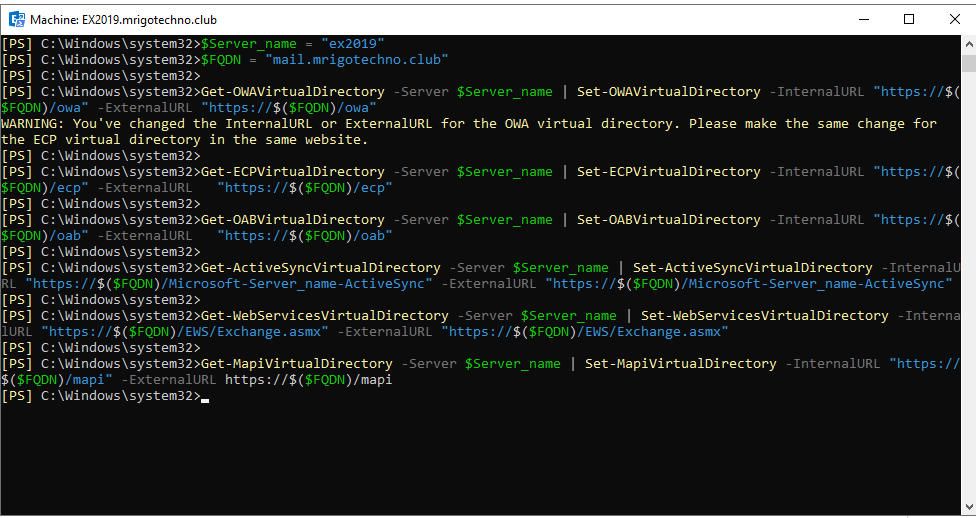
The internal and external URL of the virtual directories must be set with the fully qualified domain name(FQDN) of the exchange server with the https hostname to access features such as OWA, EWS, and so on. The script below can be used to update the internal and external URL of the virtual directories. In the script below, we have set the variable of the server name and FQDN and update the URL consistent with the assigned variable. In this case, we set the Server name to ex2019 because the exchange 2019 server is the one updated and FQDN must be the hostname with https, which we need to get it corrected. To run this script, copy the content below and change the server name and FQND’s value to your setup, run the exchange management shell as administrator, and paste it to update the virtual directories.
$Server_name = “ex2019”
$FQDN = “mail.mrigotechno.club”
Get-OWAVirtualDirectory -Server $Server_name | Set-OWAVirtualDirectory -InternalURL “https://$($FQDN)/owa” -ExternalURL “https://$($FQDN)/owa”
Get-ECPVirtualDirectory -Server $Server_name | Set-ECPVirtualDirectory -InternalURL “https://$($FQDN)/ecp” -ExternalURL “https://$($FQDN)/ecp”
Get-OABVirtualDirectory -Server $Server_name | Set-OABVirtualDirectory -InternalURL “https://$($FQDN)/oab” -ExternalURL “https://$($FQDN)/oab”
Get-ActiveSyncVirtualDirectory -Server $Server_name | Set-ActiveSyncVirtualDirectory -InternalURL “https://$($FQDN)/Microsoft-Server-ActiveSync” -ExternalURL “https://$($FQDN)/Microsoft-Server-ActiveSync”
Get-WebServicesVirtualDirectory -Server $Server_name | Set-WebServicesVirtualDirectory -InternalURL “https://$($FQDN)/EWS/Exchange.asmx” -ExternalURL “https://$($FQDN)/EWS/Exchange.asmx”
Get-MapiVirtualDirectory -Server $Server_name | Set-MapiVirtualDirectory -InternalURL “https://$($FQDN)/mapi” -ExternalURL https://$($FQDN)/mapi
The output must be the same as below screen and make sure there is no error with the red text.
Configure Service Connection Point
The service connection point is the Autodiscover functionality of the client access feature inside the firewall. Service connection point eases the configuration of client access protocols such as EWS and client configurations like outlook and ActiveSync. The Autodiscover service internal URI of the service connection point is set with the internal FQDN (Computer name). Also, which usually won’t have HTTPS hostname. We are going to update the SCP to match the HTTPS hostname pointing to the exchange server 2019. As well as the third-party certificate assigned to it. So, while setting up or connecting email clients like outlook it won’t give certificate error. Moreover avoid connection failure with a certificate error.
The screen below depicts how the Autodiscover service internal URI is changed on setting up client access service with the command set-clientaccessservice on the Exchange management shell.
Set-ClientAccessService -Identity EX2019 -AutodiscoverServiceInternalURI https://mail.mrigotechno.club/Autodiscover/Autodiscover.xml

Import Certification Authority Certificate to Exchange 2019
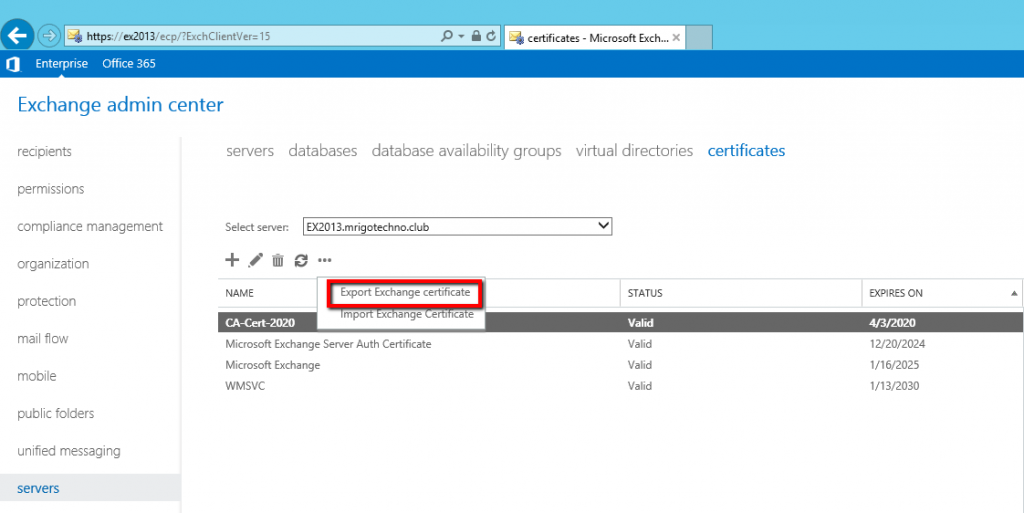
The next step on the exchange server 2019 configuration is to export the certificate from the exchange 2013 server and importing it to the exchange 2019 server. The certificate import has been done at the certificates tab on the servers on the navigation list on the exchange control panel.
Go to ServersàCertificates and select the exchange 2013 server from the drop-down list and choose the certificate that is third party certification authority provided and click on the three dots that are more settings option and select export certificate.
It will start the wizard where we can specify the path where the exported certificate needs to be placed and with a password. The file extension must be with .pfx as this certificate will be in the pfx format and that is the format that includes the private key of the certificate so that it can be imported to exchange 2019 server.

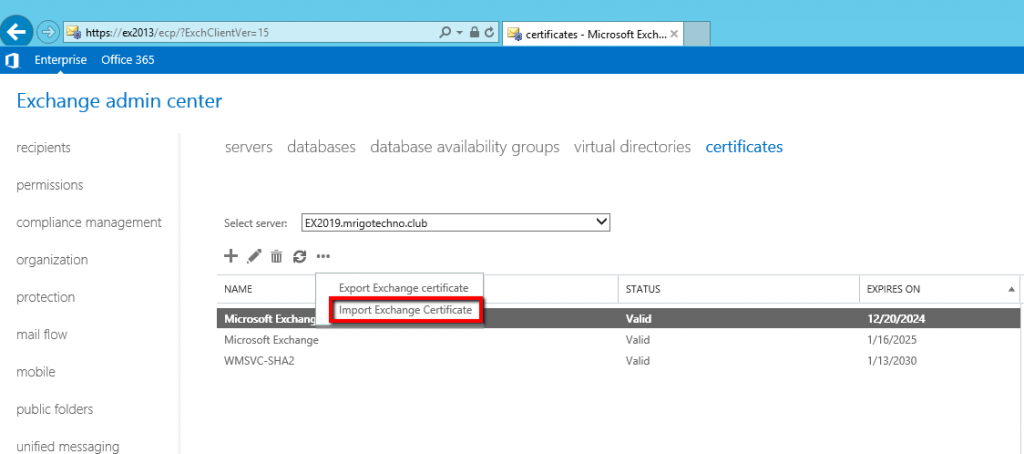
Once the certificate has been exported the next step is to import it to the exchange server 2019. The import of the certificate is the same as an export but the difference is we are choosing the exchange server 2019 from the drop-down and select Import Exchange Certificate instead.
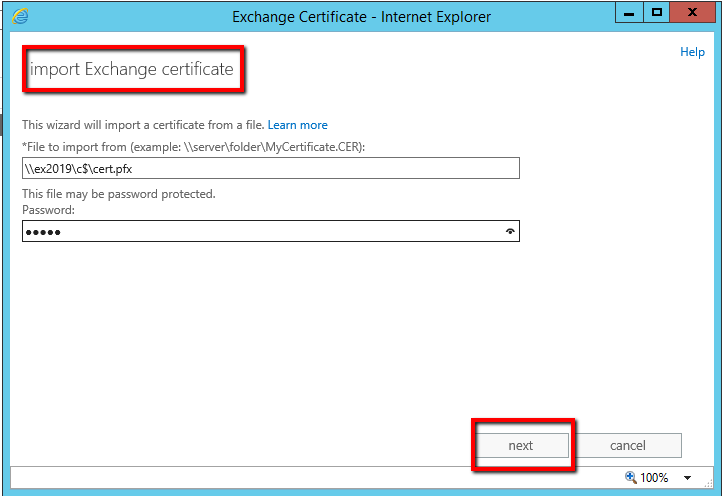
Now on import Exchange Certificate, we are providing the same file path and password that we gave while exporting the certificate on Exchange 2013 server.
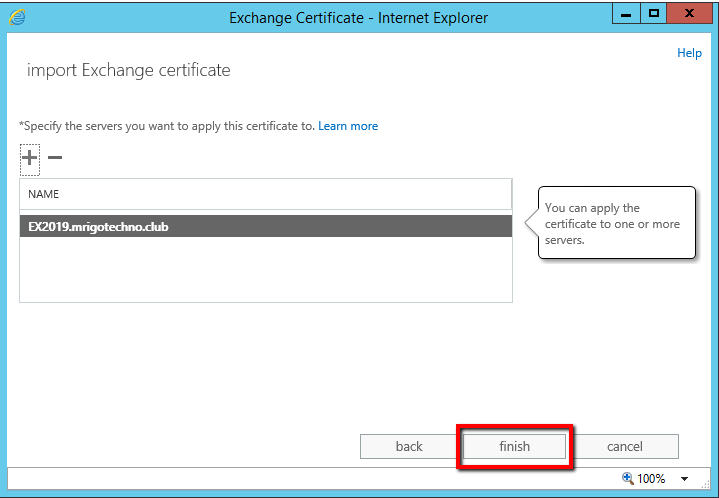
Select the Exchange 2019 server on the to specify where the certificate needs to be applied column and click Finish to import the certificate.
Assign Services to the imported certificate
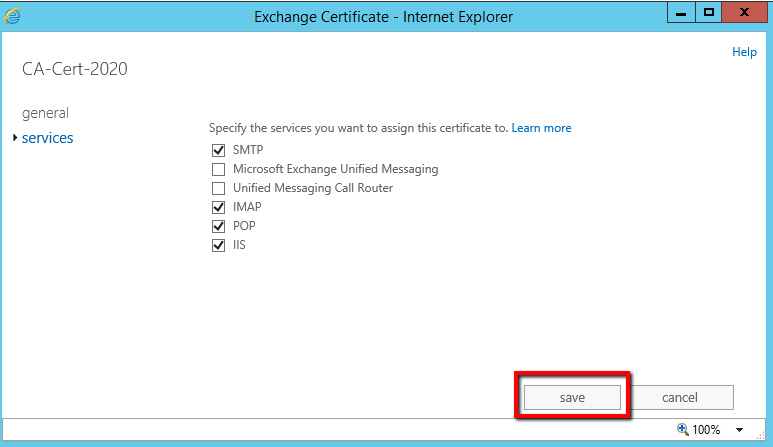
The last step on importing the exchange certificate task is to assign the services to the certificate that was imported to the exchange server 2019.

Select the certificate that was imported just before and click edit button to change the settings in the navigation list on the pop up select services and then click the checkboxes next to the services that is relevant to the exchange services where the certificate needed click save once the services are selected and click yes on the warning to copy to the existing certificate.
Summary
In this How to migrate Exchange server 2013 to 2019 article, we walk through Exchange components’ configuration. The configuration of Outlook Anywhere, Virtual Directories, and Service connection Points are some of the Client access components explained with the demonstration. We also look at importing the Certificate to Exchange Server 2019, the Certificate exported from Exchange server 2013. Next to the Certificate imported, we assigned the services to it. Here is the end of Part 2, and we are going to demonstrate the Exchange Server mail flow cutover, mailbox move, and decommission of Exchange Server 2013 in Part 3 of this article series.
How to Migrate Exchange Server 2013 to 2019 Part-1
How to Migrate Exchange Server 2013 to 2019 Part-2
How to Migrate Exchange Server 2013 to 2019 Part-3