


How to Migrate Exchange Server 2016 to 2019 | Part 3
Explore our other sections here:
Migrate Exchange Server 2016 to 2019 | Part 1
Migrate Exchange Server 2016 to 2019 | Part 2
Migrate Exchange Server 2016 to 2019 | Part 3
Preface
This is the third part of the three-part article series on How to Migrate Exchange Server 2016 to 2019. If you are landed directly to this page, please take some time, and go through the first two parts in the link above and come back to this part as this part is a continuation of the other two parts.
In this part of the article series, we are going to look at renaming the database, cutover mail flow, move mailboxes to Exchange Server 2019 including user mailbox, arbitration mailbox, and audit mailbox. In the end, we are going to look at decommissioning Exchange Server 2016 once all the workloads are migrated to Exchange Server 2019.
Rename and Move Default Mailbox Database
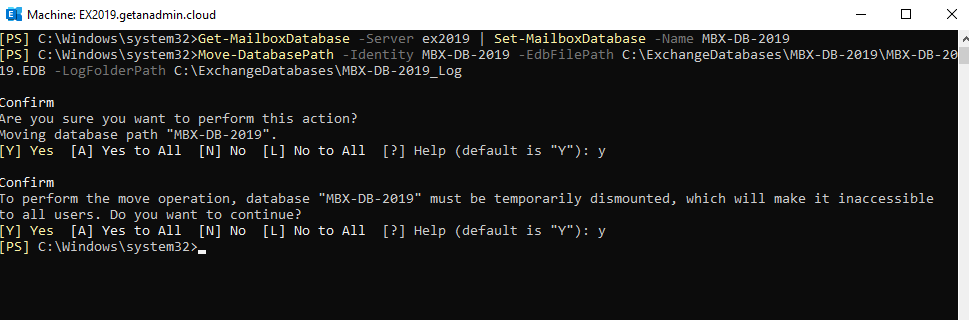
We are renaming the database as its long and random numbers in the default database name. So, giving a meaningful name to the database would be appropriate and move the path of the database to somewhere having enough disk space for the database to grow and location to store the transactional logs.
Get-MailboxDatabase -Server ex2019 | Set-MailboxDatabase -Name MBX-DB-2019
Move-DatabasePath -Identity MBX-DB-2019 -EdbFilePath C:\ExchangeDatabases\MBX-DB-2019\MBX-DB-2019.EDB -LogFolderPath C:\ExchangeDatabases\MBX-DB-2019_Log
Cutover Client Access
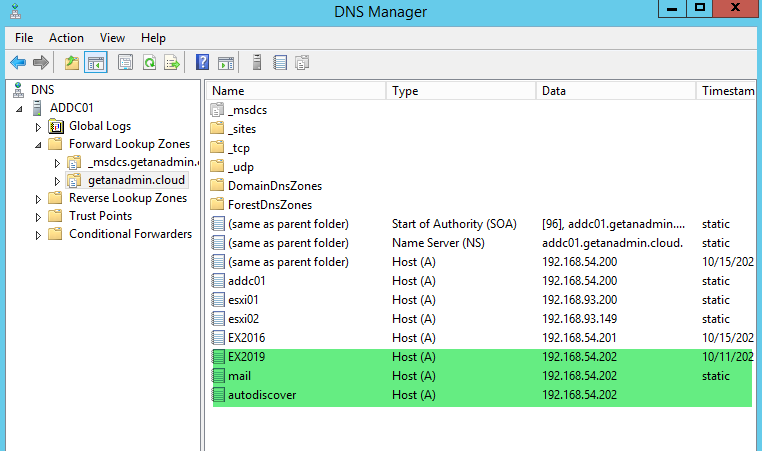
We have completed renaming the default database name and moving the database file location to other drives. The next step on this migration is to point Exchange server 2019 IP address to hostname records such as Autodiscover and exchange server FQDN hostname. The email clients internally will point to the exchange server for client access. We need to do the NAT settings on the firewall to point to Exchange Server 2019 as well. We are making these changes even though the mailboxes are still in Exchange Server 2016. Exchange server 2019 will act as a proxy to the mailboxes residing in Exchange server 2016.
Move Mailboxes to Exchange Server 2019 Database to Migrate Exchange Server 2016 to 2019
We have completed most of the Exchange server 2019 configuration-related settings and migration work. But the mailbox move is the meaty thing that we need to do next and it is the most time-consuming. We are migrating all mailboxes which are residing in Exchange Server 2016. We can do it through the Exchange Admin Center also.
Get-Mailbox -Database MBX-DB-2016 | New-MoveRequest -TargetDatabase MBX-DB-2019 -BatchName “MBX-DB-2016 To MBX-DB-2019”
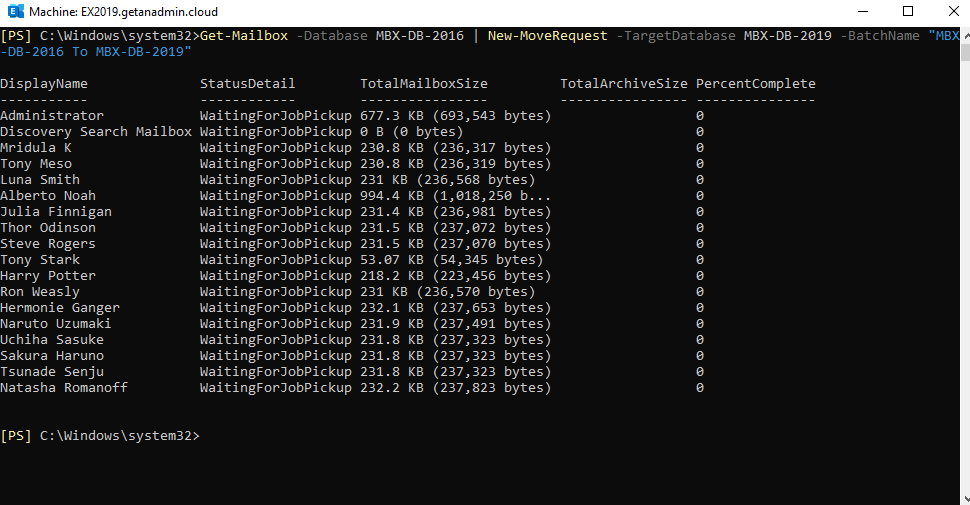
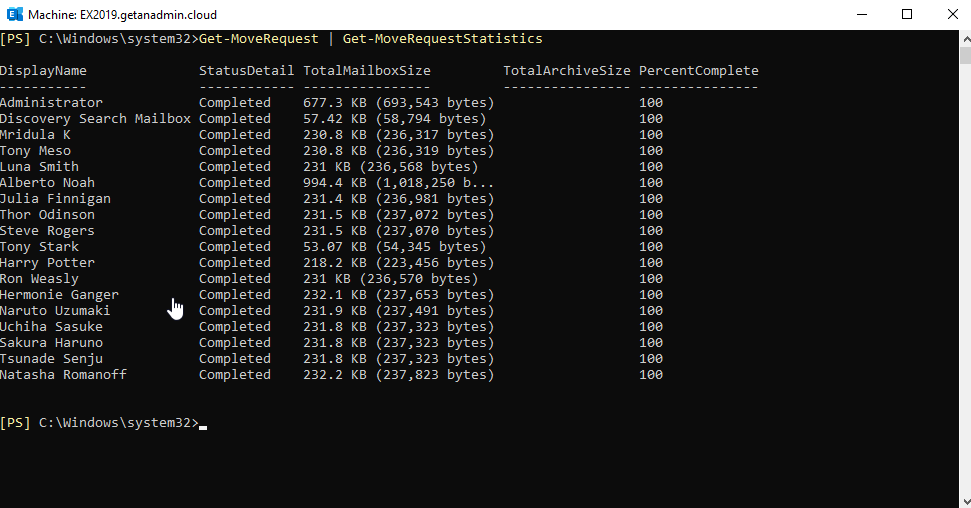
Periodically you can check the mailbox move status by running the command
Get-MoveRequest | Get-MoveRequestStatistics
In this case, our mailboxes are less in size, so the mailboxes completed moving to Exchange 2019 server database.
Migrating Arbitration Mailboxes from Exchange Server 2016 to 2019
We are going to move all arbitration mailboxes from Exchange server 2016 to 2019. The command to move arbitration mailboxes is
Get-Mailbox -Server ex2016 -Arbitration | New-MoveRequest
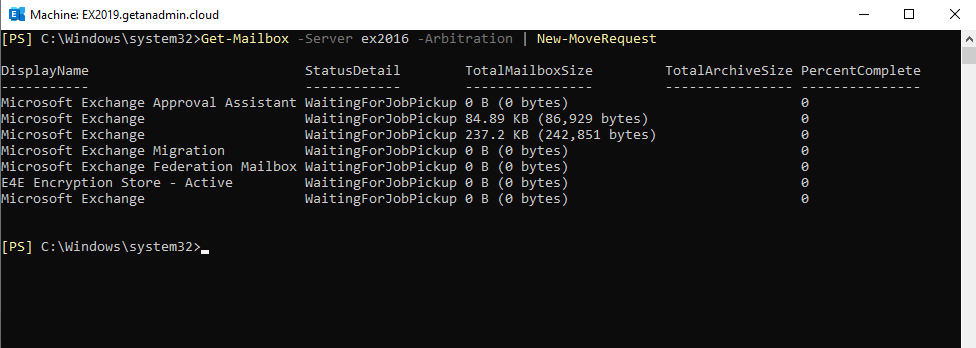
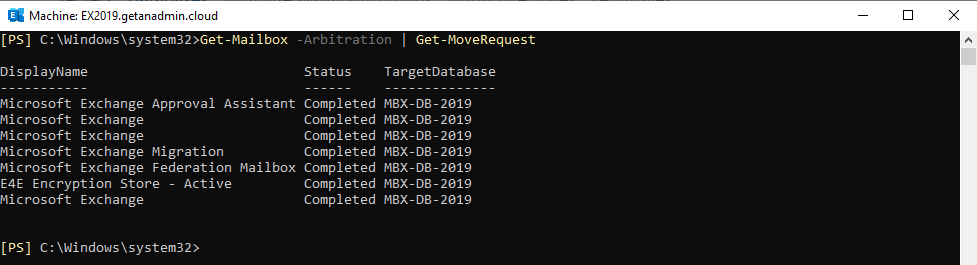
You can check if the arbitration mailboxes move completed by running the following command
Get-Mailbox -Arbitration | Get-MoveRequest
Checking the Audit Log Mailbox in Exchange Server 2016 and Later
From Exchange Server 2016 onwards, there is one more system mailbox called Audit Log. You can check the Audit Log mailbox containing the server by running the following command
Get-Mailbox -AuditLog
You can move the audit log mailbox to Exchange 2019 server running the following command
Get-Mailbox -AuditLog | New-MoveRequest
The following command will show the status of the mailbox move.
Get-Mailbox -AuditLog | Get-MoveRequest

Decommission Exchange Server 2016
We have completed moving all the workloads such as mailboxes and service points to Exchange Server 2019. In the process of moving all the workloads, we need to remove the Exchange server 2016 hostname from send connector. Login to ECP and go to mail flow\send connector. Edit the send connector and on the scoping page, remove Exchange 2016 server name from the list. If Exchange Server 2019 was not already added, add it now and remove the exchange 2016 server hostname.
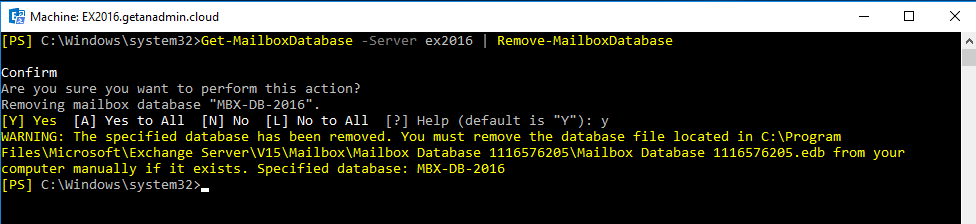
Also, in the process of decommissioning Exchange server 2016, we need to remove the Exchange 2016 server mailbox databases. Run the following command from Exchange Management Shell to remove the Exchange server 2016 databases.
Get-MailboxDatabase -Server EX2016 | Remove-MailboxDatabase
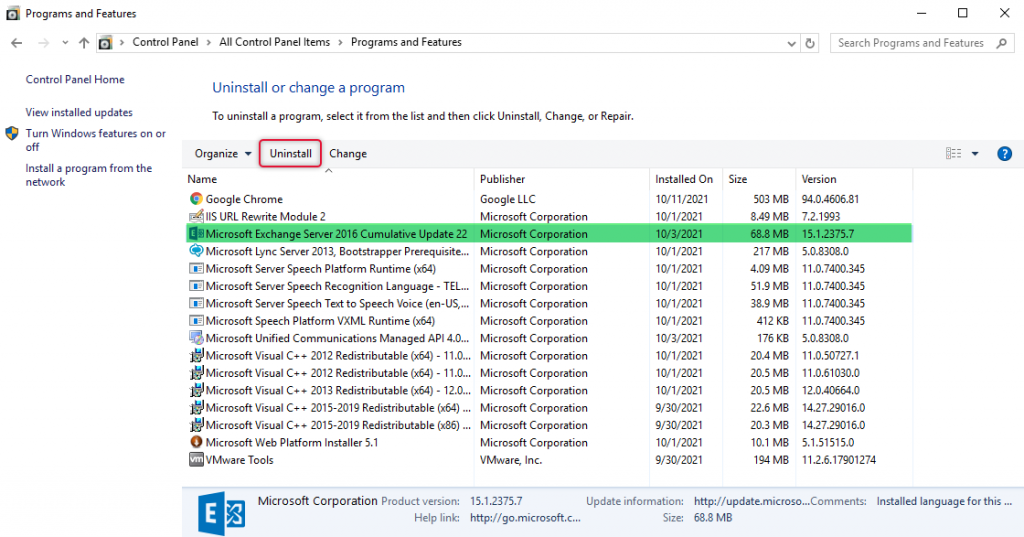
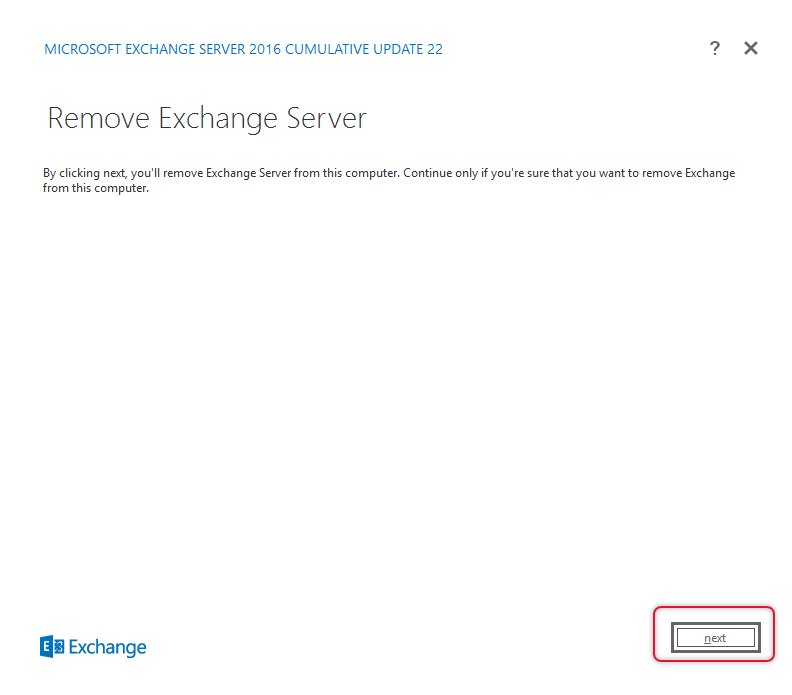
Now, it’s time to uninstall Exchange server 2016, log in to Exchange Server 2016 server desktop and go to control panel, Add Remove Programs and select Exchange Server 2016 from the list and uninstall.
The Remove Exchange Server Wizard will open and click Next to continue.
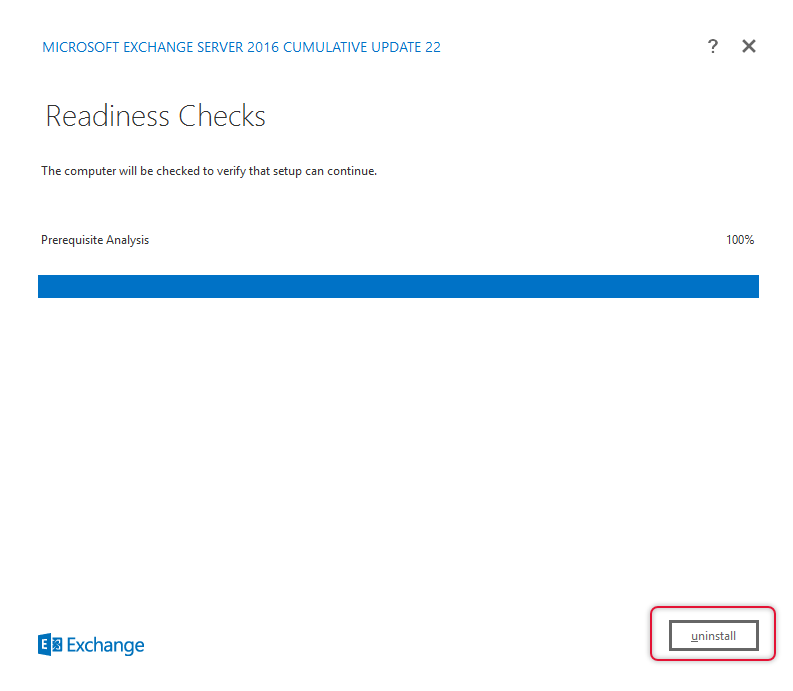
Once the readiness checks are completed click uninstall to uninstall Exchange Server.
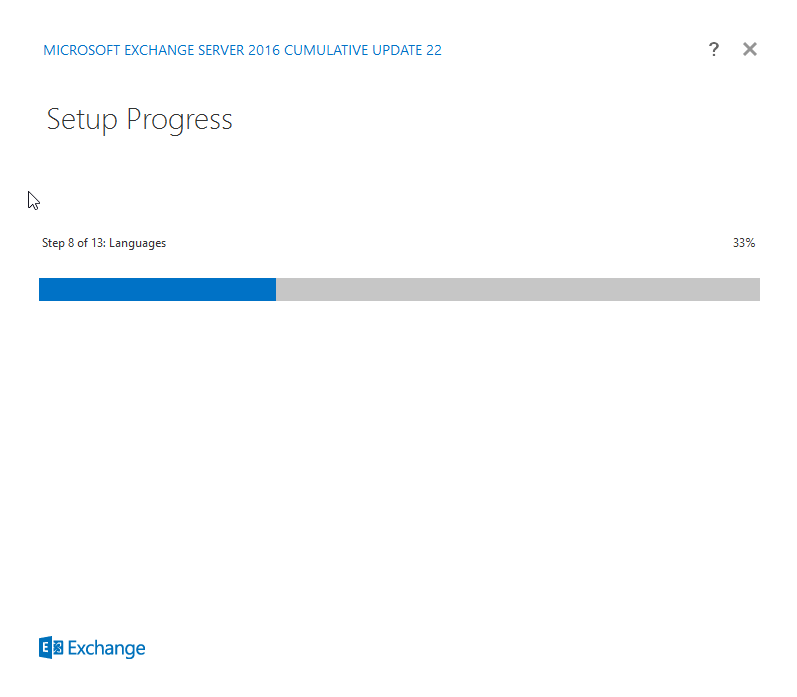
The Uninstall Progress will show the uninstall step and its progress.
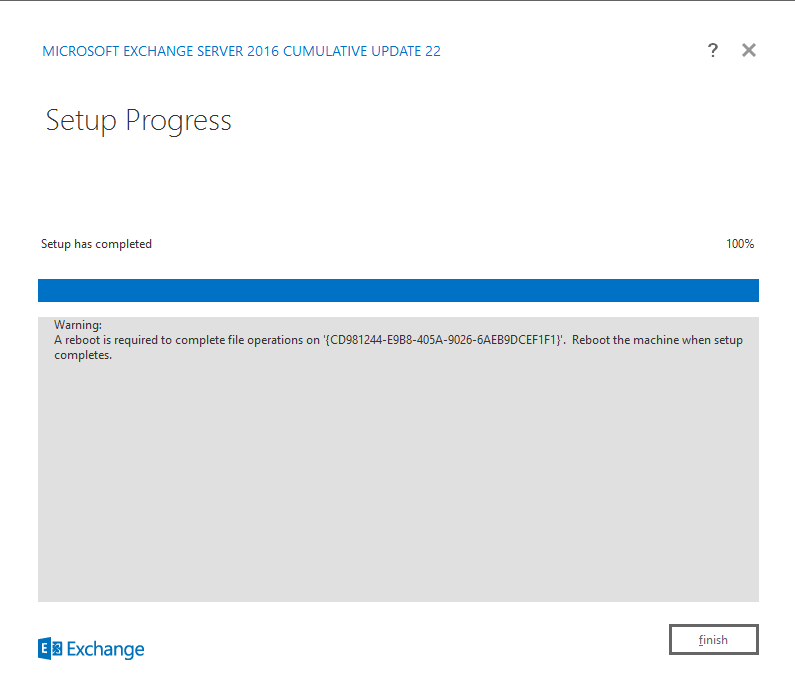
Once uninstall process is completed, click Finish Exit out of Uninstall wizard.
Conclusion:
In this three-part article series, we have started with discussing Exchange Server 2019 installation on the Existing Exchange Server organization with prerequisites install followed by the exchange server setup. We have discussed configuring Exchange Server 2019 components such as Outlook Anywhere, Virtual Directories, Service Connection Point, and Certificate import from the old Exchange server. We have discussed Client access service cutover and mailbox move. In the end, we have decommissioned the old Exchange server which includes uninstallation of the Exchange server.
I had already created Exchange Server 2013 to 2019 migration, even though I mentioned Exchange server 2013 and 2016 migration is more or less the same, most of the users migrating Exchange server 2016 are not following that article. Also, I thought an exclusive article series just for Exchange Server 2016 to 2019 will help migrate flawlessly.
This is the end of the Exchange Server 2016 to 2019 migration demonstration; I look forward to connecting with you to clarify your questions and answer them and I will be helpful to solve the issues in case you come across any. I will join you in an instance with another article and would like to say goodbye for now. Thanks for following my article to migrate your Exchange server.
Migrate Exchange Server 2016 to 2019 | Part 1
Migrate Exchange Server 2016 to 2019 | Part 2
Migrate Exchange Server 2016 to 2019 | Part 3
Migrate Exchange Server 2016 to 2019 | Part 2
Migrate Exchange Server 2016 to 2019 | Part 1
Migrate Exchange Server 2016 to 2019 | Part 2
Migrate Exchange Server 2016 to 2019 | Part 3
This article is the continuation of how to Migrate Exchange Server 2016 to 2019 Part 1, and we are going to discuss the configuration part of the Exchange Server 2019. We have completed installing Exchange Server 2019 and logged into the Exchange Admin Center using the hostname of Exchange Server 2019. The Exchange Server 2019 needs to be set with internal and external hostnames to resolve them from the network where the users accessing with their outlook client. We are also going to set internal and external URLs of Virtual directories such as OWA, OAB, EWS, and so on. We need to set the internal Autodiscover Uri to configure outlook with auto-discovery, this is called service connection point. At the end of this Part 2 article, we are going export the certificate from the Exchange Server 2016 and then import it to Exchange Server 2019. So, let’s start configuring these components on Exchange 2019 Server straight away.
Outlook Anywhere Setup
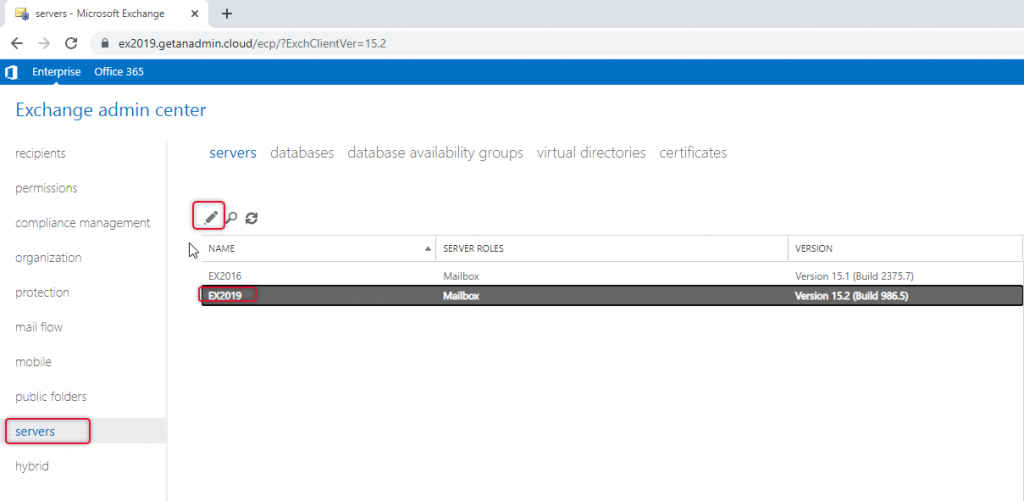
From the Exchange Admin Center navigate to the server from the left side navigation and on the servers list, we can find both Exchange 2016 and Exchange 2019 servers. Select the Exchange Server 2019 node and click on the edit button to configure Outlook Anywhere.
On the Server, configuration go to Outlook anywhere and type the FQDN of the hostname which can be accessible publicly also has the hostname in the certificate subject alternative name. Click save and exit.

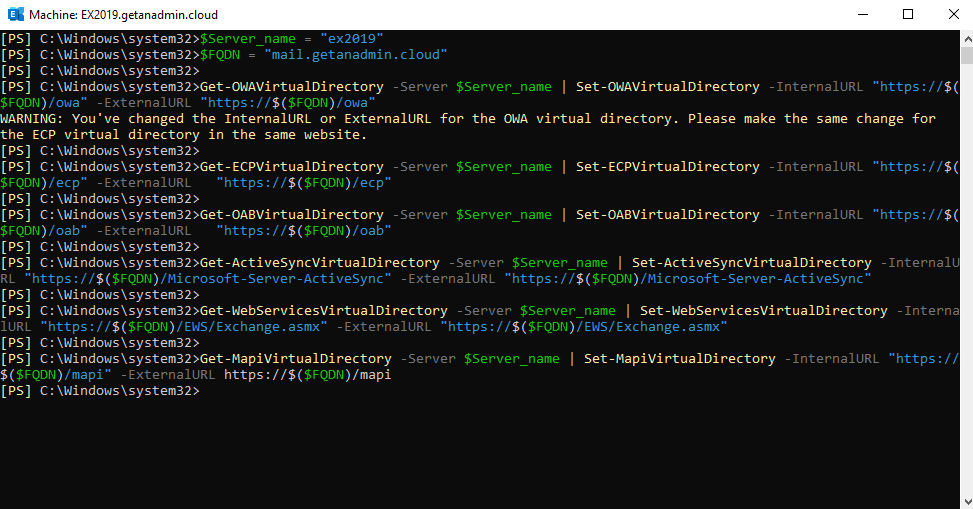
Configure Virtual Directories of Exchange 2019 Server
Server_name = "ex2019"

$FQDN = "mail.getanadmin.cloud"

Get-OWAVirtualDirectory -Server $Server_name | Set-OWAVirtualDirectory -InternalURL "https://$($FQDN)/owa" -ExternalURL "https://$($FQDN)/owa"

Get-ECPVirtualDirectory -Server $Server_name | Set-ECPVirtualDirectory -InternalURL "https://$($FQDN)/ecp" -ExternalURL   "https://$($FQDN)/ecp"

Get-OABVirtualDirectory -Server $Server_name | Set-OABVirtualDirectory -InternalURL "https://$($FQDN)/oab" -ExternalURL   "https://$($FQDN)/oab"

Get-ActiveSyncVirtualDirectory -Server $Server_name | Set-ActiveSyncVirtualDirectory -InternalURL "https://$($FQDN)/Microsoft-Server-ActiveSync" -ExternalURL "https://$($FQDN)/Microsoft-Server-ActiveSync"

Get-WebServicesVirtualDirectory -Server $Server_name | Set-WebServicesVirtualDirectory -InternalURL "https://$($FQDN)/EWS/Exchange.asmx" -ExternalURL "https://$($FQDN)/EWS/Exchange.asmx"

Get-MapiVirtualDirectory -Server $Server_name | Set-MapiVirtualDirectory -InternalURL "https://$($FQDN)/mapi" -ExternalURL https://$($FQDN)/mapi
Migrate Exchange Server 2016 to 2019
The commands must be returned with no errors in red text, and it has to be something similar to the screen capture below but with your exchange server name and server FQDN.
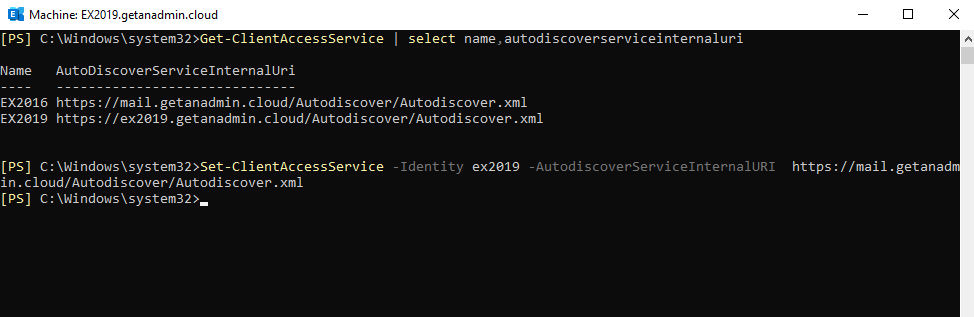
Service Connection Point or Internal Autodiscover service
The outlook clients connecting from the internal Active Directory would use the Service Connection Point, also called the internal Autodiscover service Uri to get the configuration details to configure it automatically. The command to set the internal Autodiscover service URI is given below.
Set-ClientAccessService -Identity EX2019 -AutodiscoverServiceInternalURI https://mail.getanadmin.cloud/Autodiscover/Autodiscover.xml
Import Certification Authority Certificate to Exchange 2019
The third-party certificate installed on Exchange Server 2016 will be usable for Exchange Server 2019 as the subject alternative names are the same ones with both servers. So, we are going to export the certificate from Exchange Server 2016 and import it to Exchange Server 2019. We need the certificate exported in pfx format with a security passcode from the Ex2016 server.
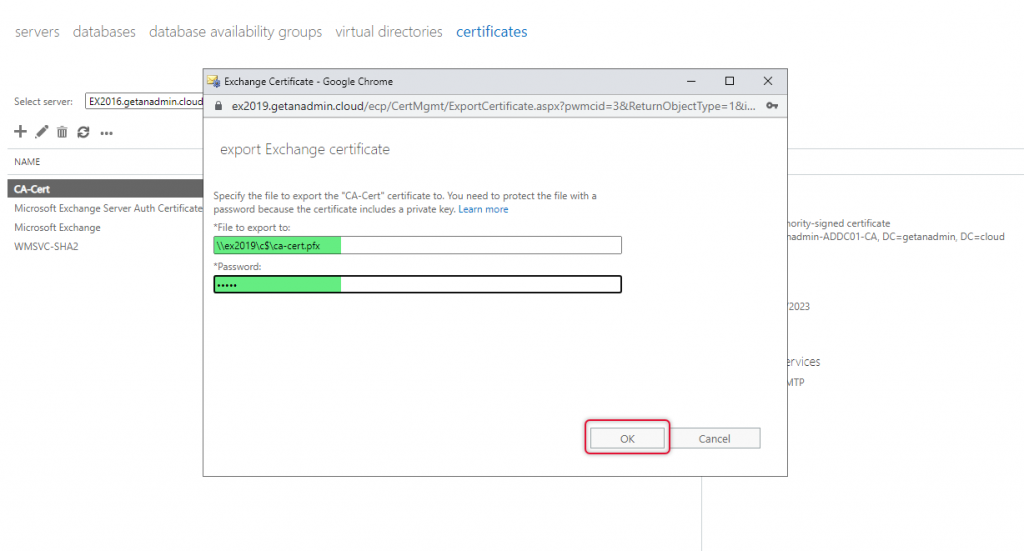
Navigate to the server section on the left side navigation and select the Certificates tab from the top navigation. Select the Exchange Server 2016 server name in the Server name drop-down and the Certificate name of the third-party certificate assigned with IIS. Then, from the more options with the triple dots click on export Exchange certificate.

Give a UNC path for the file to be saved on a network location with a certificate filename with the pfx format and a password. Click OK to complete the certificate export.
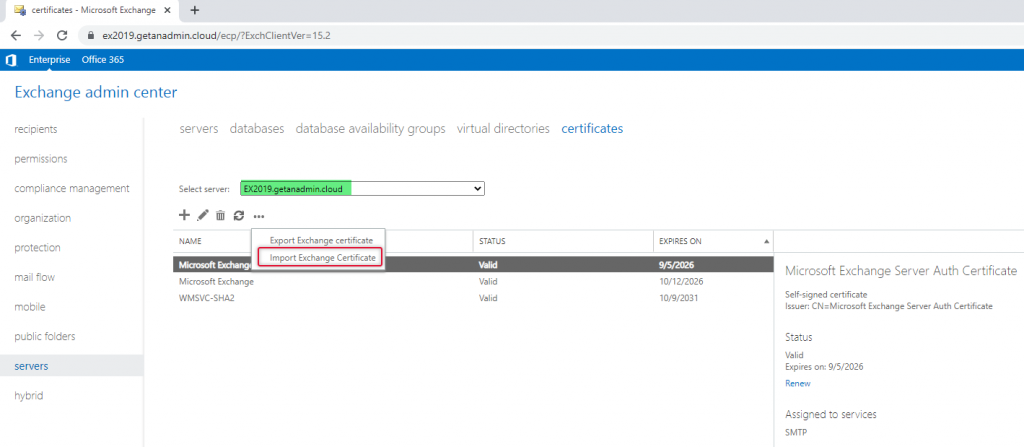
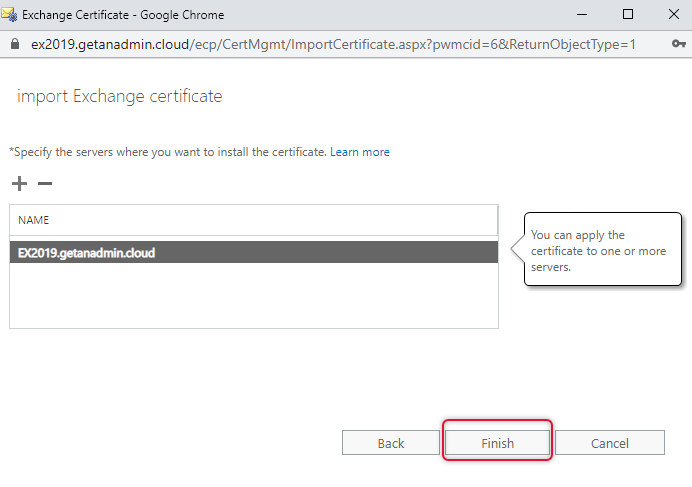
Now we are going to import the certificate to Exchange Server 2019, select more options with triple dots and click import Exchange Certificate.
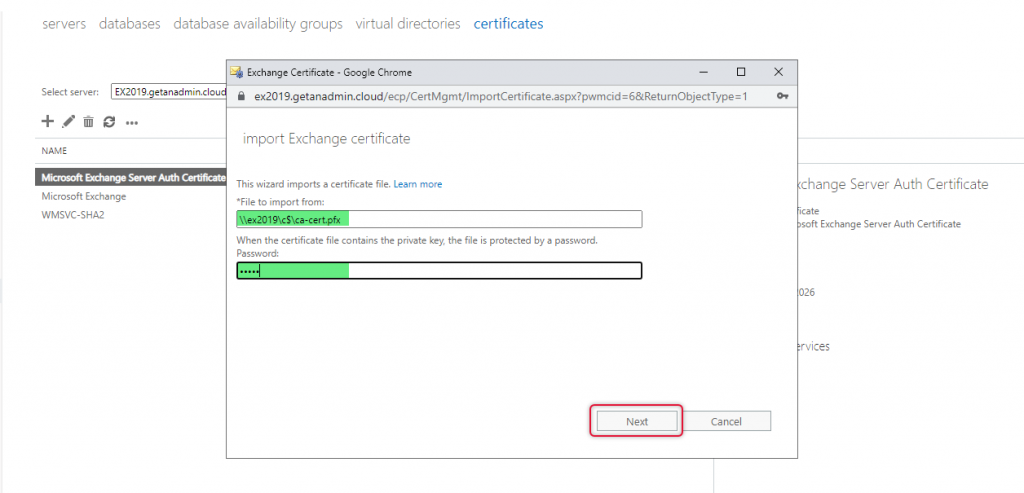
Give the same path that you have given while exporting the certificate and the password that you gave given earlier, click next to continue importing the certificate.
On the specify a server name, click add and select the EX2019 server and click add OK.
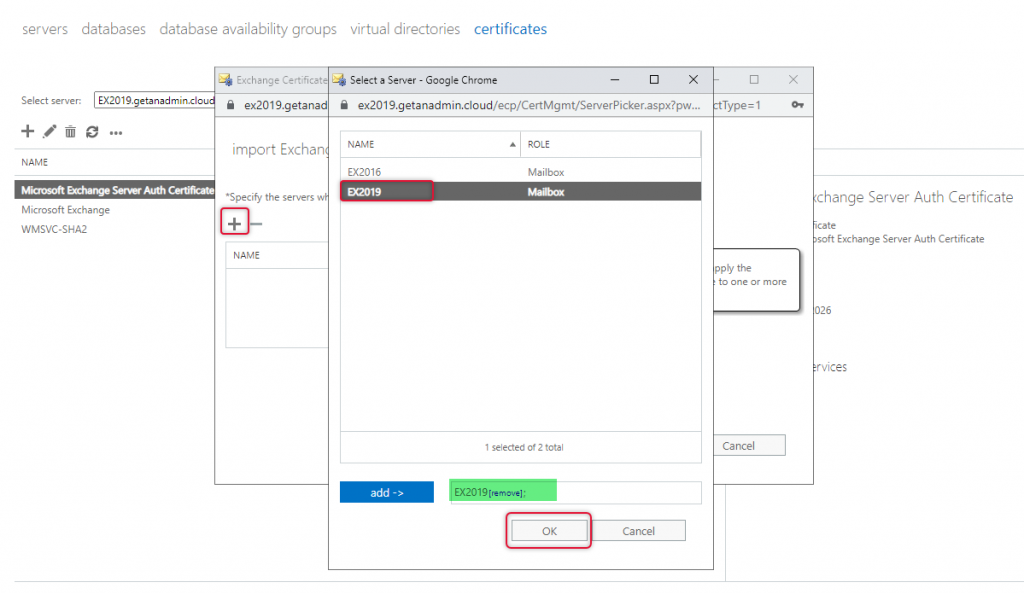
Click Finish to complete the certificate import.
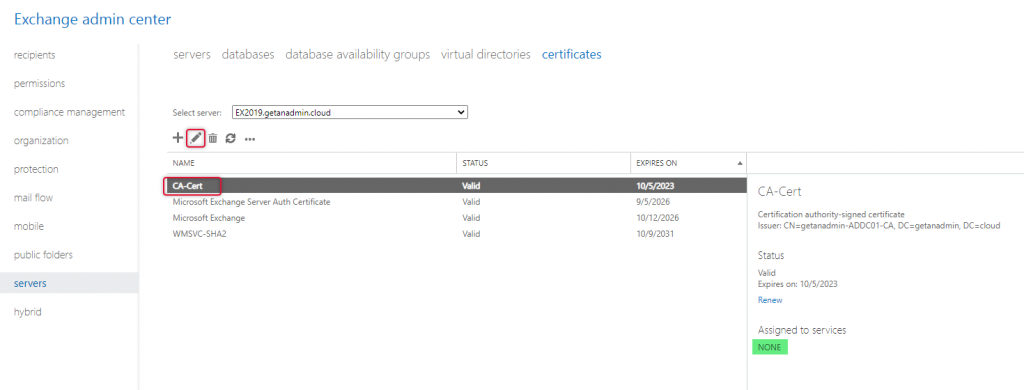
Now the next step is to assign services to the certificate, choose Exchange Server 2019 server name from the Select server drop down and click the Edit button to open the Exchange certificate properties of the certificate that we have just imported.
Select services from the left side navigation and click on SMTP and IIS checkboxes. If you are planning to use POP and IMAP, select them as well and click on save to assign services.
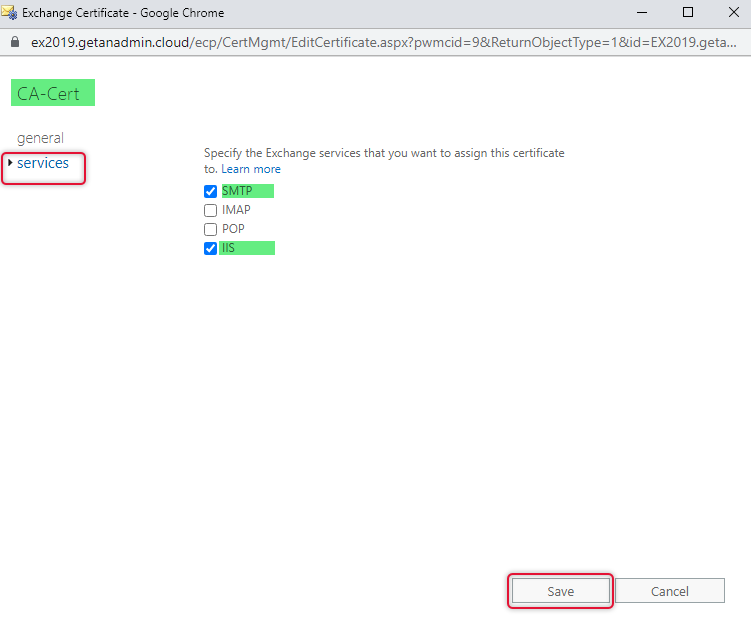
Click Yes to overwrite the default SMTP certificate.

Summary
In this article, we have gone through the configuration part of how to Migrate Exchange Server 2016 to 2019, and we have covered how to set the internal and external hostname of Outlook Anywhere. The Virtual Directories internal and external URLs have been set using a script and service connection point set for the internal Autodiscover service. In the end, we exported the third-party certificate from Exchange server 2016 and imported it to Exchange server 2019. This concludes part 2 of the article series, we are going to discuss mail flow cutover, mailbox migration, and Exchange Server 2016 decommission on the third and final part of this article series, so click the link below to go to part 3 of this article series.
Migrate Exchange Server 2016 to 2019 | Part 1
Migrate Exchange Server 2016 to 2019 | Part 2
Migrate Exchange Server 2016 to 2019 | Part 3
How to Migrate Exchange Server 2016 to 2019 | Part 1
Migrate Exchange Server 2016 to 2019 | Part 1
Migrate Exchange Server 2016 to 2019 | Part 2
Migrate Exchange Server 2016 to 2019 | Part 3
Preface:
The messaging system evolving day by day, but the fundamental elements of messaging doesn’t change. There is a new way of the email systems coming to use in the modern world and the Microsoft product Exchange servers have no exception. The exchange servers are shining with new updates every three months with cumulative updates and Microsoft fixing all the loopholes of the product with sending the security updates regularly for each exchange server version. But upgrading the Exchange server is important for an organization to keep the messaging environment up to date and fulfill the need for messaging functionalities. In this article, we are going to look at the Exchange server 2016 to 2019 migration step by step and in the end, we are decommissioning the Exchange Server 2016 server after we completely migrate the exchange server to Exchange server 2019.
We had already discussed the migration of Exchange server 2013 to 2019 in another article series if your email system is Exchange server 2013 and you want to migrate to Exchange server 2019, I have provided the link to jump into Exchange server 2013 to 2019 Migration and you can follow those article series to migrate your Exchange server 2013. Even though most of the steps are identical as far as migration to Exchange server 2019 from Exchange server 2013 or 2016, it is not satisfying to follow an article that does not discuss its own article series. So, I have decided to write a separate article series to migrate Exchange Server 2016 to 2019, and here are those articles just for you migrating from an Exchange server 2016. I encourage you to come up with your questions and feedback either it is positive or negative and shares your thoughts in the comments section after you follow the steps or go through it completely. I will be there always to help you solve your issue and if you want to resolve or migrate the Exchange server from 2016 to 2019 and need my consultancy, please do not hesitate to connect me on skype at the skype ID “mrigotech” or send an email to my email ID hello@getanadmin.com.
To get the migration going, start the migration by installing Exchange server 2019 on a Windows 2019 server on the same Active Directory network as Exchange Server 2016 and follow the other part of the migration to get it migrated fully. Once the Exchange Server 2019 installation is completed, we are going to set the virtual directories with the internal and external URLs with the Exchange server’s common hostname with the certificate acquired from the third-party certification authority. Also, we are updating the internal and external server names of the ‘outlook anywhere’ settings on the server properties. We are completing the migration by moving the user mailboxes and arbitration mailboxes to the new exchange server and decommissioning the Exchange server 2016 once we verified Exchange Server is migrated to Exchange Server 2019 completely.
Concept:
Migrating Exchange Server 2016 to 2019 is the same as migrating Exchange Server 2013 to 2019. This article is written for the administrators who want to follow Exchange server 2016 to 2019 migration steps just as a specific migration step just for Exchange Server 2016. You may see this article is identical to the Exchange server 2013 to 2019 and if you are an Exchange server migration learner do not get surprised by seeing the same steps but medium changes between the articles.
Before starting the Exchange Server 2019 installation I would like to urge the need to update the Exchange Server 2016 to the latest build. When I was writing this article the latest cumulative update for Exchange Server 2016 is CU 22. You can find the Exchange Server build numbers in the link here. You need to download the cumulative update ISO file and mount it as an ISO drive and run the setup to update the Exchange Server 2016.
Migrating Microsoft Exchange Server 2016 to 2019
The following list of steps we are following to migrate Exchange server 2016 to 2019
- Install Exchange Server 2019 on the same Active Directory domain where Exchange Server 2016 Installed
- Configure Exchange Server 2019 roles such as Client Access, Mailbox, and Transport roles
- Move mailboxes from Exchange server 2016 to 2019
- Decommission Exchange Server 2016
Install Exchange Server 2019
We are going to discuss Exchange Server 2019 Server requirements and Prerequisite installation before installing Exchange Server 2019.
Exchange Server 2019 system requirements.
Before preparing the Windows server where the Exchange server 2019 is deployed, we are going to analyze some important system requirements that are the baseline to install the 2019 version of Exchange Server into the Organization.
The forest functional level of Domain controllers in the Active Directory Forest needs to be Windows Server 2012 R2. If you have any Domain Controller running older than Windows Server 2012 R2 that is not be supported and you need to decommission them or upgrade them to Windows Server 2012 R2 and raise the functional level. Without fulfilling this Active Directory requirement, you will get an error on the Exchange installation readiness check.
The Windows Server you are going to install Exchange Server 2019 must be Windows Server 2019 (at the time of writing this article the RTM version of Windows Server 2022 is not released). You can’t install Exchange server 2019 on Windows Server 2016 or earlier versions.
The MAPI client needs to be Outlook 2013 or later with Windows and Outlook 2016 on the MAC client.
Install Exchange Server 2019 Prerequisites
The following Exchange Server 2019 Prerequisites need to be installed on the server where the Exchange Server 2019 is installed, once the prerequisite installation is complete you can install Exchange Server 2019.
The following are the Prerequisites that need to be installed.
- Install .Net Framework 4.8
- Microsoft Visual C++ 2012 Redistributable
- Microsoft Visual C++ 2013 Redistributable
- Microsoft Unified Communications Managed API 4.0
- URL Rewrite 2.1
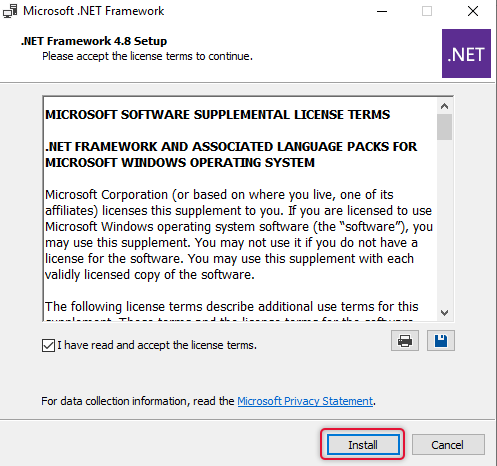
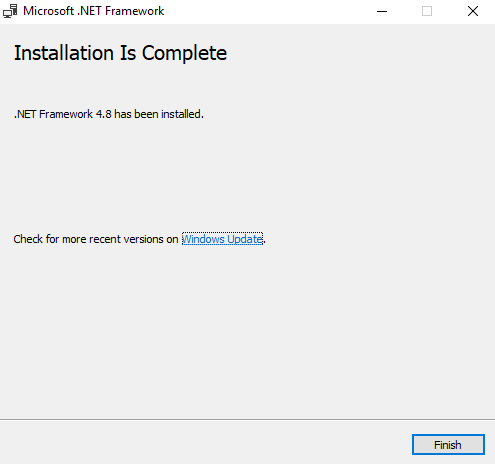
- Install .Net Framework 4.8
You can download the Don net Framework 4.8 from the following link
Doble clicks the installer package and goes through the wizard to install it.
The following setup wizard will appear and click install to start the install wizard.
Once the installation is complete, click finish and restart the Server.
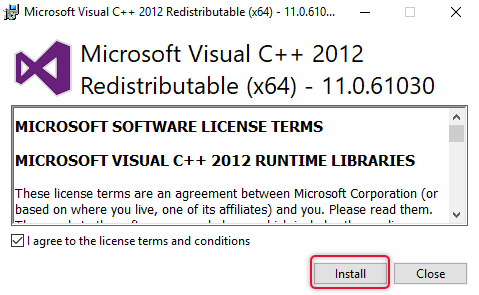
- Microsoft Visual C++ 2012 Redistributable
Click on the link below to start the Microsoft Visual C++ 2012 Redistributable 2012 and double-click to start the installation.
Microsoft Visual C++ 2012 Redistributable
Click install to start the installation and close to coming out of the wizard.
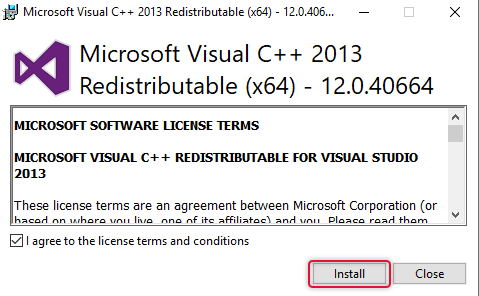
- Microsoft Visual C++ 2013 Redistributable
Click on the link below to start the Microsoft Visual C++ 2012 Redistributable 2012 and double-click to start the installation.
Microsoft Visual C++ 2013 Redistributable
Click install to start the installation and close to coming out of the wizard.
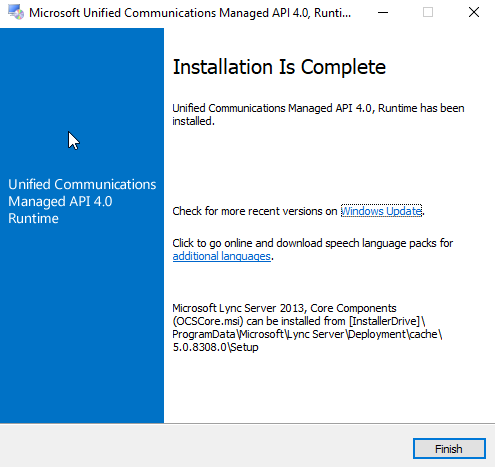
- Microsoft Unified Communications Managed API 4.0
The following link will take you to the Microsoft site where you can download the installer.
Microsoft Unified Communications Managed API 4.0
When you launch the install, the install wizard will show up, and click next to start the installation.
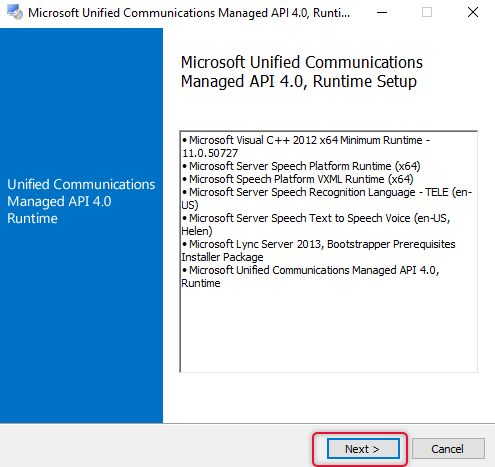
After install complete close out the wizard by clicking Finish.
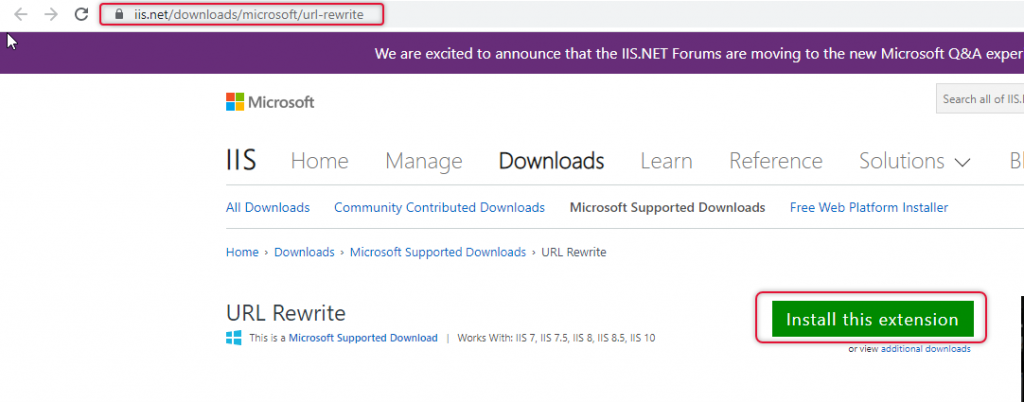
The URL rewrite is a mandatory prerequisite starting from Exchange Server 2019 Cumulative Update 11, so, navigate to the link below and install URL rewrite.
Click install this extension to start the URL rewrite installation.
Click install to start the installation.
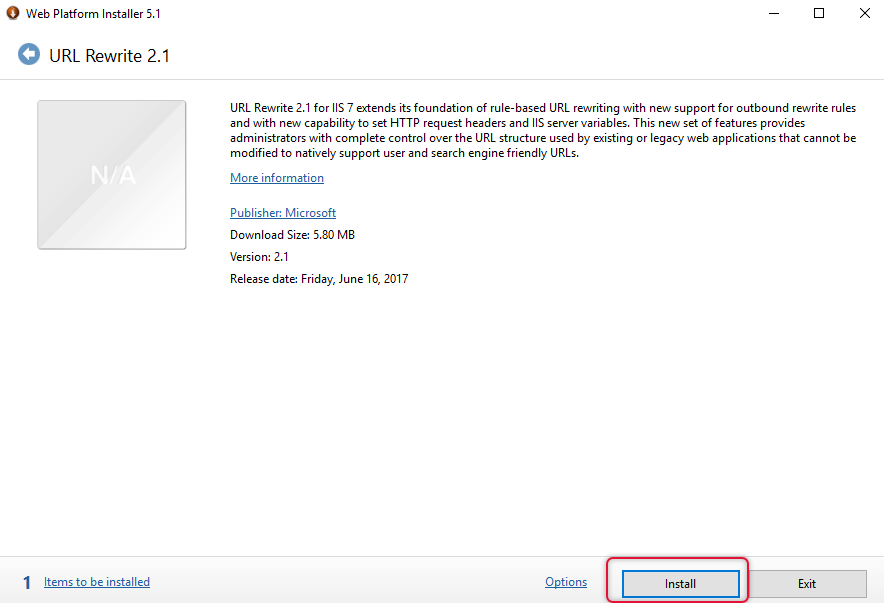
When the installation is complete, click Finish to close out the install wizard.

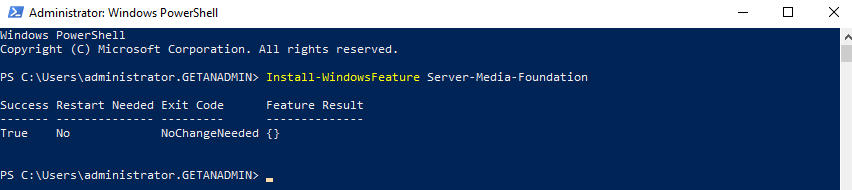
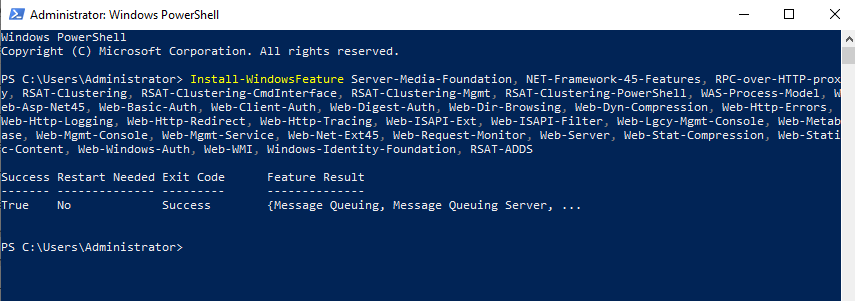
Install the following Windows Feature and once the installation of the feature is complete restart the Server.
Install-windowsfeature Server-Media-Foundation
Install-windowsfeature Server-Media-Foundation, NET-Framework-45-Features, RPC-over-HTTP-proxy, RSAT-Clustering, RSAT-Clustering-CmdInterface, RSAT-Clustering-Mgmt, RSAT-Clustering-PowerShell, WAS-Process-Model, Web-Asp-Net45, Web-Basic-Auth, Web-Client-Auth, Web-Digest-Auth, Web-Dir-Browsing, Web-Dyn-Compression, Web-Http-Errors, Web-Http-Logging, Web-Http-Redirect, Web-Http-Tracing, Web-ISAPI-Ext, Web-ISAPI-Filter, Web-Lgcy-Mgmt-Console, Web-Metabase, Web-Mgmt-Console, Web-Mgmt-Service, Web-Net-Ext45, Web-Request-Monitor, Web-Server, Web-Stat-Compression, Web-Static-Content, Web-Windows-Auth, Web-WMI, Windows-Identity-Foundation, RSAT-ADDS
Once all Exchange Server 2019 Prerequisites are installed and the server is rebooted, download the latest Exchange Server 2019 Build from the link below.
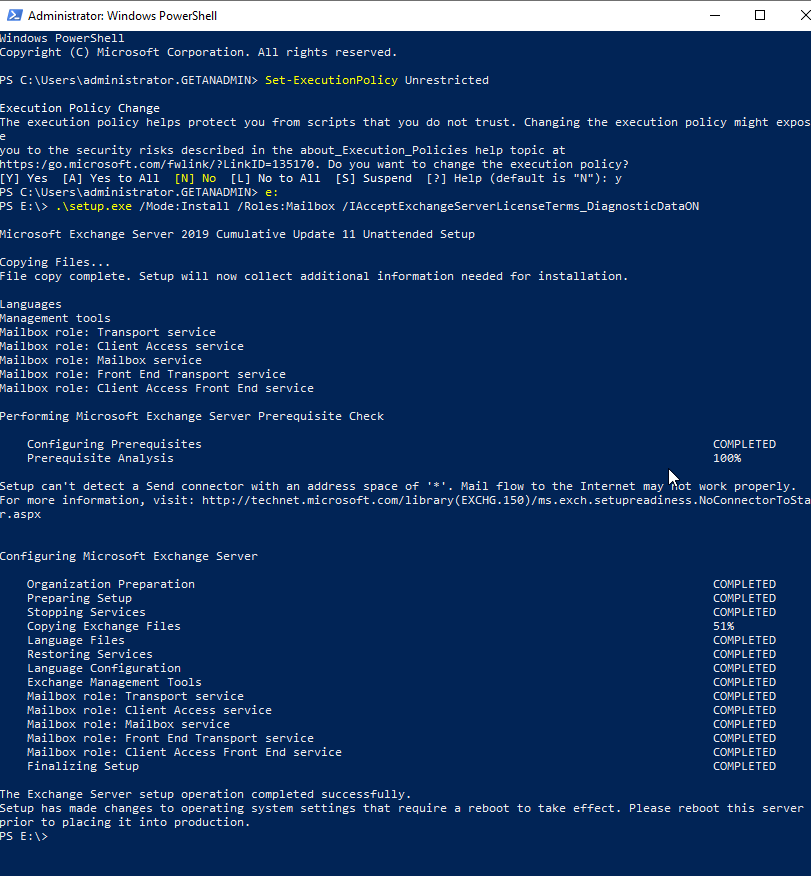
The downloaded ISO file needs to be mounted and note down on the drive later. Launch a PowerShell window change the Drive to the drive letter where you mounted the ISO file and run the following commands.
Set-ExecutionPolicy Unrestricted
.\Setup.exe /Mode:Install /Roles:Mailbox / IAcceptExchangeServerLicenseTerms_DiagnosticDataON
Summary:
In this article, we had gone through some Exchange server 2019 migration plans and system requirements. Afterward, we had gone through the Exchange Server 2019 prerequisites installation steps and then we installed some windows features required to install Exchange Server 2019. In the end, we deployed Exchange Server 2019 on the same organization where Exchange Server 2016 is running. We are going to configure Exchange Server 2019 in the next part, click the link below to go to Part 2 of this article series.
Migrate Exchange Server 2016 to 2019 | Part 1
Migrate Exchange Server 2016 to 2019 | Part 2
Migrate Exchange Server 2016 to 2019 | Part 3
Preface:
In this article, we are going to create Azure Load Balancer. An Azure load balancer is a service in Azure that provides high availability and load balancing between identical Azure workloads such as Virtual machines and web applications. Azure load balancer operates at layer 4 which is the transport layer of the OSI model, whereas application gateway is on layer 7 which is the Application layer. The application layer is capable of identifying the loads like protocols HTTP and HTTPS, whereas the transport layer is application unaware but capable of identifying the loads with the protocols TCP/UDP.
There are four components in Azure load balancers that are mandatory in configuring load-balanced Azure network resources and some optional components which will improve the security and performance running the load balancers.
The first and foremost component used to configure the IP address pool to access the load-balanced resources is the Frontend IP address, using this component you can create a pool of IP that can be accessed over the internet using a public IP address or private address assigned to the pool. The second component is the backend pool, which is the pool of Virtual machines or web applications added which will render the service that the load balancer pointing to. The third component is the Health Probe which is used to find the health of transport layer health of each resource. The health probe is used to dynamically add or remove the resource which is in the backend pool which is determined healthy or unhealthy. Using all the above components, a load balancer rule was created with the protocol which is used to query for the resource. The rule will access Frontend IP Address for IP address resolution and backend pool for finding the resource which renders the service and the most important the health of each resource in the backend pool with the type of protocol that is in requirement.
There are two kinds of Load Balancer, there are
Public load balancer used to load balance web tier
Internal load balancer used load balance database tier
Create Azure Load Balancer Service
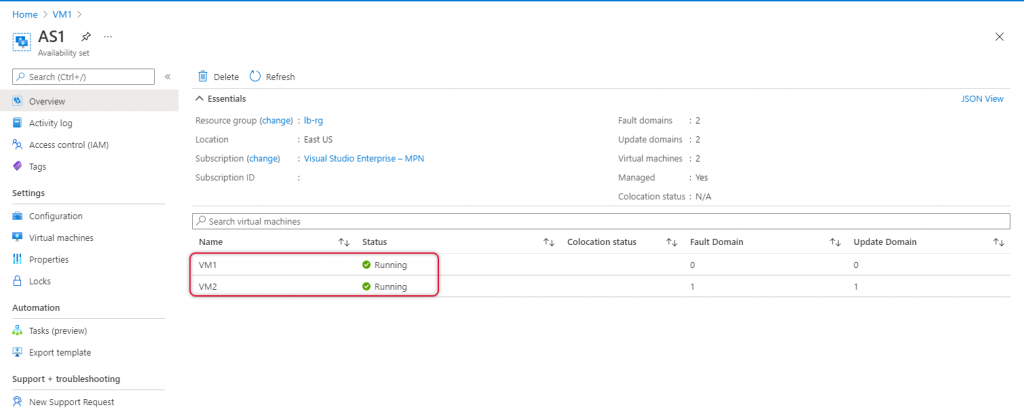
I have already created two virtual machines named VM1 and VM2 on the availability set AS1. You can find the Availability Set Overview page below.
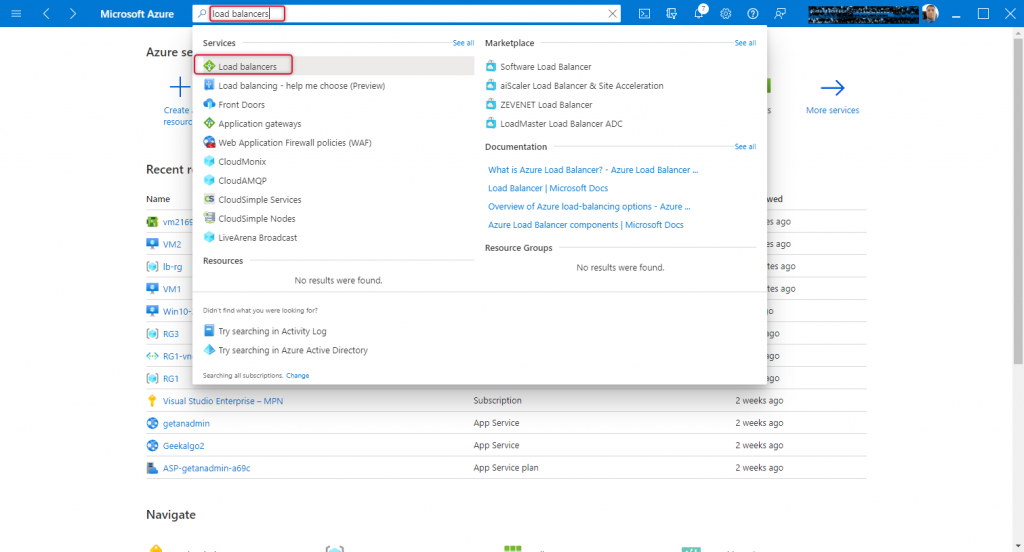
Launch Azure admin panel and type Load balancer on the top search bar and the resulting dropdown select Load balancer as it appears.
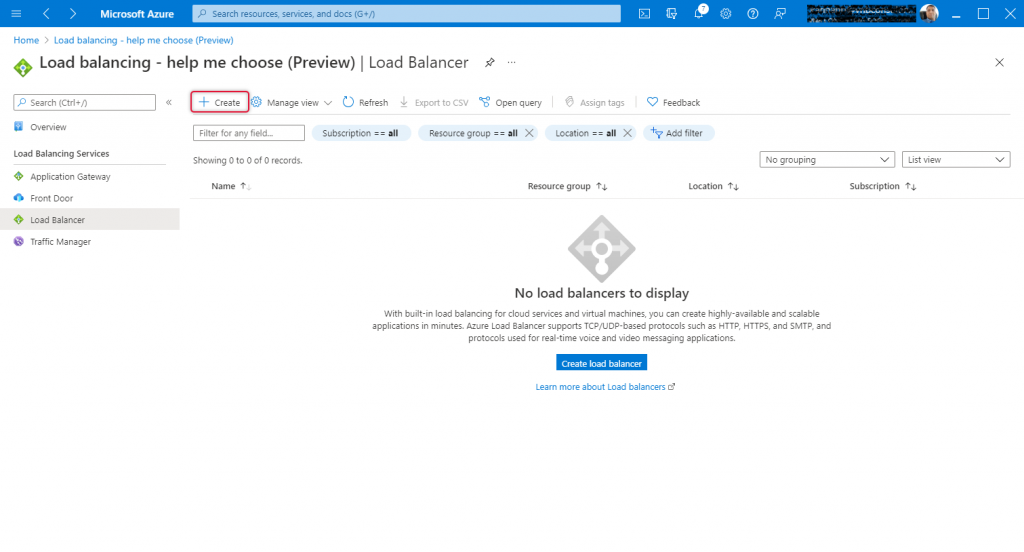
The Load balancing – help me choose screen appears and click create either on the top navigation or on the middle pane.
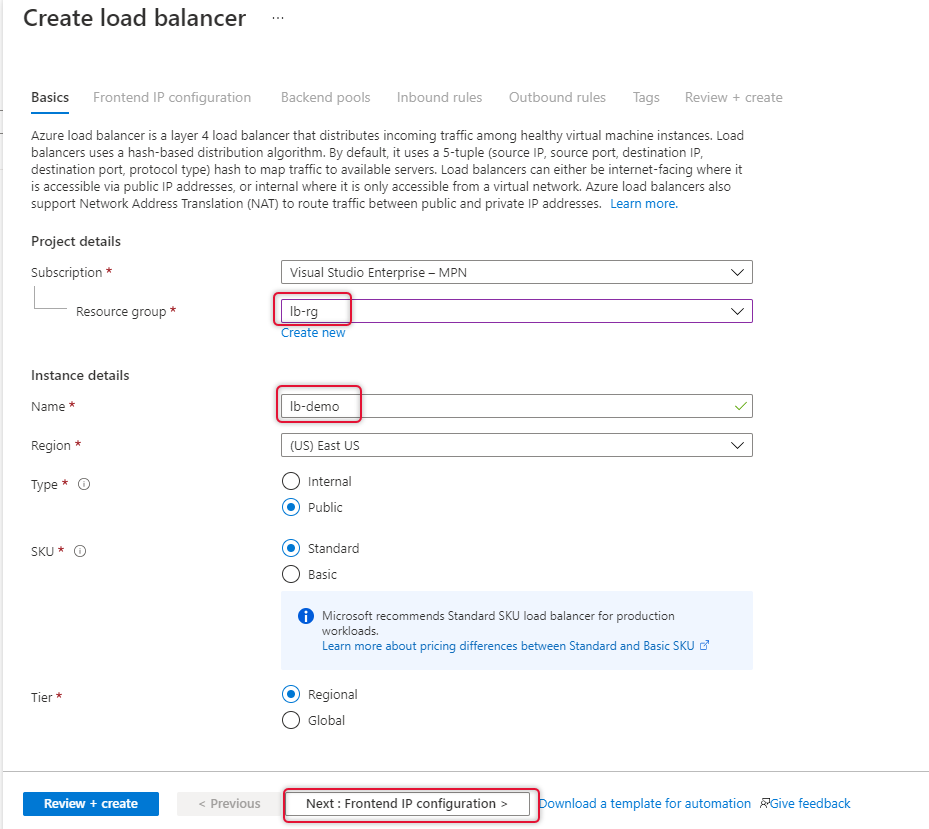
On the create load balancer page, I have already created a resource group called lb-rg on east us location, select the resource group where Availability Set and Virtual machines are located. Mine is lb-rg.
Type a name for this load balancer, here it is lb-demo.
Leave all other settings as it is and click ”Frontend IP configuration” at the bottom of the page.
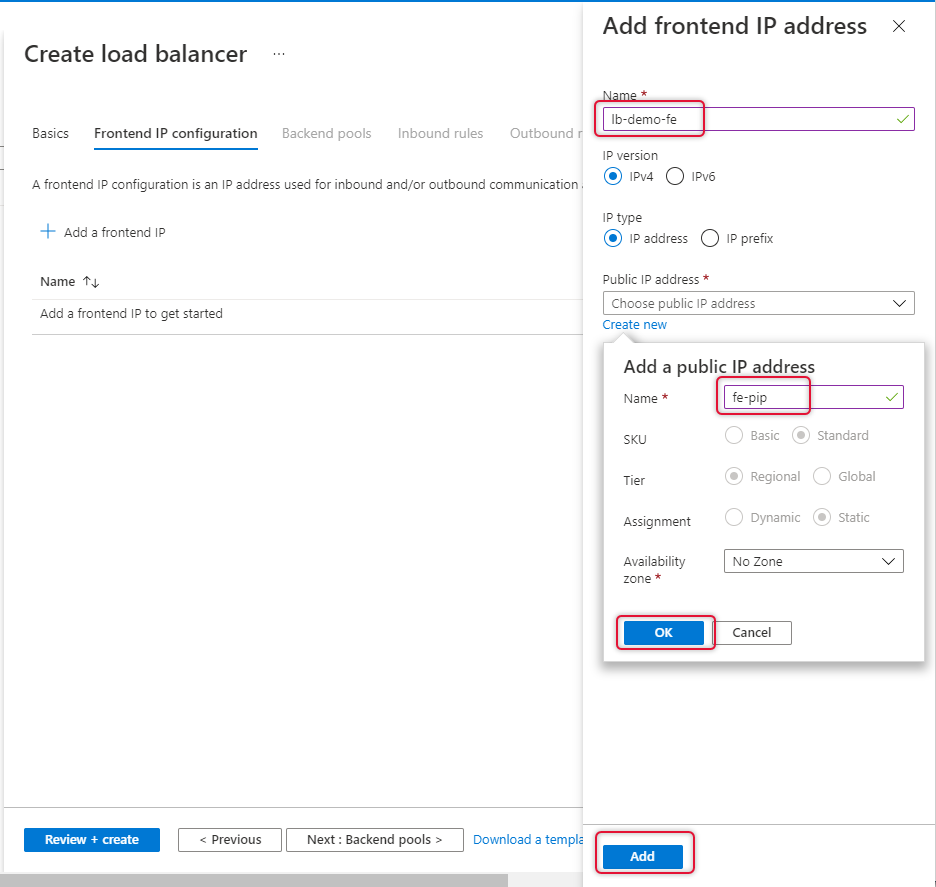
On the Frontend IP Configuration page click “Add a Frontend IP”

Type a name for the frontend IP and create new standard SKU public IP.
Once Frontend IP has been added, click Next at the bottom of the page to create a backend pool

Click Add a backend pool and select the Virtual Machines running on Availability Set.
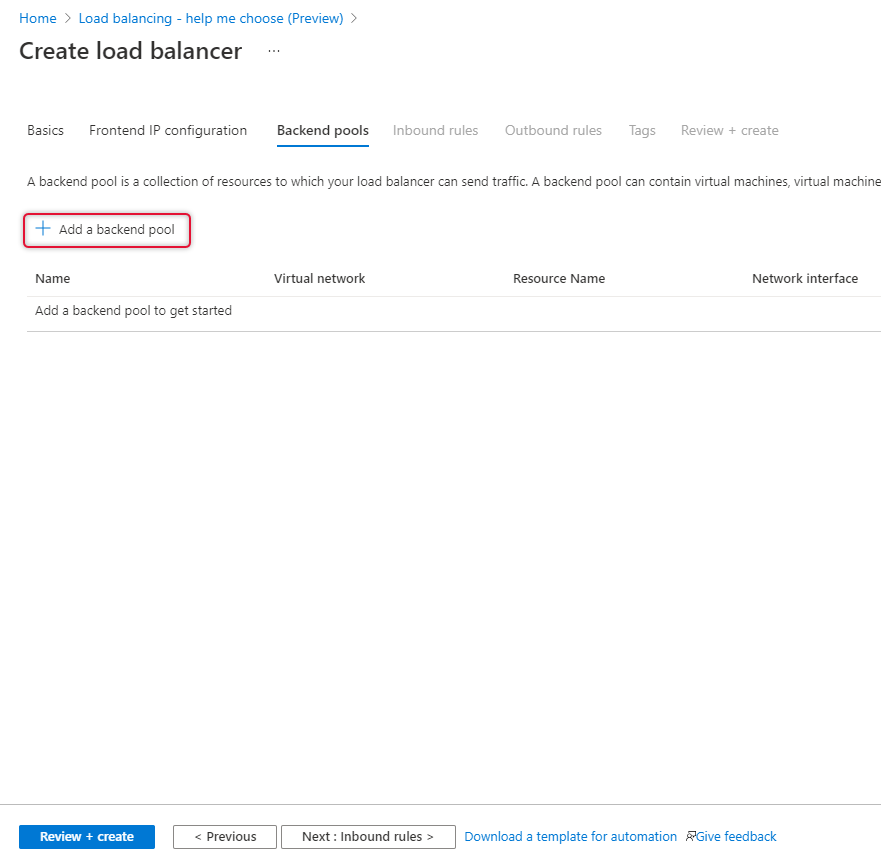
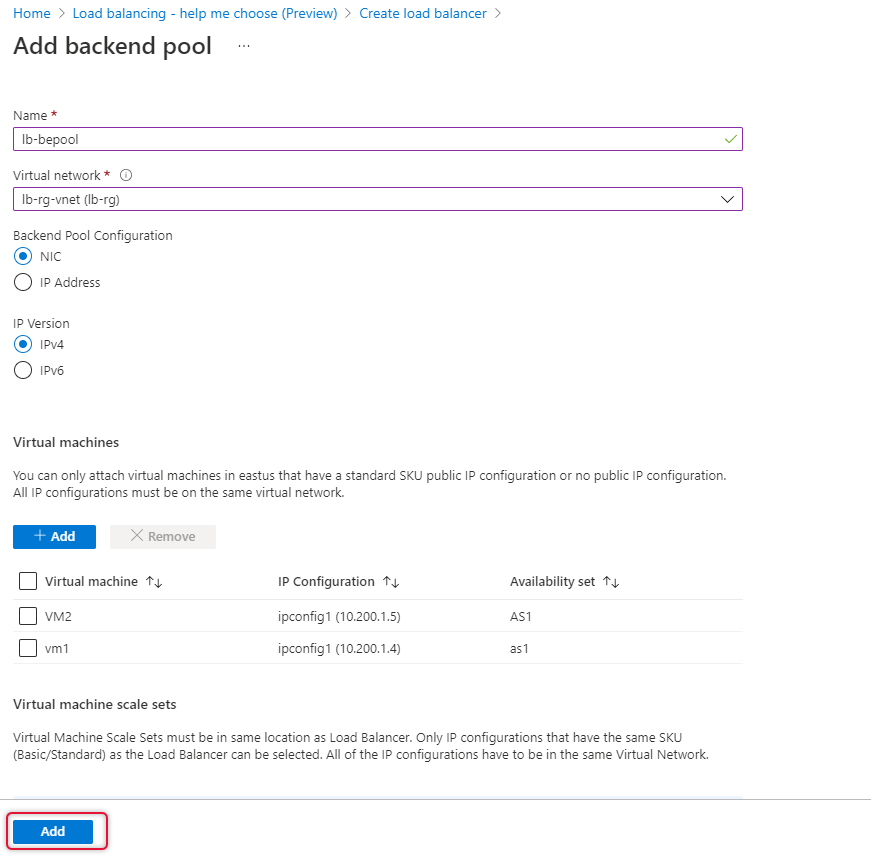
Type a name for the backend pool and select the Virtual Network where the Virtual machines are connected.
Click Add to add virtual machines.
Select the Virtual machines which are ready for load-balanced and click Add.
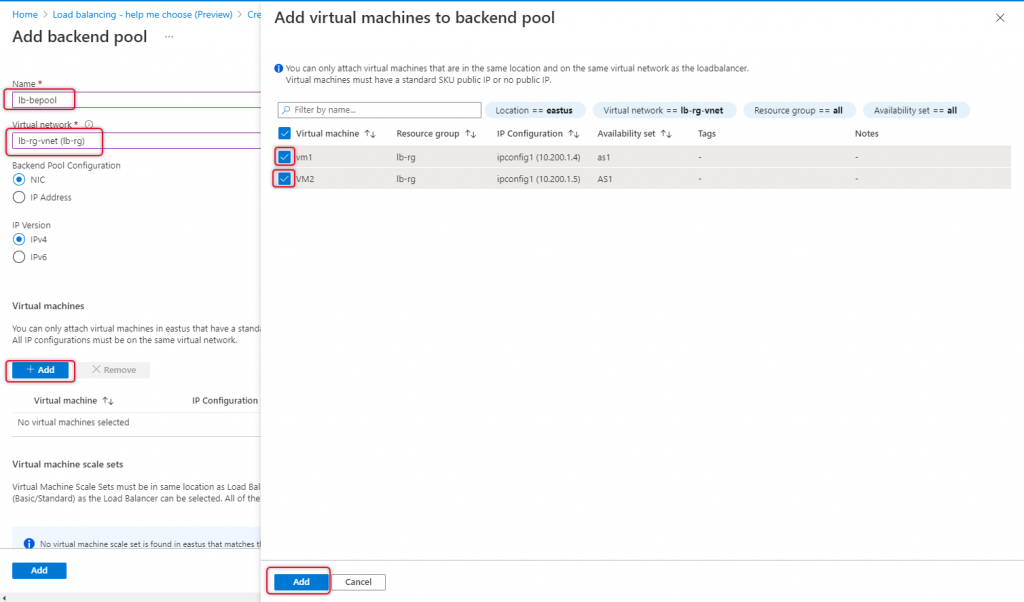
Click add to add a Backend pool.
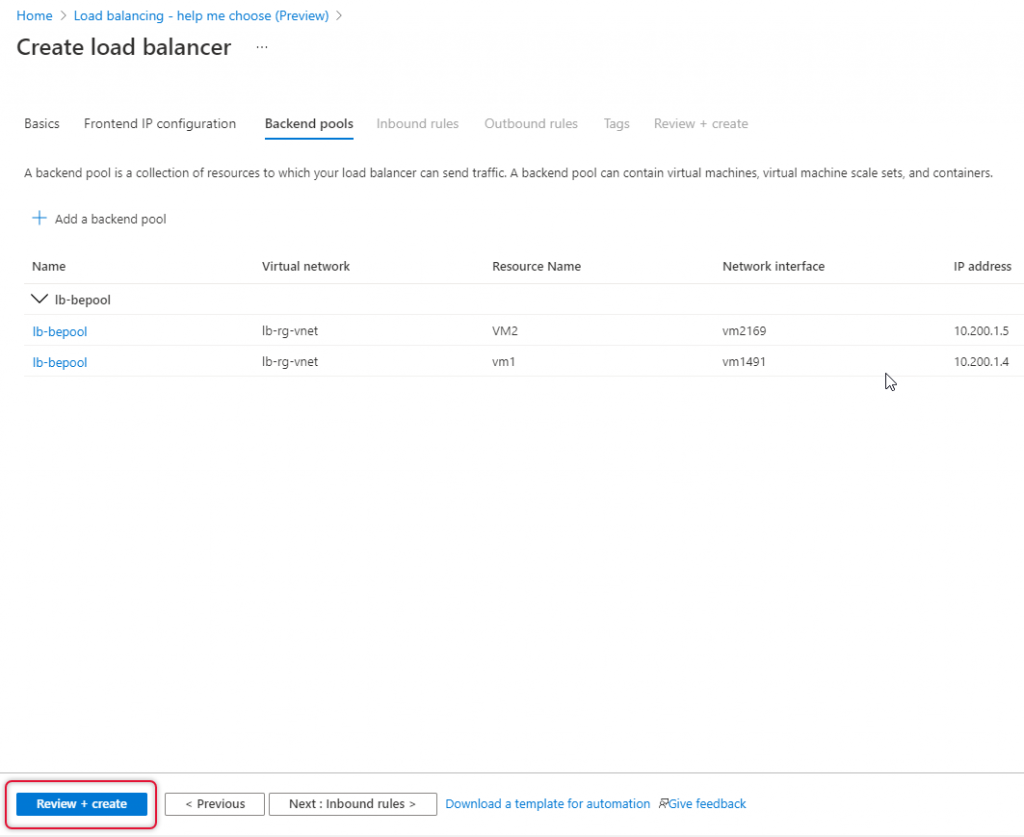
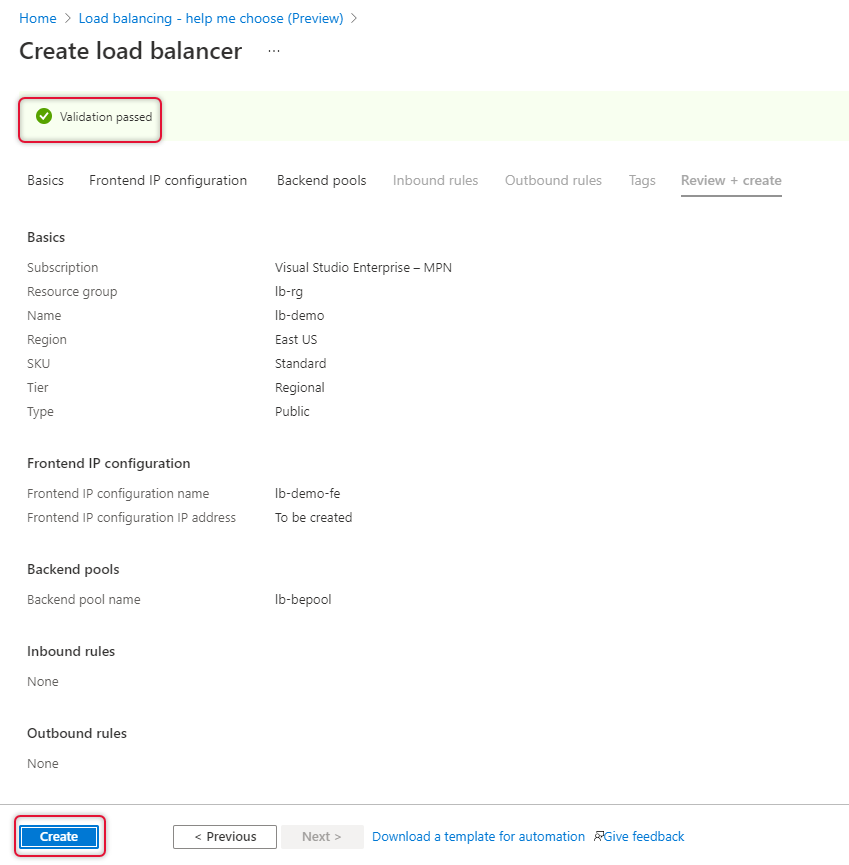
Leave other tabs default and click Review and create to create the load balancer.
The Load Balancer validation is passed and clicks create to create the load balancer.
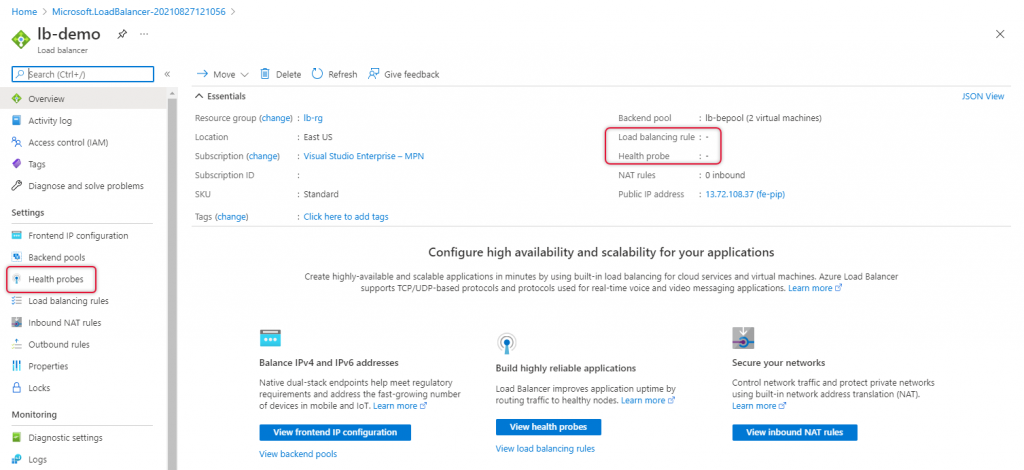
Once a load balancer is created you will see that deployment of the load balancer is complete, click Go to resource to go to the newly created load balancer.

On the load balancer resource overview, you can find Health Probe and load balancer rules are blank and we are going to create them.
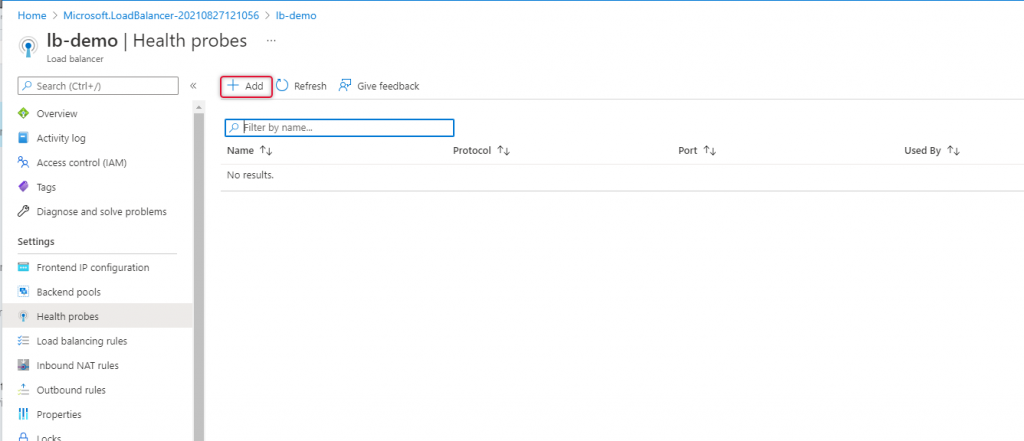
Add Health Probe
Navigate to the health probe on the left side navigation and click add to add a new health probe.
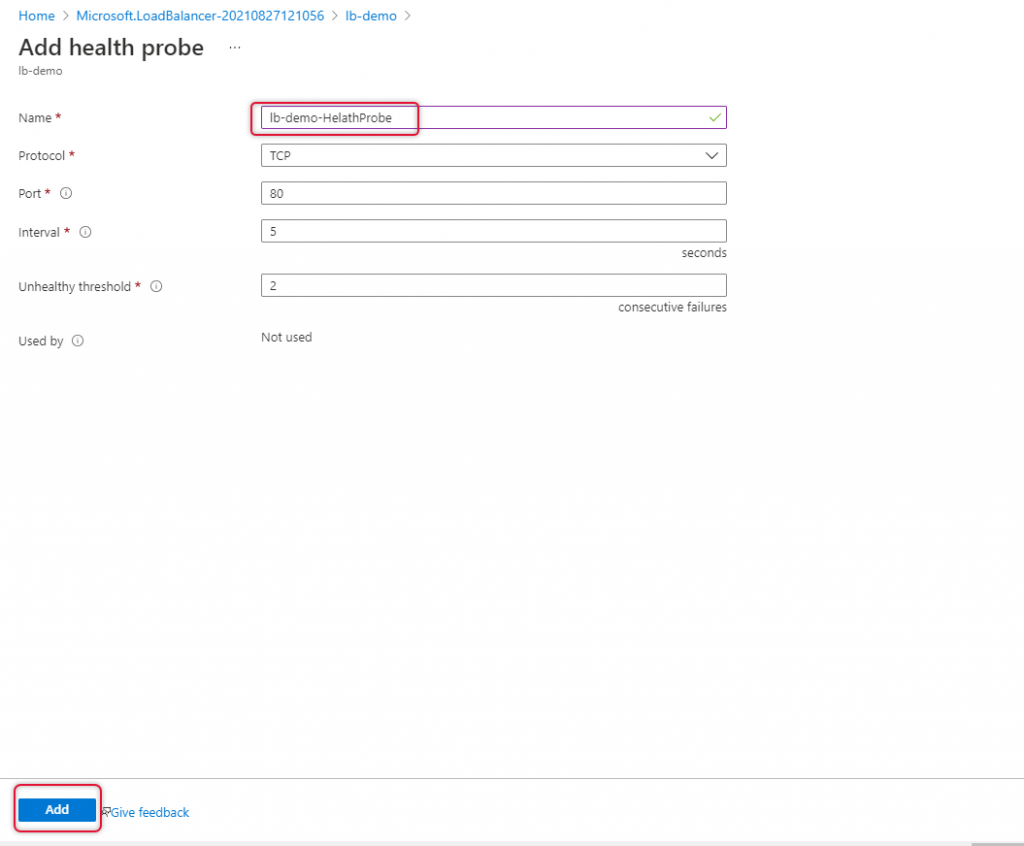
Type a name for the health problem and change the port to what protocol you want to load balance, in this demo we are going to load balance HTTP workload, so I left port 80 which is default as well.
Click add to add health probe.
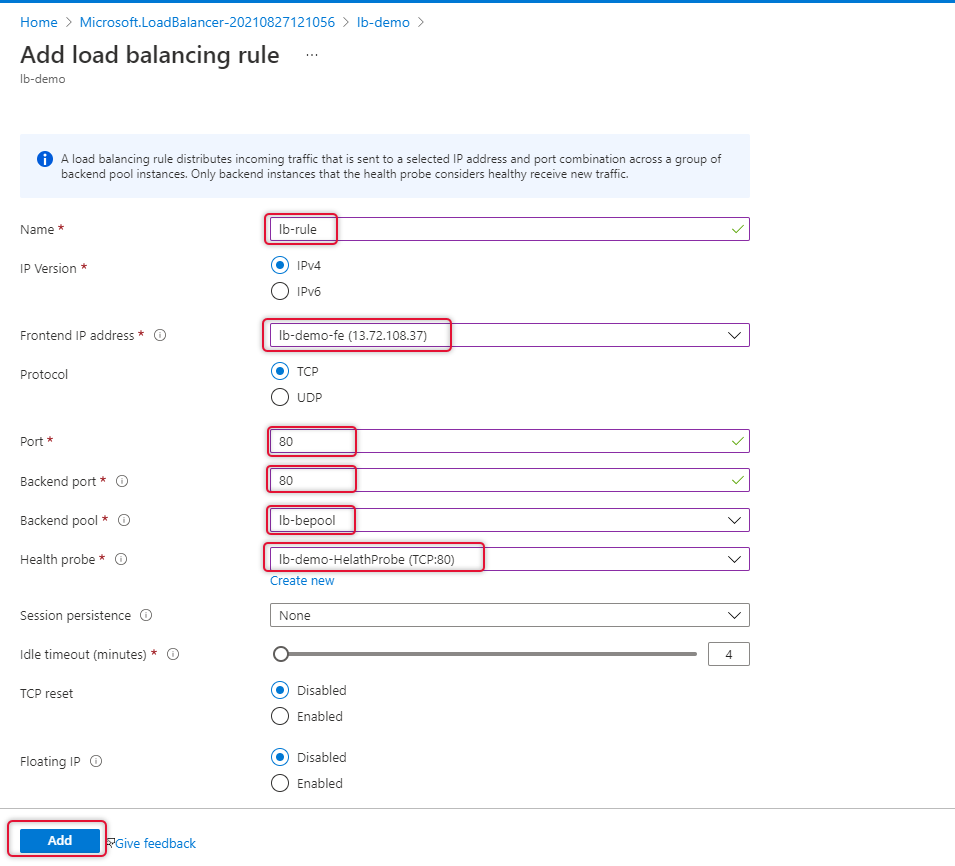
Add Load Balancing Rule
Navigate to Load balancing at the left side navigation to add a new rule.

Type a name for the load balancing rule.
Select the front-end IP address that we have already added.
Leave the protocol to TCP and port to 80, type backend port to 80, if you are trying to load balance HTTPS type port 443 on port and backend port.
Select the backend pool and health probe and leave other settings as default and click Add.
Test the Azure Load Balancer
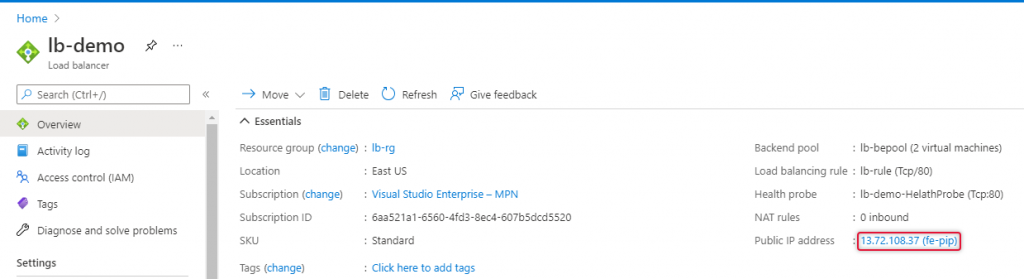
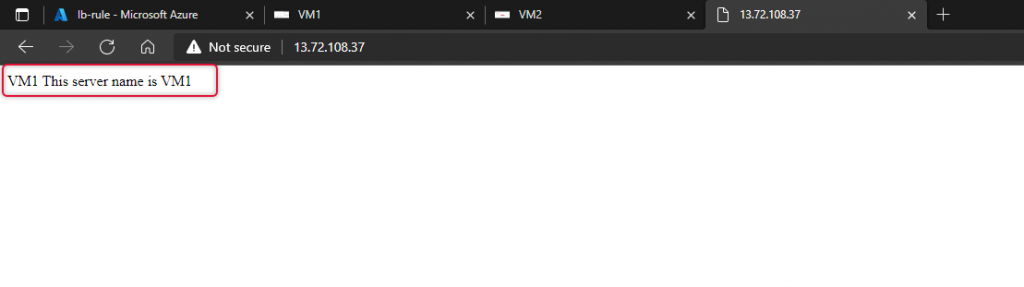
We have completed creating the Azure Load Balancer and Heath probe and load balancer rule added. Copy the Load balancer Ip address on the overview page as below.
Launch a web browser and paste the public IP address copied from the load balancer overview page. I have already modified default.htm to show the name of the virtual machine. You would see the name of two virtual machines.
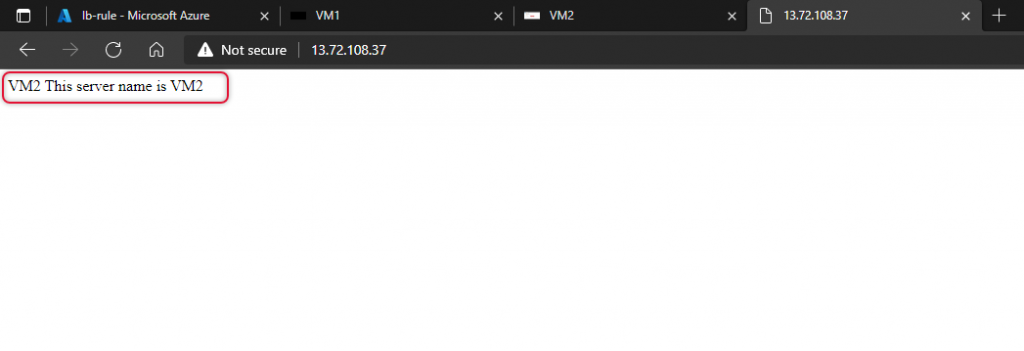
Now I have stopped Vm1 and refresh the web browser and now the web page is loaded from VM2.
Conclusion:
In this article, we have seen the demonstration of how to Create Azure Load Balancer and access tested the HTTP web page load balancing between the two Virtual Machines under the Availability Set. I’m excited to receive your feedback and comments below to improve this article and upcoming ones. I’m looking forward to seeing you on another occasion with a different article. Thanks for taking the time to read the article and I hope this article will help you create a Load Balancer or understand how it is deployed.
Preface: Access Virtual Machines using Azure Bastion
The traditional RDP access using port 3389 is the hacker’s target for the virtual machines running on the cloud and the desktops access connecting on the internet. The Virtual machine running on the Azure cloud has no exception to these attacks. To mitigate this security risk Microsoft has introduced a feature in Azure to Access Virtual Machines using Azure Bastion.
Bastion is a web-based Remote Desktop Protocol (RDP) and Secure Shell Protocol access service. It eliminates the need for exposing the ports such as RDP (3389) and SSH (22) over the internet for accessing Azure virtual machines. The Azure Bastion works on SSL connection using the web browser and there is no need for an agent on the Virtual Machines. Bastion is a more secure way of accessing Virtual machines from the Azure Admin Portal. The browsers should be HTML5 compliant with all the security measures taken care of and accessed using port 443. The Bastion connections are scalable and can be configured to access more than one connection at the same time.
Adding Bastion Subnet to the Virtual Network
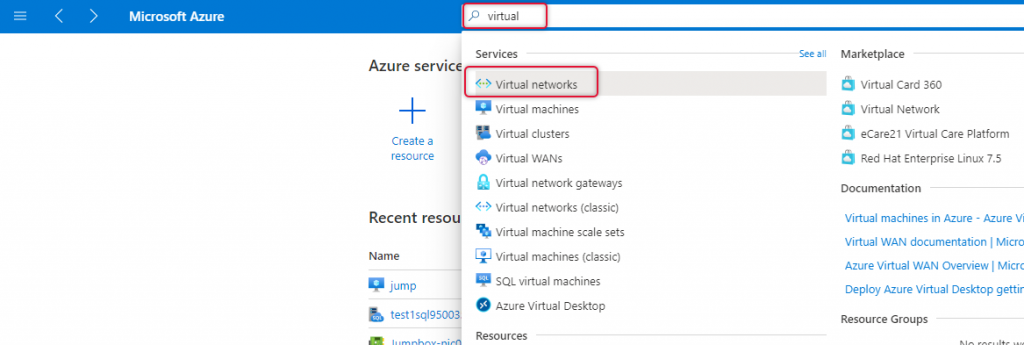
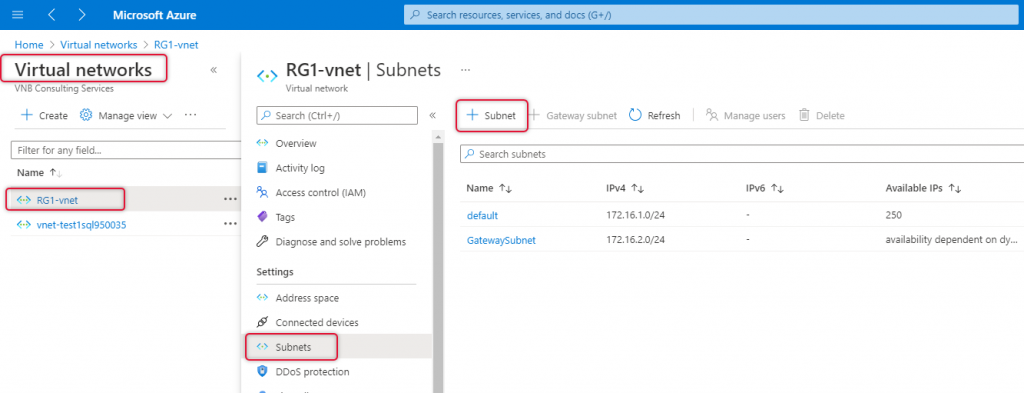
Adding Bastion service and configuring it is so simple and bring bastion service implemented just some clicks of the mouse pointer. In order to add this feature, create the Bastion subnet upfront and then add the service. Go to Virtual Networks and select Subnet from the left side navigation and click Add Subnet.
Click on Add Subnet on the subnets pane.
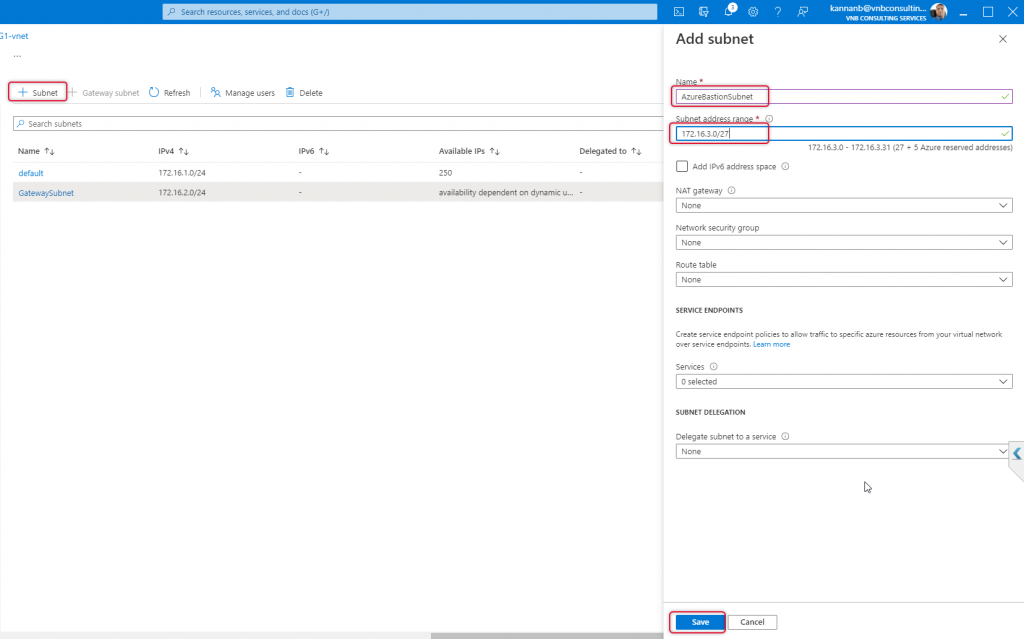
The name of the subnet should be AzureBastionSubnet and add a subnet with the prefix of 26 or 27, 27 is the lowest subnet that can be used on any subnet on Azure Virtual Network. The subnet prefix 27 will be good enough for bastion subnet purposes. In my case, I have typed 172.16.3.0/27 subnet as my Virtual Network address space is 172.16.0.0/16 and leave the other values as is and click save.
Creating Bastion Service
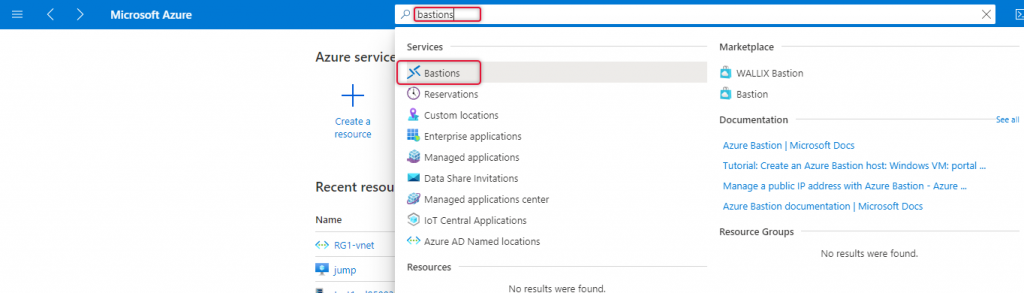
Azure Bastion Subnet with the subnet name AzureBastionSubnet has been created, now is the time to create Bastion services, type Bastion at the top search bar, and select the Bastions from the search results dropdown.
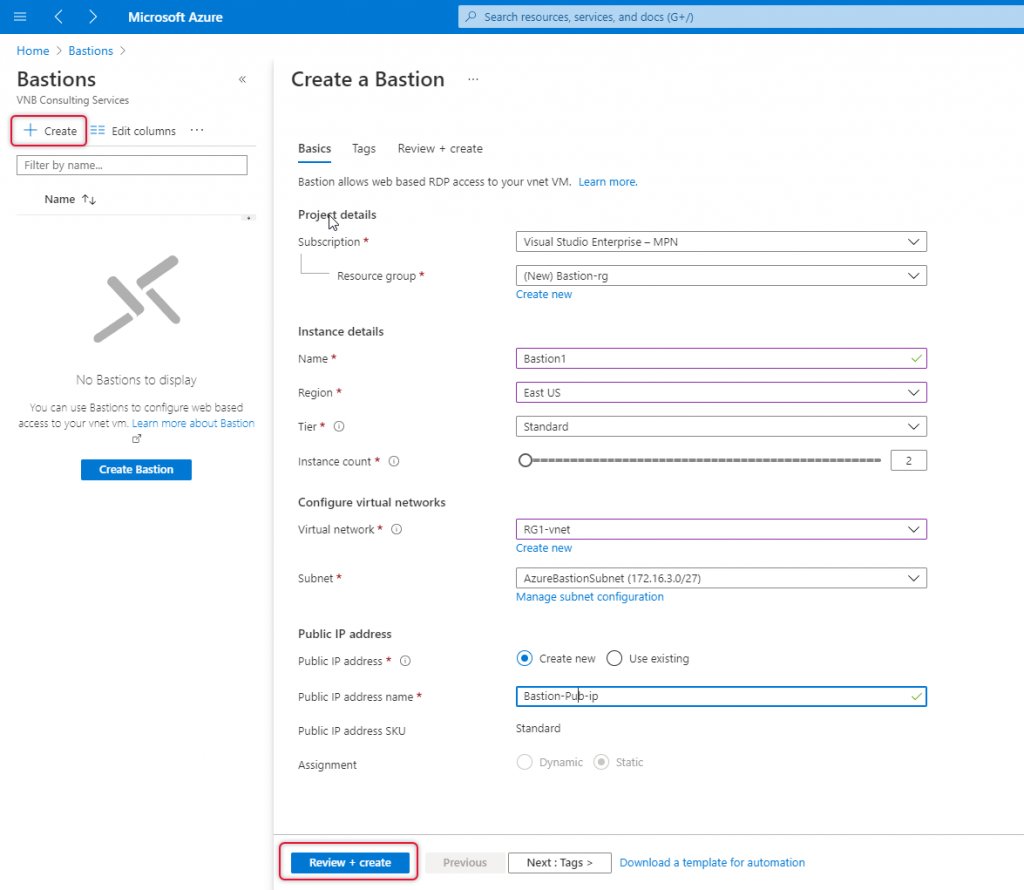
Create a Bastion page opens and on the Basics tap do the following.
Subscription: Select the subscription where the virtual machines are running if you have multiple subscriptions.
Resource Group: Resource group you can either create a new one or select the existing one as appropriate.
Name: On the Instance details give a name for this bastion resource.
Region: Select the location where the Virtual Network resource is located.
Tier: you can either choose Basic or standard as per Bastion instance host scaling.
Instance Count: You can create a number connection needed concurrently. Drag the instance count as your need.
Virtual Network: Virtual Network is for which virtual network you are crating Bastion.
Subnet: Subnet will be chosen from the list, AzureBastionSubnet that we have created will be the one chosen.
Public IP address: Select Create and type an appropriate name to identify later.
Click Review + Create.
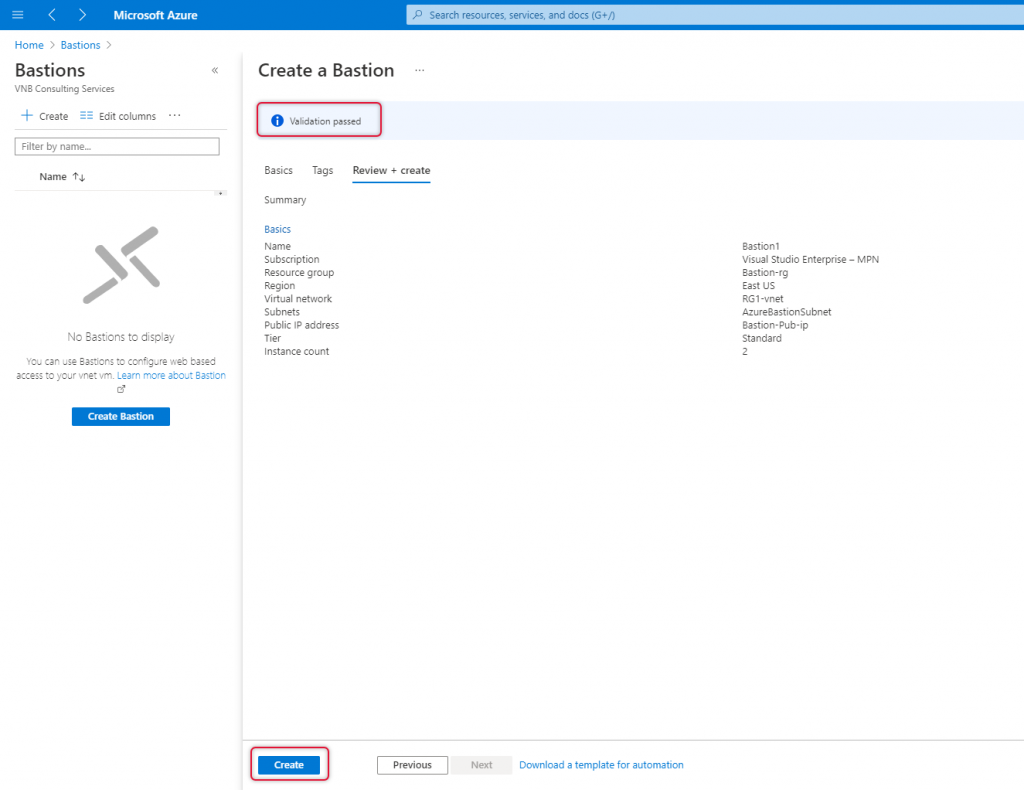
On the create page you should is validation passed if the basics parameters are correct. Click ‘create’ to start Bastion deployment.
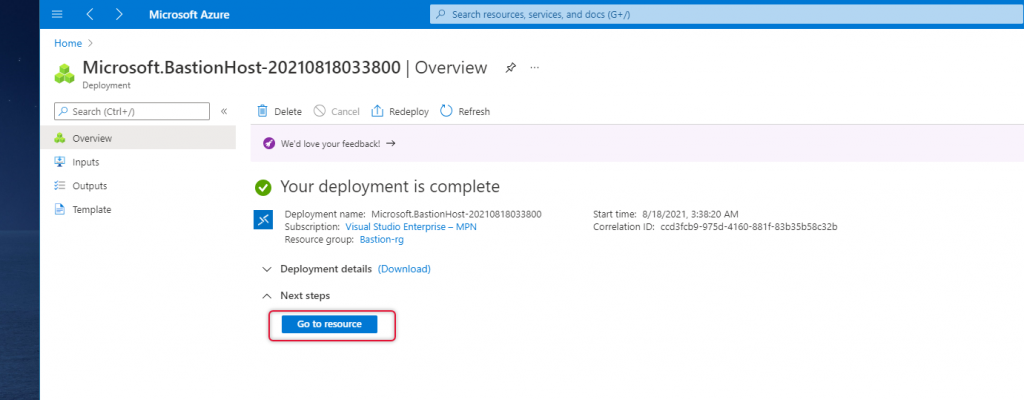
Click Go to Resource, to view what are the additional resources created along with Bastion.
Testing Bastion
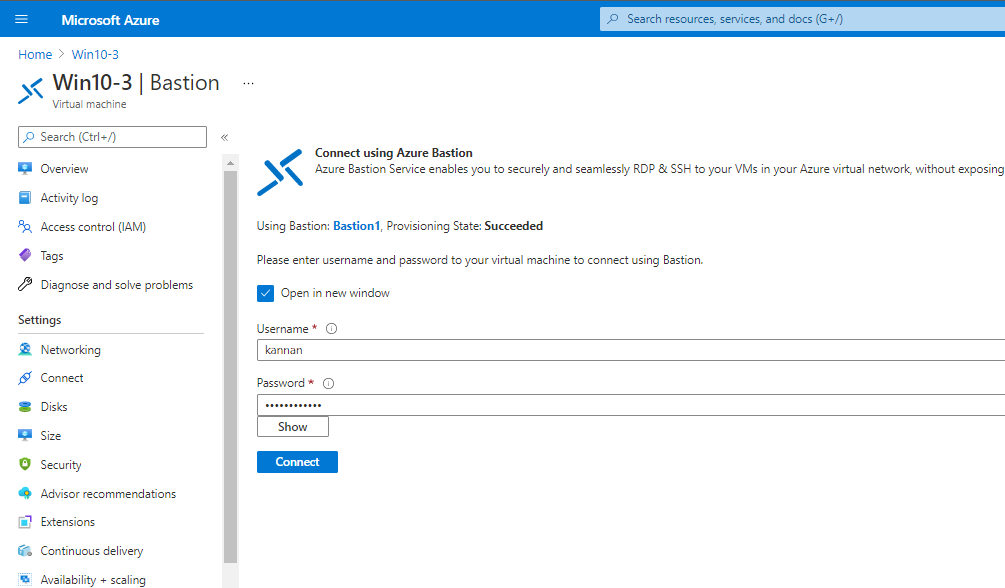
Now, time to connect to the virtual machine. Click connect and select Bastion.
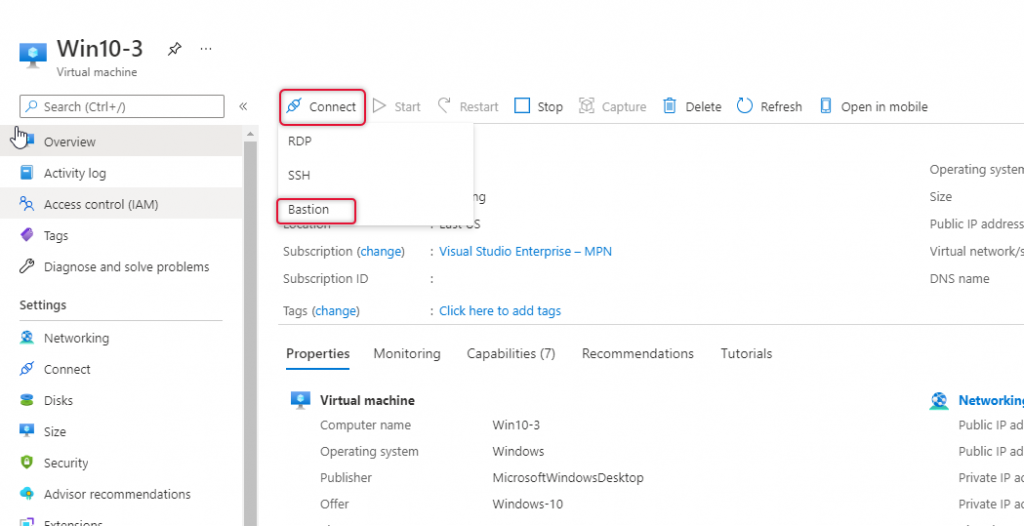
Type the username password that you provide on RDP connection access to the Virtual Machine.
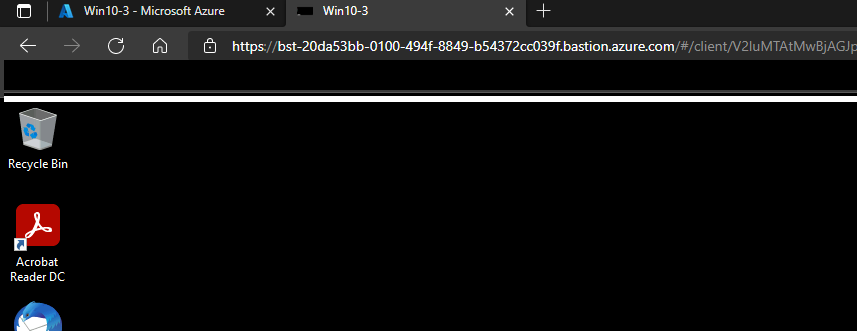
Whola, here is the virtual machine RDP console on a web browser tab.
Conclusion: Access Virtual Machines using Azure Bastion
In this article, we have seen the demonstration of how to create Bastion service and access Virtual Machines using Azure Bastion securely and seamlessly. I’m excited to receive your feedback and comments below to improve this article and upcoming ones. I’m looking forward to seeing you on another occasion with a different article. Thanks for taking the time to read the article and I hope this article will help you create Bastion Service or understand how it is deployed.
High Availability and Load Balancing Remote Desktop Services:
The Remote Desktop Services also called the Terminal Server predecessor is a value-added service of Windows Servers that is a cost-effective solution for the hardware and software licenses and ease of access to the apps. The RDS servers are very critical services as other Windows Services and high availability and Load Balancing is the most needed configuration in the Microsoft Windows Network. The High Availability and Load Balancing are not changed much from Windows Server 2012 R2 to the most recent release of Windows Server 2022.
In this article, we are going to look at important configurations required to set up High Availability and Load Balancing. The High availability part is relevant to RDS Connection Brokers and Load balancing will be of RDS Session Hosts. In order to configure RDS Connection Broker with High Availability, we need to have Microsoft SQL servers in place. Even though we have High availability for Connection Broker it is not complete if you have not configured failover for the Microsoft SQL server which holds the database of Connection Broker services. I have demonstrated RDS high availability with a single SQL server, but in your setup make sure you have configured high availability for the MSSQL server as well.
The following configurations are outlined for High Availability and Load Balancing in RDS:
- MS SQL Installation and configuration (pointed out some important parts)
- Deploy RDS roles with standard deployment.
- Create an Active Directory security group and add connection broker servers to it.
- Add Security group to MSSQL login and give dbcreator server role.
- Open port 1433 on the MSSQL server windows firewall.
- Create DNS A record for the RDS Farm hostname.
- Install MSSQL Client Tools connectivity and add ODBC x64 connection on Connection broker servers.
- Configure High Availability for Connection broker RDS server role.
- Configure User mapping to the Connection Broker DB as DB owner for the security group created in Step 3.
- Add a second Connection Broker server to the CB role.
- Add RD Licensing role to a server in the pool.
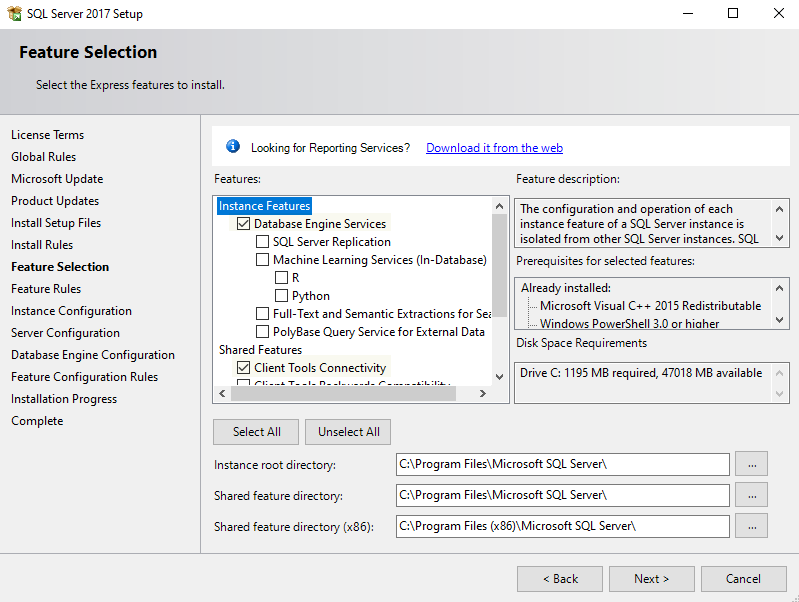
MS SQL Installation and configuration (pointed out some important parts)
Install the MSQL server with the Client Tools connectivity feature. This will allow client connectivity from the connection broker servers.
Once MSSQL server installation is complete, the TCP/IP protocol on the server needs to be enabled, and check dynamics port on the properties of the TCP/IP protocol Is set to port number 1433.
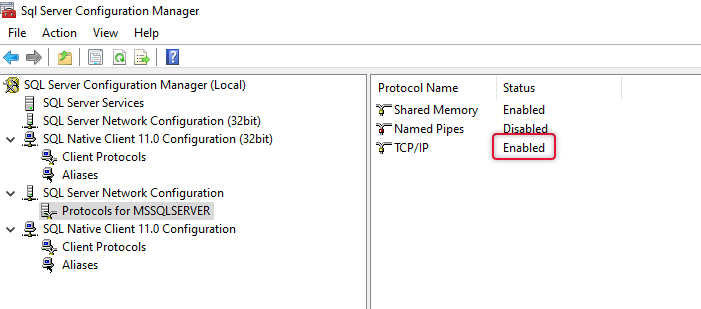
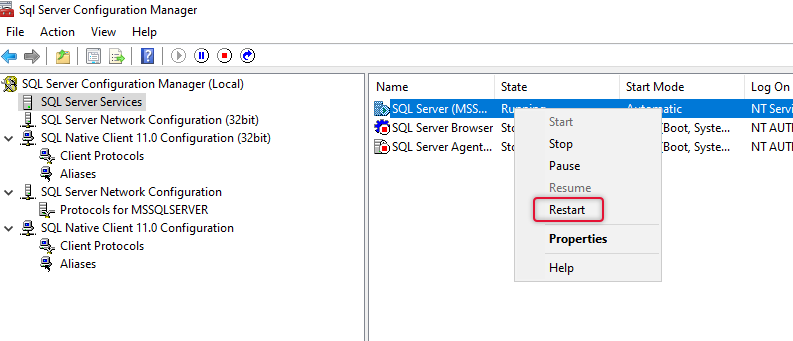
After enabling the TCP/IP port, restart the SQL server service from the services window.
Now, that the SQL server has been set up and configured, if you already have the SQL server in place just make sure the TCP/IP protocol is enabled and the port is set correctly.
- Deploy RDS roles with standard deployment.
The next part is to deploy RDS roles on one of the servers assigned for RDS deployment. Before doing the deployment, make sure you have added servers that you are configuring with RDS roles already added in the server pool.
To add servers to the server pool, click Add other servers to manage and add the servers by selecting appropriately
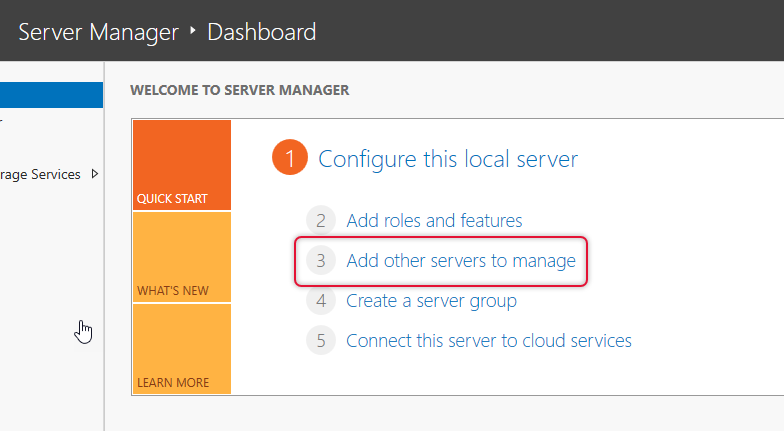
When you click the find now button on the add other servers window, you will be listed out with the list of servers in the network. If your network is big then type the names and add one by one.
Now servers are added to the server pool, and you are ready to start the deployment of RDS with standard deployment.
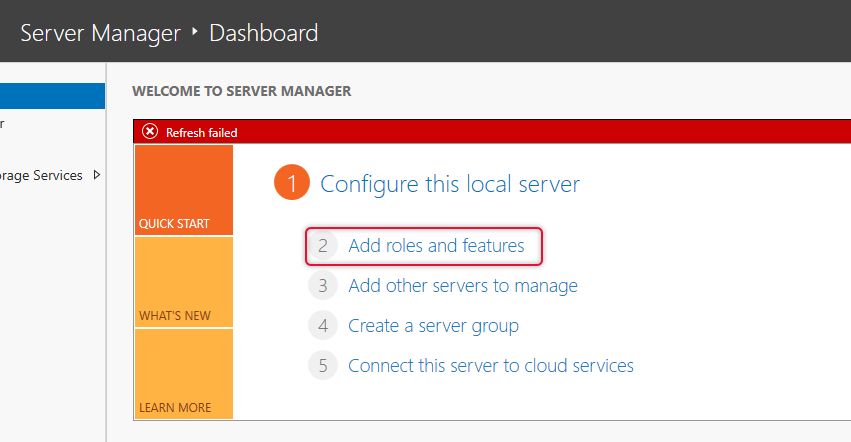
Click Add roles and features from the server manager console and the add roles and features wizard will be shown to you for further actions.
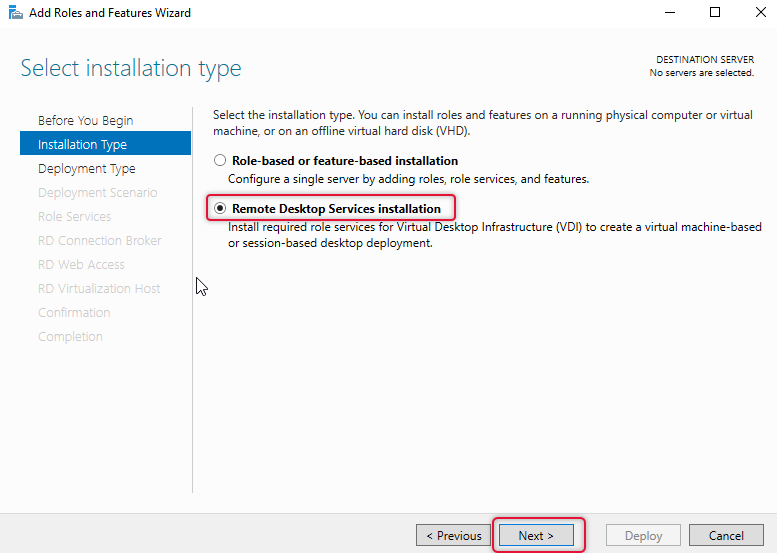
Here, we are installing remote desktop server roles, so select remote desktop services installation and click Next.
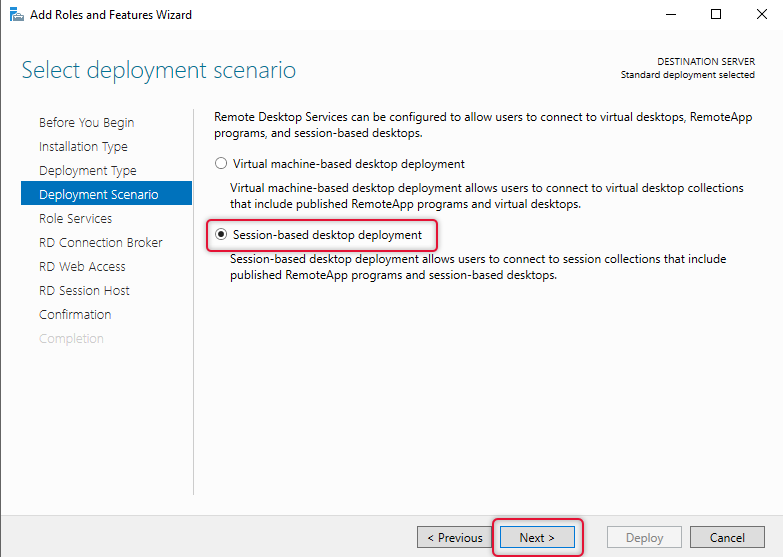
On the deployment, type select Standard deployment and click Next.

On the Next screen of the adding roles, select session-based desktop deployment and click Next.
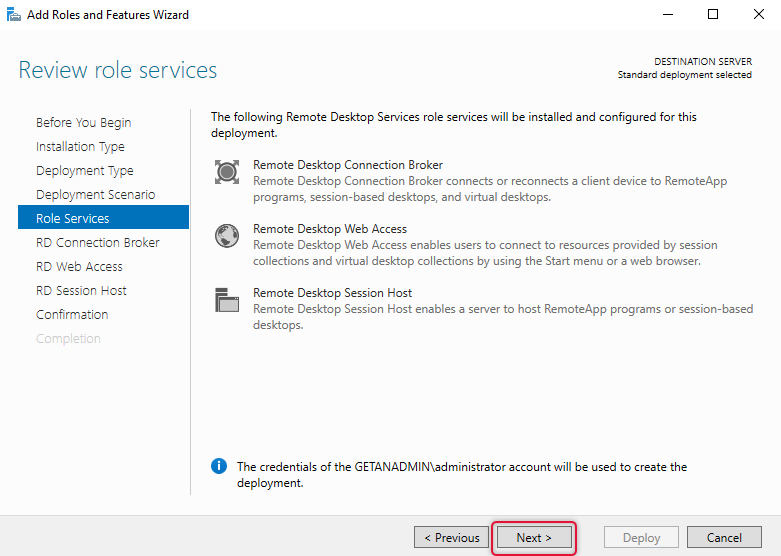
The Review Role services screen goes through the services and clicks Next.
Select the appropriate server for connection broker, this is the first server you are installing you can add only one server to this role service, select the appropriate one and click Next.

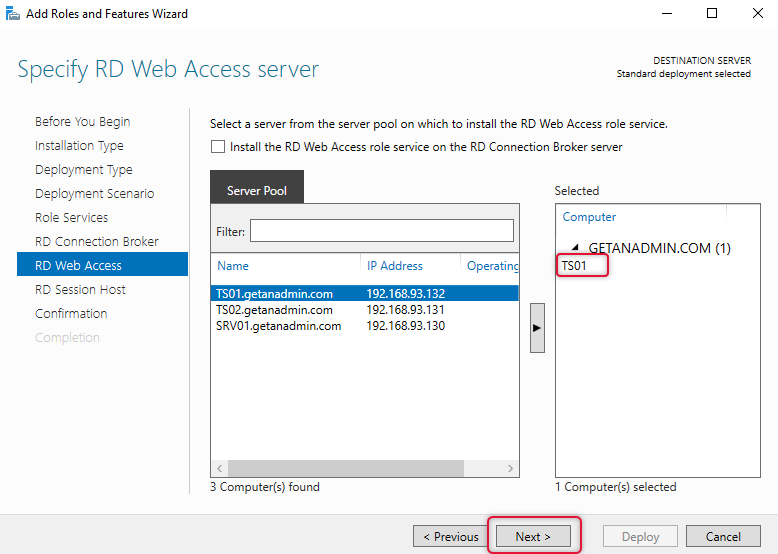
On the RD web service select the web service role server and click next.
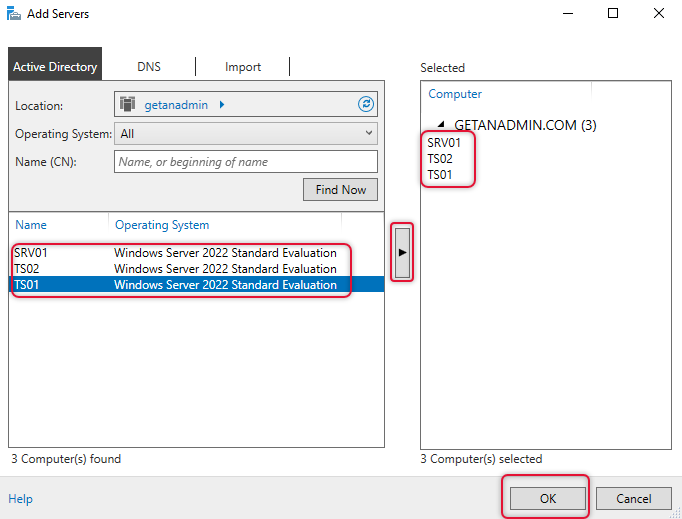
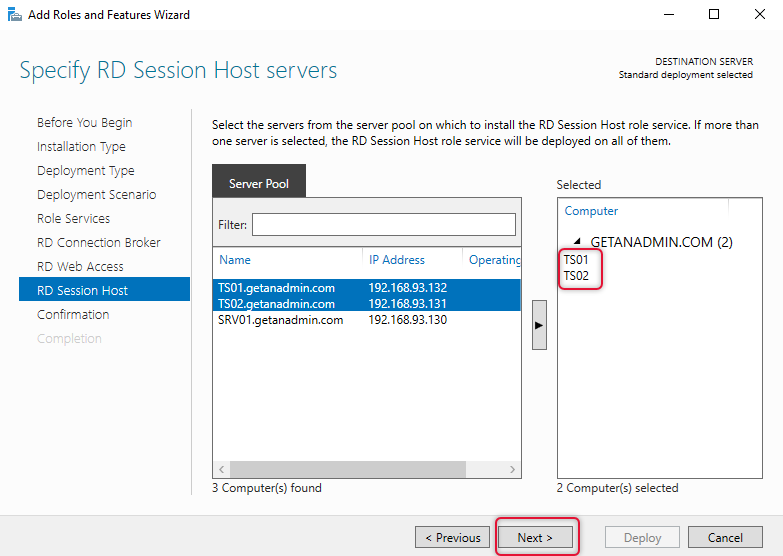
The next screen is to select session hosts, here you can select more than one server, I have selected ts01 and ts02. Click Next to continue.
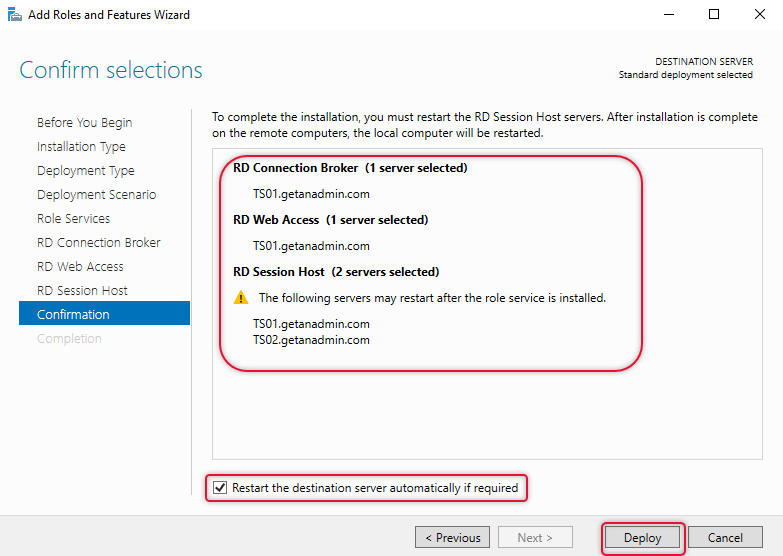
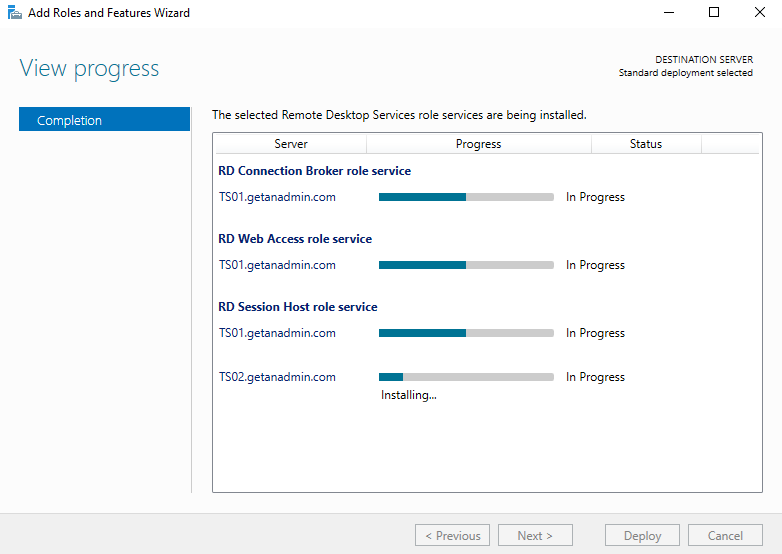
Verify all the server selections are as you intended and click Deploy. Make sure the restart check box is checked.
The progress bar indicates the progress of the role services deployment, the server will restart in between and start the installation again when you log in to the server after a restart.
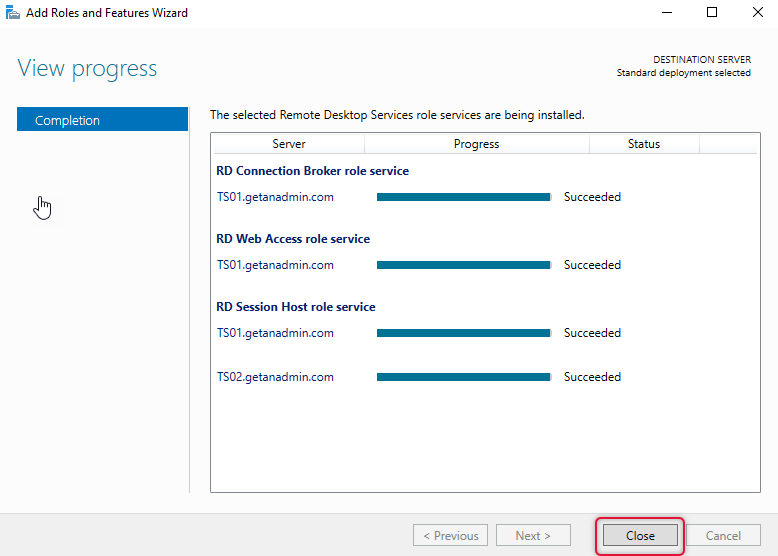
The below screen shows the deployment completion, and all role services are successfully installed. Click close to close out the deployment window.
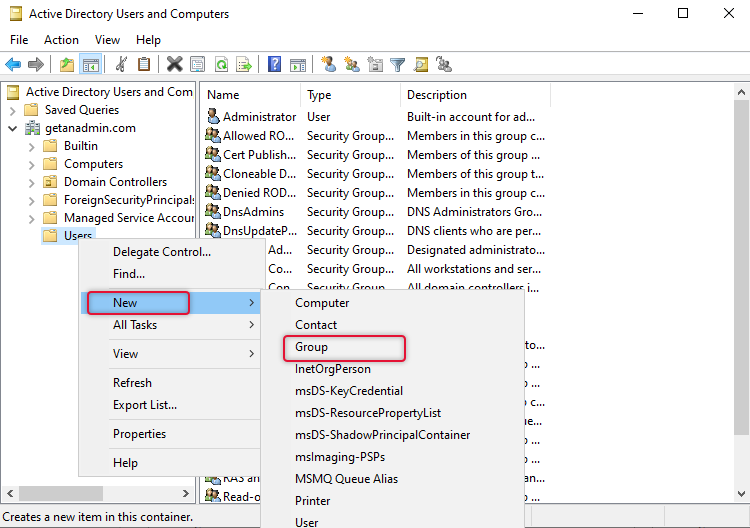
- Create an Active Directory security group and add connection broker servers to it.
Now, we are going to create a security group and add the connection broker server’s computer accounts to it. We are creating a security group with connection broker servers in it to assign the DB creator role on the MSSQL server so that the connection broker server can create a database on the MSSQL server.
On the domain controller launch Active Directory Users and computer and right-click on an Organizational Unit and point to New/Group to add a security group.
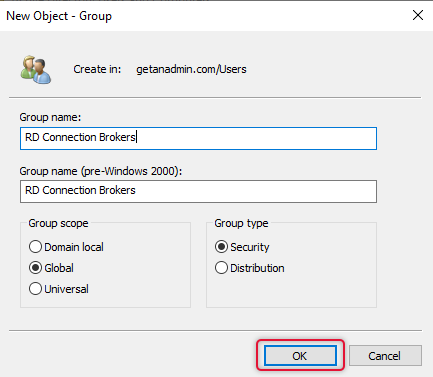
On the New object for group dialogue box opens type a name for this group that would be descriptive and leave security scope and type default and clicks OK.
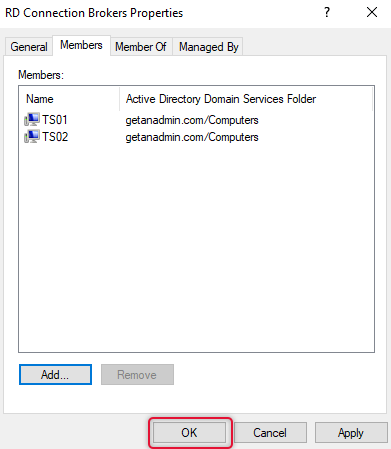
Once the Security group has been created, right-click the group, select properties and go to the Members tab and add connection broker servers that you are intended to configure. Make sure you have selected object type to Computers and location to the active directory domain.
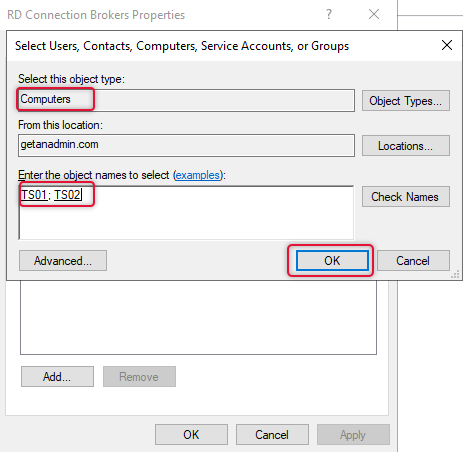
Once the connection broker servers are added, click OK to close the group object properties.
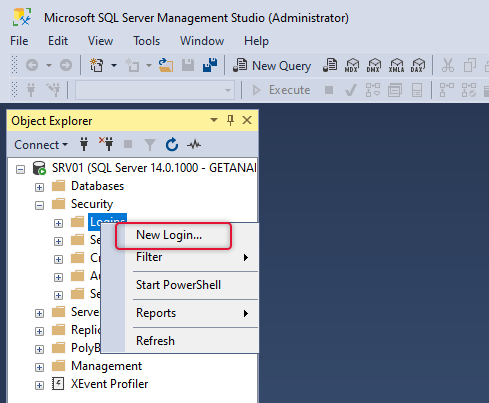
- Add Security group to MSSQL login and give dbcreator server role.
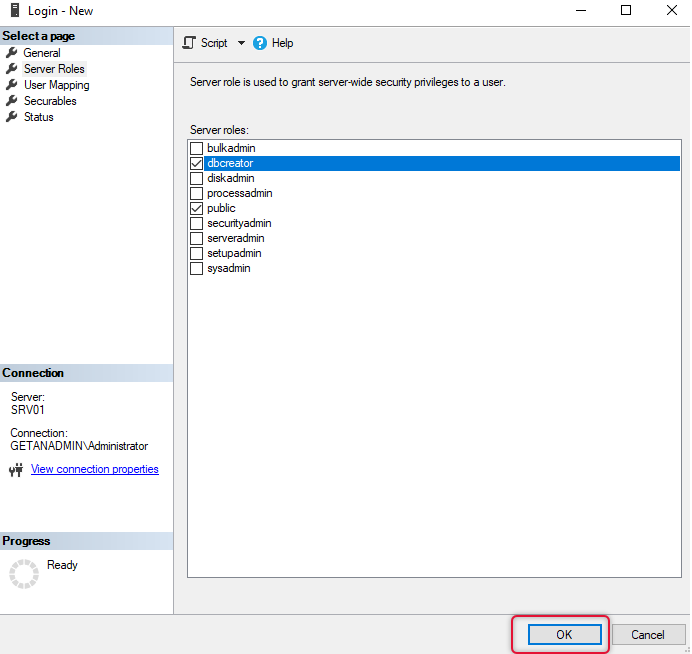
The next step is to add the security group that was created In the previous step in the MSSQL security login menu. Launch SQL Server Management Studio on SQL server and expand security and right-click Logins and select New Login as in the screenshot below.
On the general tab and login name field search for the security group with connection broker computer object in it and leave other settings default.
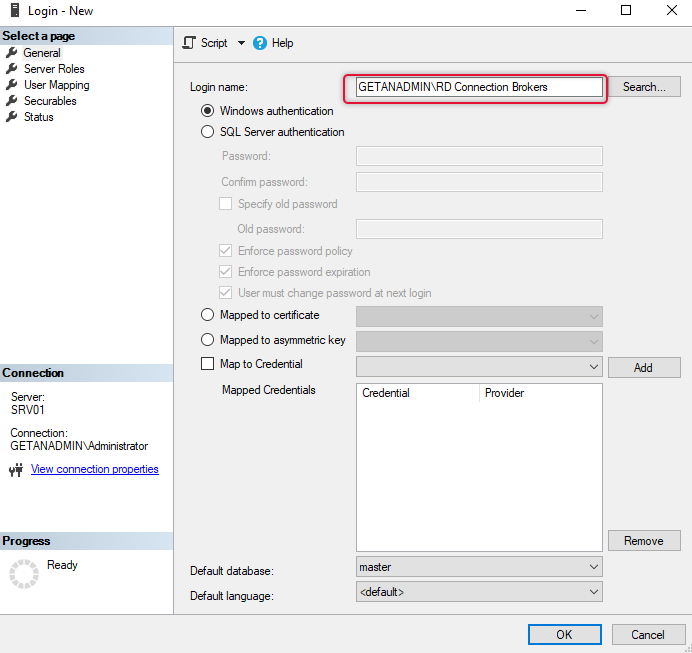
On the Server, roles tab select dbcreator server role and click OK to exit the dialogue box.
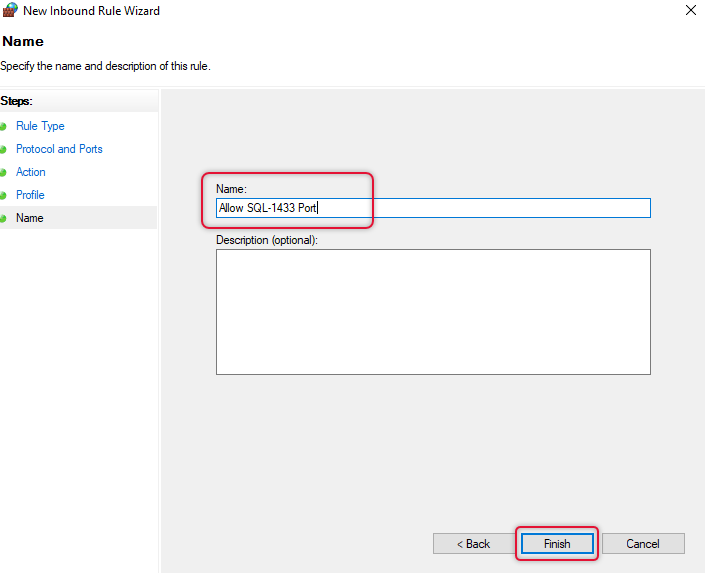
Open port 1433 on the MSSQL server windows firewall.
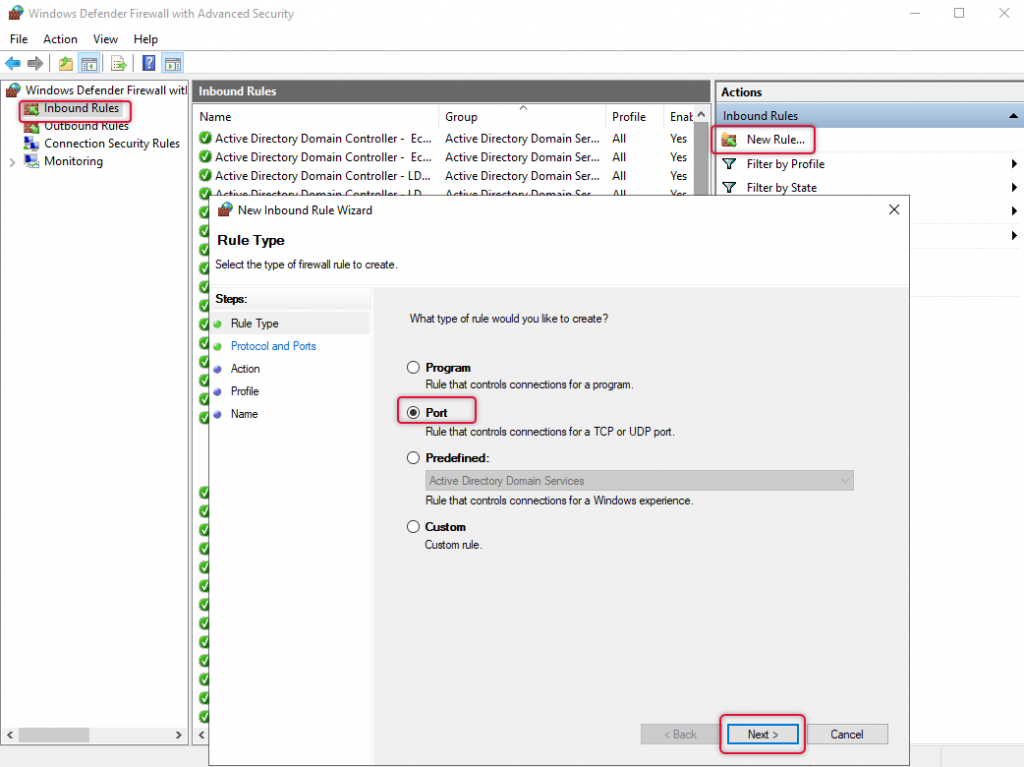
Once we completed adding connection broker servers to dbcreator role with the security group, the next step is to open the MSSQL default port 1433 on the windows firewall on the MSSQL server, Launch the windows firewall, and follow the steps below.
Select Inbound Roles and on the Actions menu click the new Rule. And on the New inbound rule wizard select Port and click Next.
Leave the apply to TCP and type the specific local ports to 1433 and click Next.

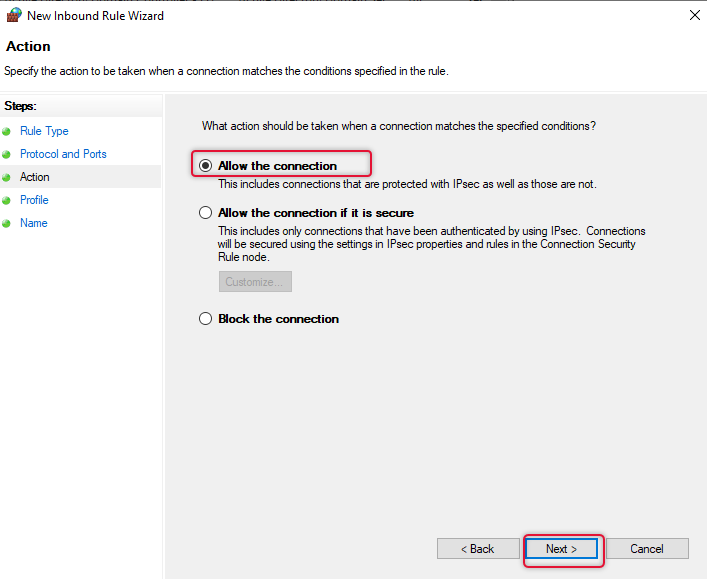
On the Action, tab select “Allow the connection” and click Next.
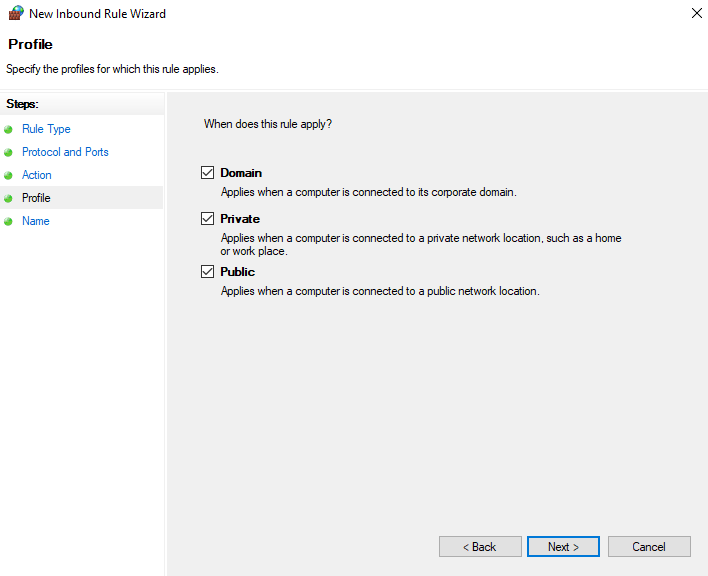
On the profiles tab, leave all profiles selected and click Next.
Give a descriptive name and click Finish to end the inbound rule wizard.
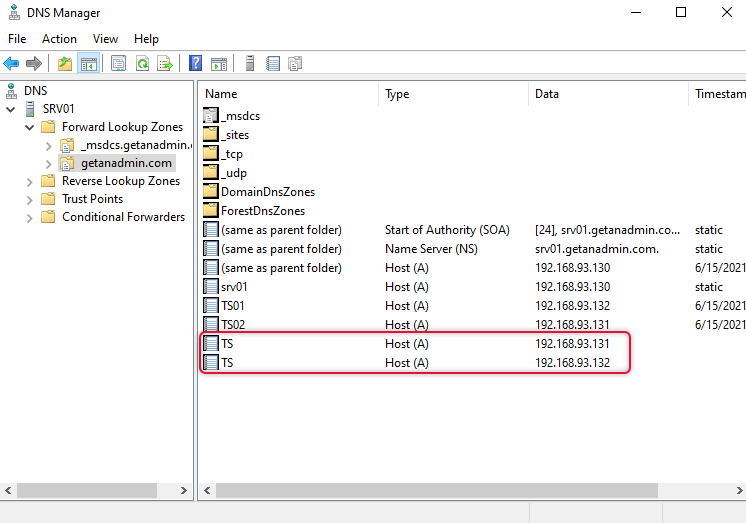
Create DNS A record for the RDS Farm hostname.
We have completed the inbound rule wizard and the next step is going to be to create “DNS Round Robin”. This means creating A records for the farm name and giving the IP address of each connection broker server IP address. The created Farm and its records are depicted on the screen capture below, so create the records as per your environment IP addresses of connection broker servers.
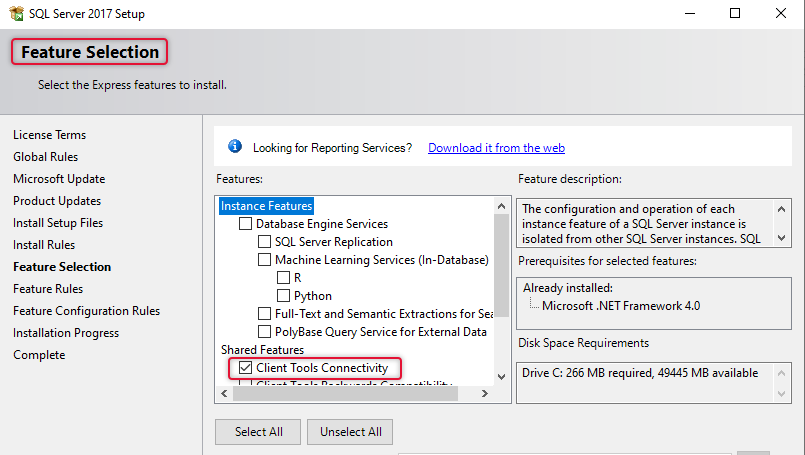
Install MSSQL Client Tools connectivity and add ODBC x64 connection on Connection broker servers
The next action is to install client tools connectivity on each connections broker server. Go to each connection broker serves and launch the MSSQL server setup from the MSSQL server installation media. The only thing we need to select is Client tools connectivity and remove all other selections on the Feature selection. The following steps must be done on each connection broker server. As the steps are identical, I have shown the demo of this installation and configuration one time. You need to do the same on all the connection broker servers.
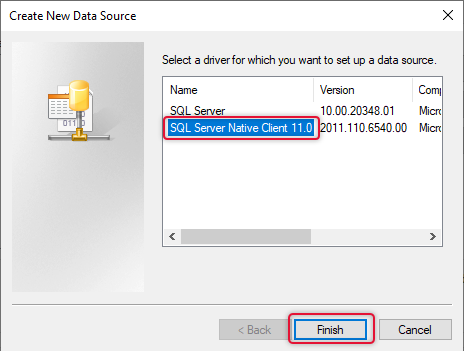
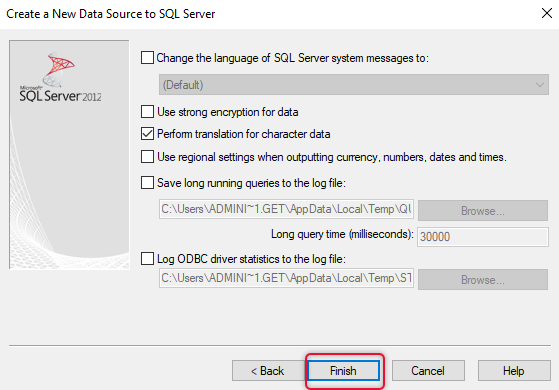
On each connection broker server, go to server manager à Tools and launch ODBC data administrator x64. The following dialogue box pops up and clicks add to add a data source.
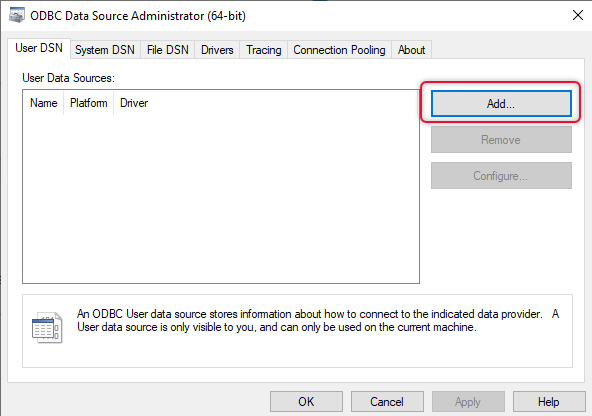
Select SQL Server Native Client 11.0 and click Finish, the Create a new data source to SQL server wizard will open on clicking the Finish button.
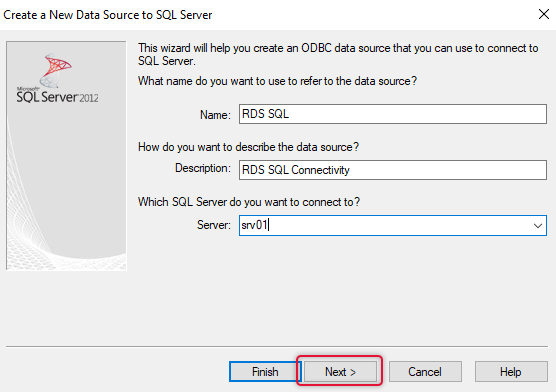
Give some descriptive name and description and type the name of the SQL server and click Next.
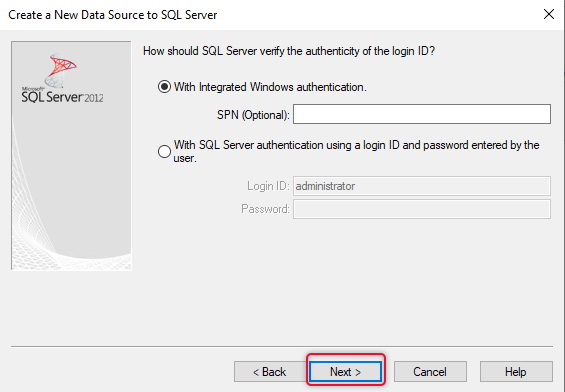
Leave the integrated windows authentication selected and click Next.
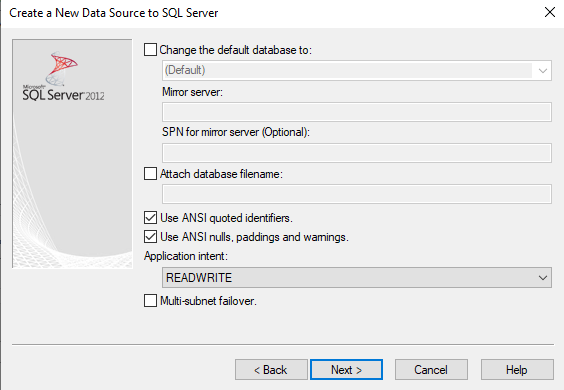
Leave the settings as default and click Next.
Click Finish to end the wizard.
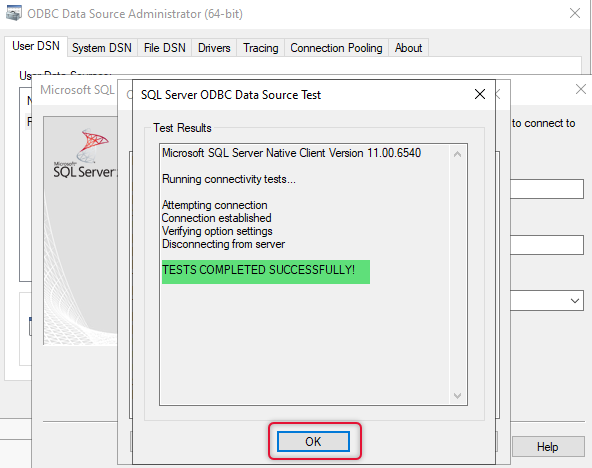
Click Test data source and find the Tests Completed Successfully popup and click OK. Do these steps on other connection broker servers.
Configure High Availability for Connection broker RDS server role.
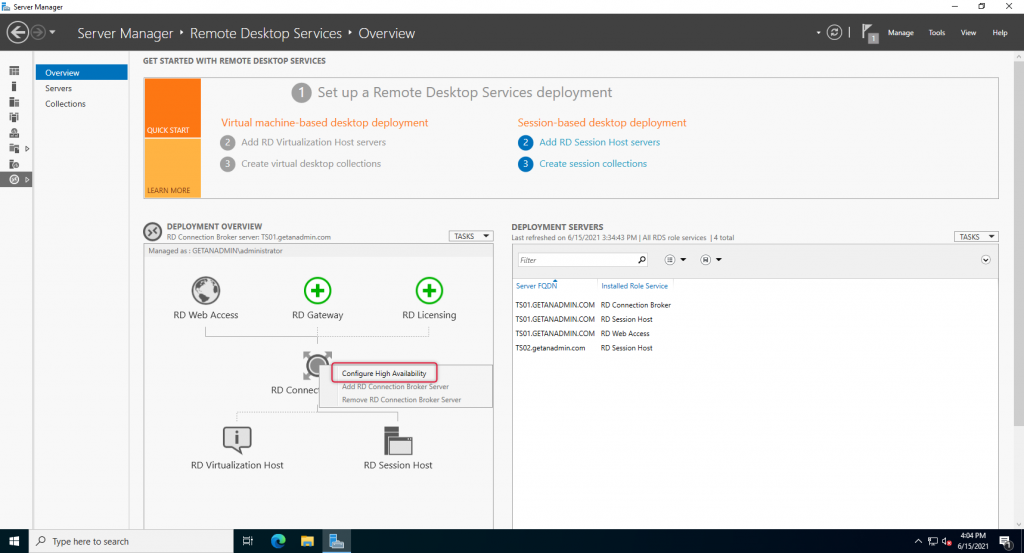
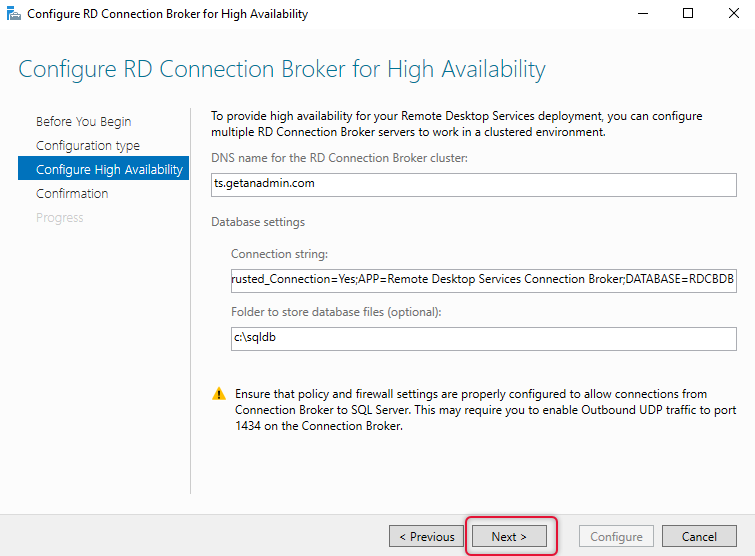
Now we are ready to configure the connection broker server’s High Availability. Launch Server manager on remove Desktops services management servers, this happens to be the first server that you install the RDS role service, and right-click on the connection brokers icon and click Configure High Availability.
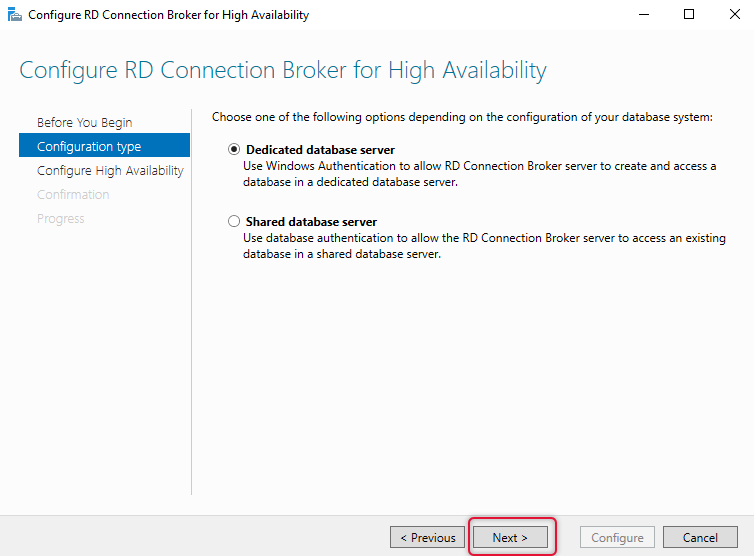
Leave the Dedicated database server radio button selected and click Next.
On the Configure High availability tab, type the details intuitive to your environments such as SQL Server, Far, and database name, and click next. The explanation is given below.
DNS Name connection Broker cluster:
Ts.getanadmin.com
Connection string:
DRIVER=SQL Server Native Client 11.0;SERVER=srv01;Trusted_Connection=Yes;APP=Remote Desktop Services Connection Broker;DATABASE=RDCBDB
Physical path:
C:\sqldb
In your environment replace SRV01 with your MSSQL server and RDCBDB with a database name appropriate to you. It’s ok to leave this database name if you have no specific names.
Ensure the folder name you have typed on the physical path exists on the SQL server.
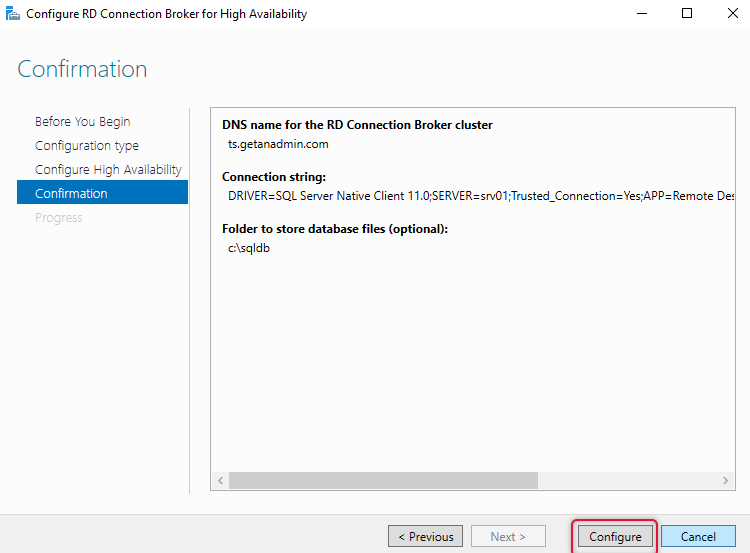
If your high availability details are correct you will be shown with the confirmation dialogue and click configure to configure High Availability.
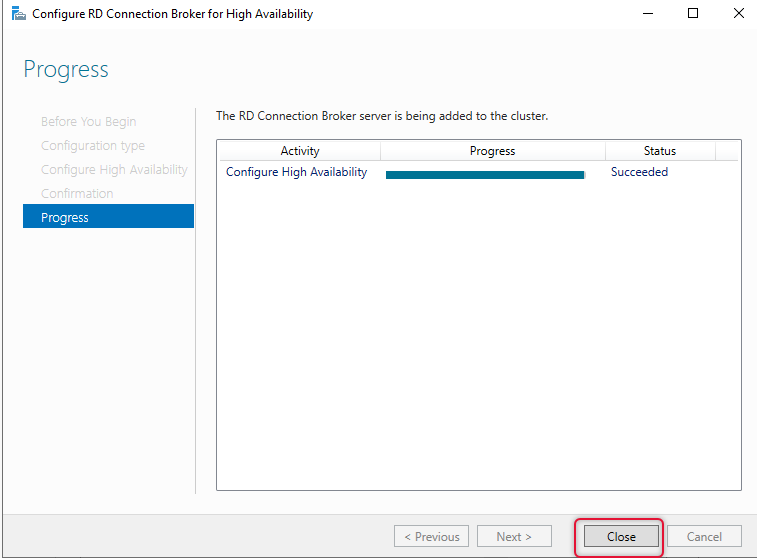
The progress bar indicated that the High availability configuration is succeeded, and you can click close to close the wizard.
The RDS connection broker high availability configuration is completed and now the steps to follow is to add the rest of the connection broker servers to the connection broker configuration.
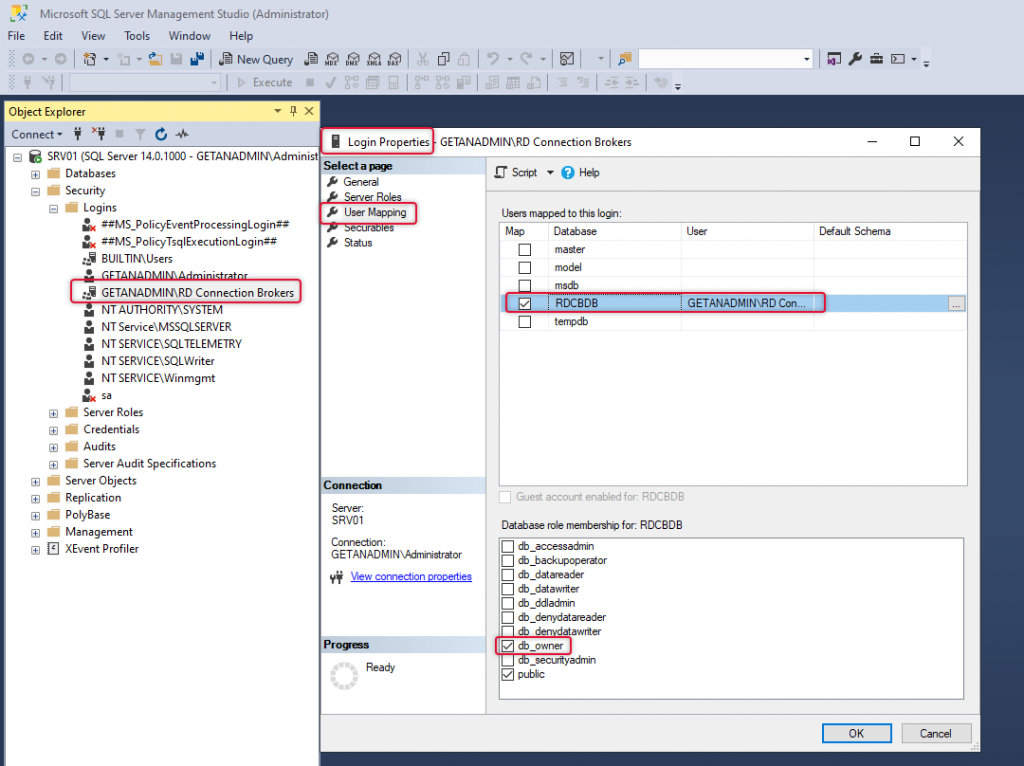
Before adding the connection broker servers, we need to make the security group the owner of the database that we created In the configure high availability wizard in our previous step.
Launch SQL Server Management Studio and go to the Logins tab and select security group to open login properties of the security group. On the User Mapping tab on the left side navigation, select the database that configures the high availability wizard created and change the database role membership to DB owner.
Configure User mapping to the Connection Broker DB as DB owner for the security group created in Step 3
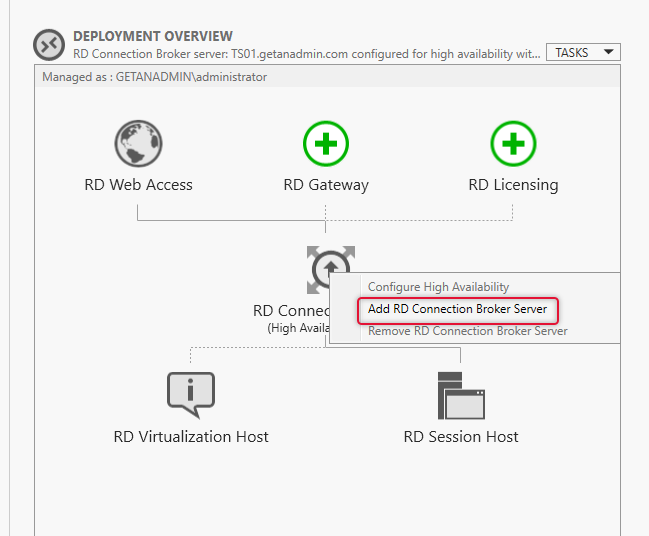
Now the security group is the DB owner of the database, now we go back to RDS Server and launch server manager and right-click the Connection broker icon, and select Add RD Connection Broker Server.
Add a second Connection Broker server to the CB role
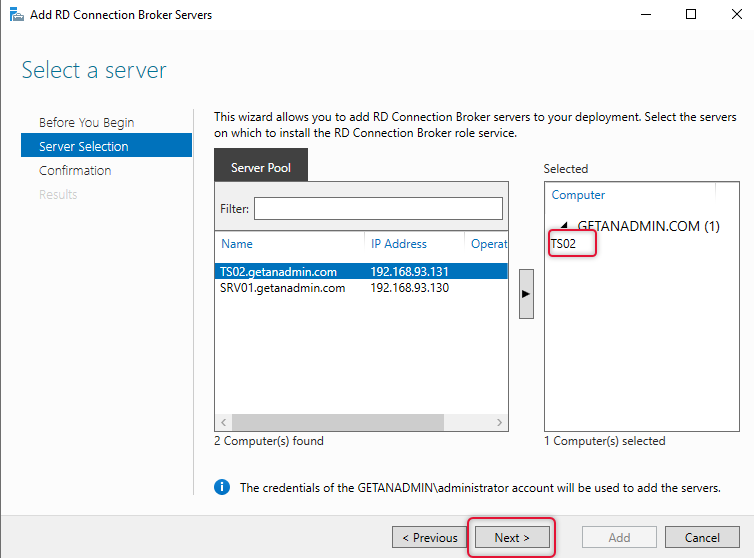
The Add Connection Broker servers wizard pops up and on the server selection tab select the connection broker server that you intended to add and click Next.
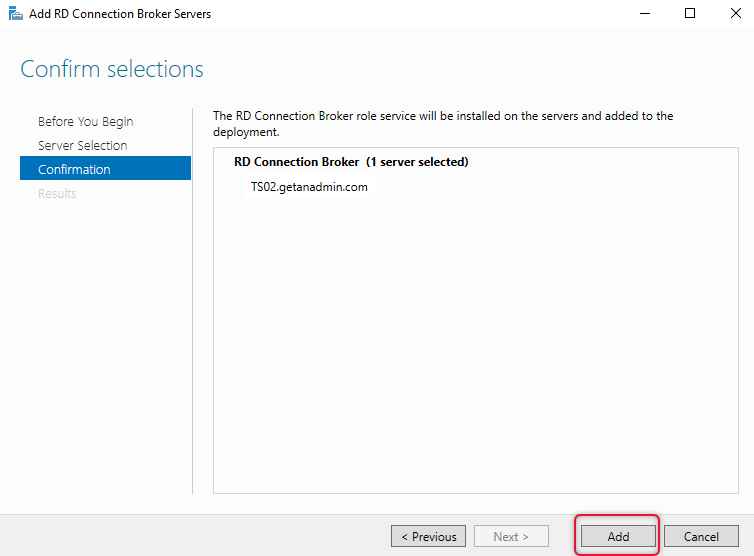
On the confirmation, dialogue click adds to confirm the addition of the second connection broker server.
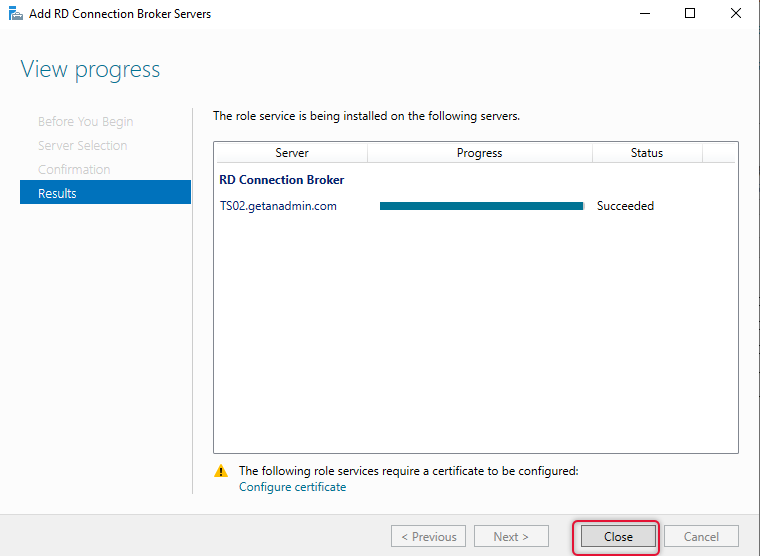
The results tab shows the progress and the “succeeded” status after adding the server to the server pool. Click close to end the ”Add Connection Broker Server” wizard.
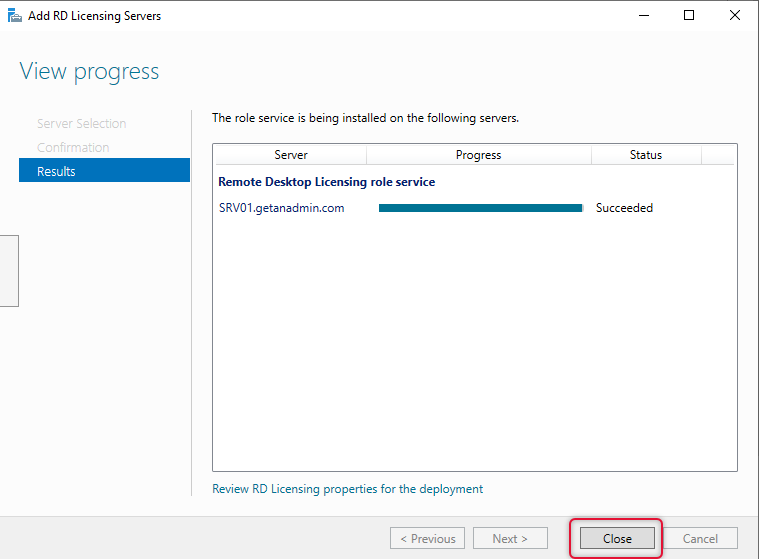
The very next and last part of this demonstration is adding RD Licensing Servers to RD Servers Farm. Click on the Green icon with add licensing server to launch add licensing server wizard. Once the add licensing server wizard pops up select the server meant for Licensing and click Next.
Add RD Licensing role to a server in the pool
On the confirmation tab with the Licensing server selected click to add to add this server as Licensing server on the RD Farm.

The Wizard shows that the status of adding Licensing server is succeeded and click close to close the wizard and back to server manager with Remote Desktop configuration.
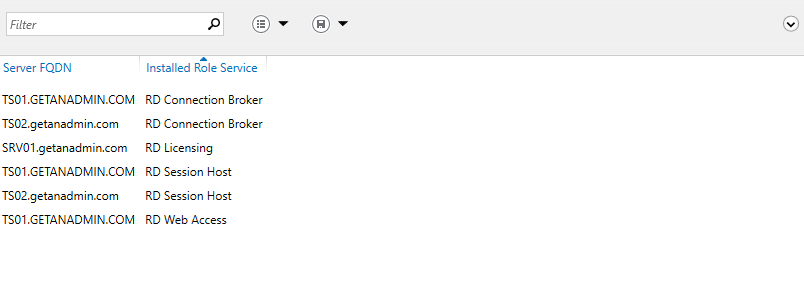
Here is the list of servers and their installed Role services from Remote Desktop Configuration.
High Availability Remote Desktop Services Conclusion:
This is the end of the demonstration and in this article, we have seen how to install and configure Remote desktop Services in infrastructure with multiple servers with different role services using standard Installation. We also looked at how to install and configure the connection broker server’s High Availability and add connection broker servers o the High availability pool. We have seen how to add Licensing server in the end.
I hope this will help administrators assigned with the RD Farm installation and configuration work. I am excited to receive comments from you, send me your comments and feedback to help others and improve this article and other articles on this website. And, I am pleased that you have read this article to the end of it. I look forward to meeting you in some other article that you are expecting to join with. See you next time and I sign off now.

After upgrading from Exchange Server 2013 or 2016 to 2019, the address book download seems to give an error on offline address book download on Outlook desktop client. This issue happens because the Exchange Server 2019 Offline address book configuration on the Exchange server has incorrect server details and addresses book distribution. This can be resolved by enabling global web distribution and setting the virtual directory to null.
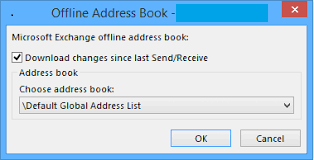
On the Outlook client when you expand the “send and receive group” drop-down and select download address book. You would see the popup something similar as below.
And you would see the error as below when you try to download. The error is
(0x8004010F): 'The operation failed. An object cannot be found.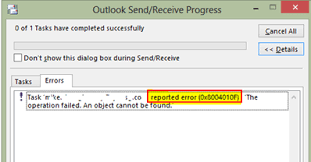
This error can be resolved, and the offline address book can be downloaded by enabling global web distribution on the Exchange server using the Exchange management shell.
Run the below command to set the default offline address book with the command.
Get-Mailbox | Set-Mailbox -OfflineAddressBook "\Default Offline Address List"Check the list of address books using the command below.
Get-offlineaddressbookTo resolve the above error run the command below to make the virtual directory to null. In this command, we are enabling global web distribution and shadow mailbox distribution as well.
Set-OfflineAddressBook -Identity "Default Offline Address Book" -VirtualDirectories $null -ShadowMailboxDistributionEnabled $true -GlobalWebDistributionEnabled $trueAfter running the above command restart the server. This will let the configuration changes to take effect on the Offline Address Book and the download error will be resolved. Test it on your outlook desktop client.

Preface
Quick Steps on Outlook is a time saver to make the multiple steps of action to make it quick and easy with a single click of the mouse. In this article, we are going to look at the steps to Import Outlook Quick Steps from an old PC to a new PC or from one profile to another. Quick steps are integrated with the mailbox, so the import is necessary when the new mailbox is created or for a new mailbox account. This can be used either office 365 mailbox, live account mailbox, or Exchange server mailbox. The steps are the same. You do not have to connect outlook when the import is being done.
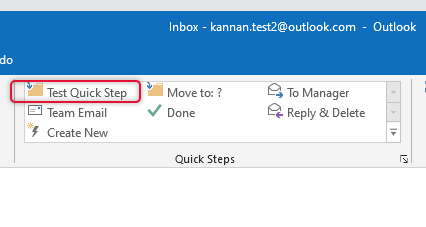
As we see on the Quick Steps list on the image below taken from the old outlook profile, the Test Quick-Step is the one we need to bring to New profile, you can use the same steps to bring it to the new PC.
To import the quick steps, we need to use a tool called MFCMAPI which can be downloaded from the link here
https://github.com/stephenegriffin/mfcmapi/releases/tag/20.0.20307.01
based on your Outlook architecture you can use either 32- or 64-bit version of the executable and run it on the computer where the Quick steps need to be exported from.
The 64-bit builds will only work on a machine with 64-bit Outlook installed. All other machines should use the 32-bit builds, regardless of the operating system.
RECOMMENDED:

How to Import Outlook Categories in just 10 steps
How can we get the categories from an old profile to a new profile or an old computer to a new computer? I had recently intervened in a difficult situation for our CEO categories missing on his Exchange Server mailbox…
Steps to Import Outlook Quick Steps:
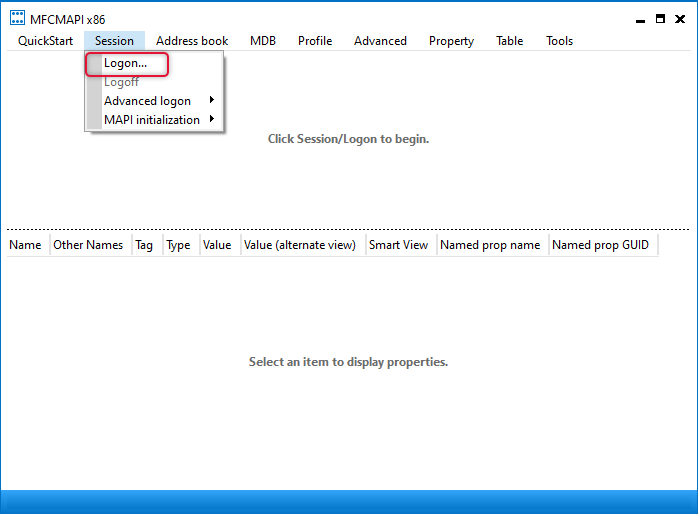
Launch the tool and click Session => Logon and select the outlook profile you want to get the quick steps from.
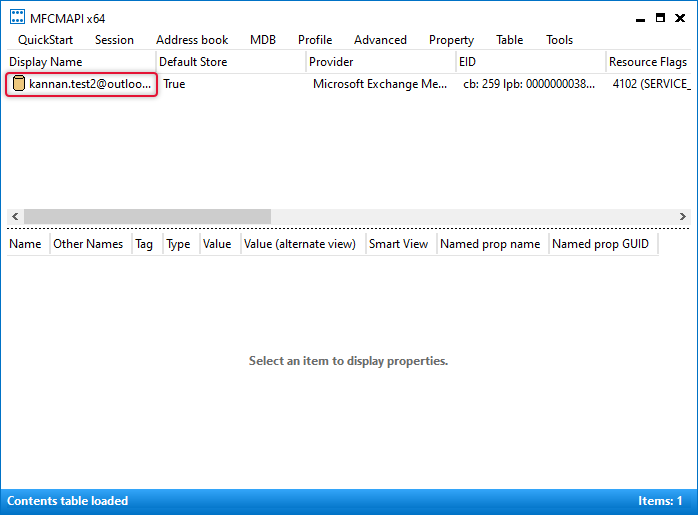
You would see the email account that is on the profile, double click the name of the email account which will bring the new window to MAPI properties.
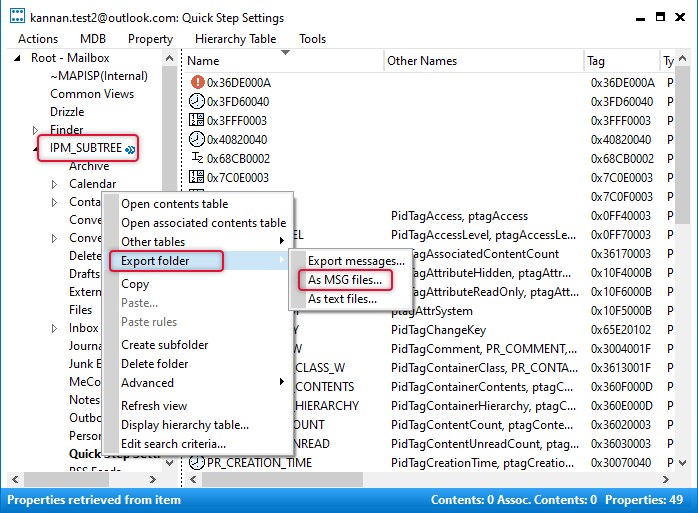
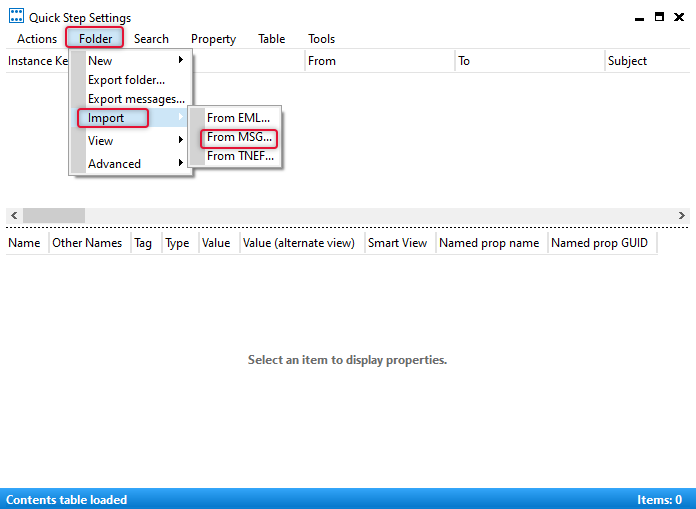
Expand the Root-Mailbox tree and the subtree called IPM_SUBTREE. Right-click Quick Step Settings on the IPM_SUBTREE and point to Export folder => As MSG files.
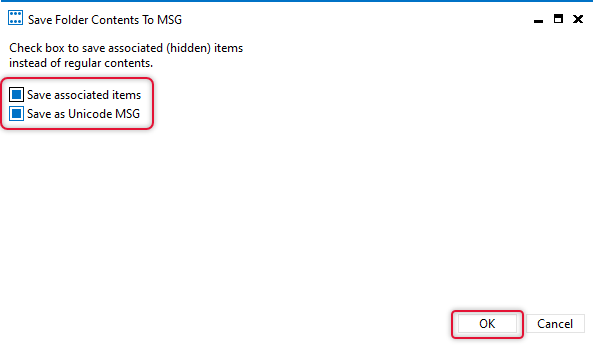
On Save Folder Contents to MSG, dialog box select both save associated items and Save as Unicode MSG and click OK.
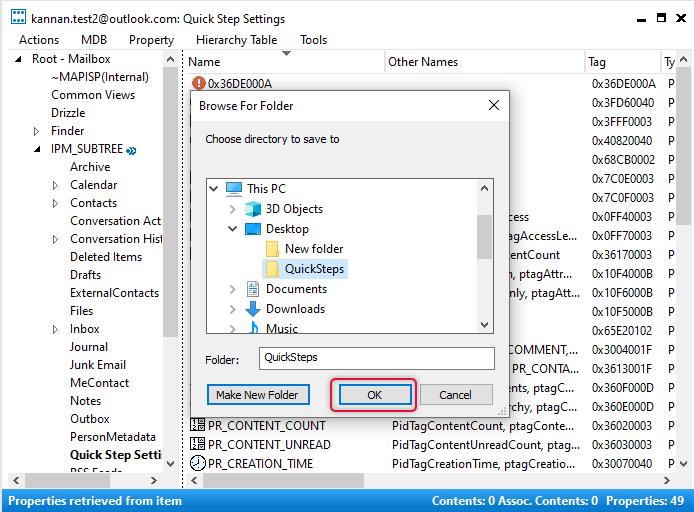
Select a folder to save as an MSG file and click OK.
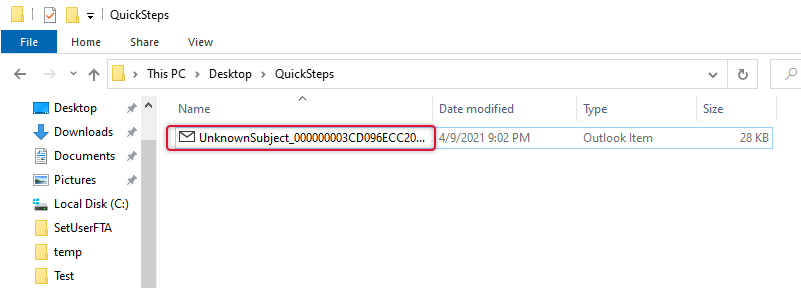
The MSG file is saved on the path given in the previous step, copy this file to a flash drive or network location that can be accessible by the PC you want to import.
On the New PC or the profile launch the MFSMAPI tool and log on to the profile that you want to Import Outlook Quick Steps it to.

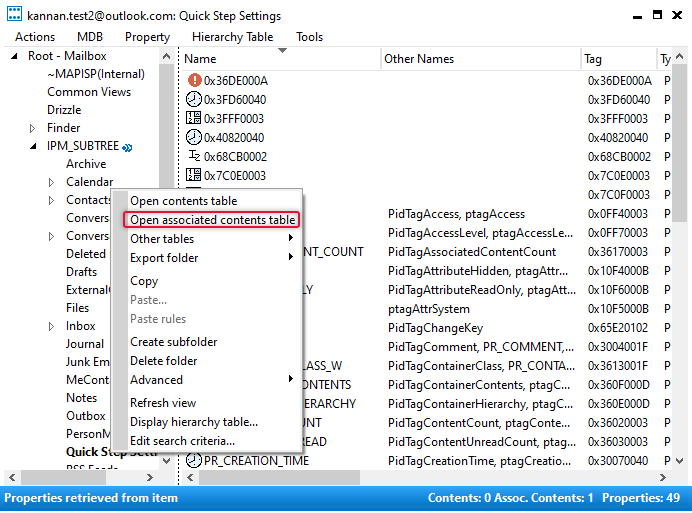
As we exported expand the tree Roo-Mailbox/IPM-SUBTREE/Quick-Step Settings and right-click Quick Step Settings and click “open Associated contents table”.
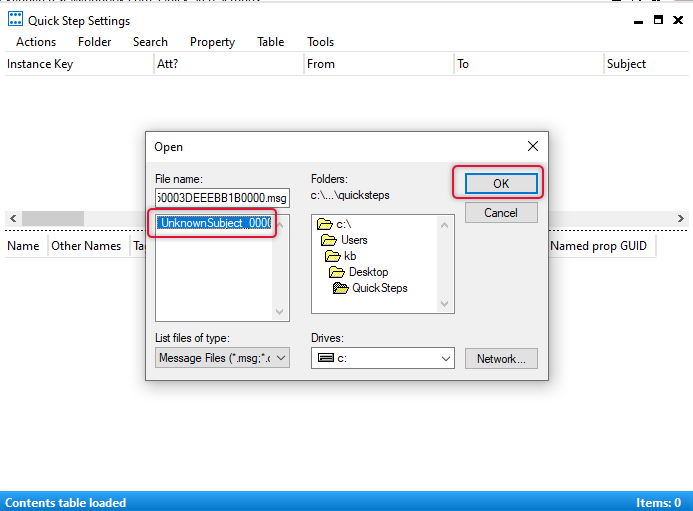
On the Quick-Step Settings window select Folder ⮞ Import ⮞ From MSG… to import from the MSG file that we stored previously.
Point to the folder where the MSG file is available and select the file and click OK.
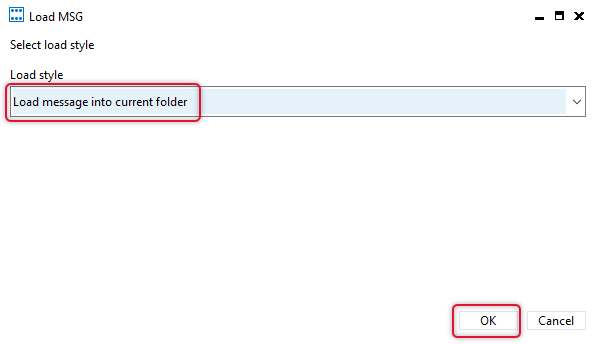
Select Load message into the current folder and click OK.
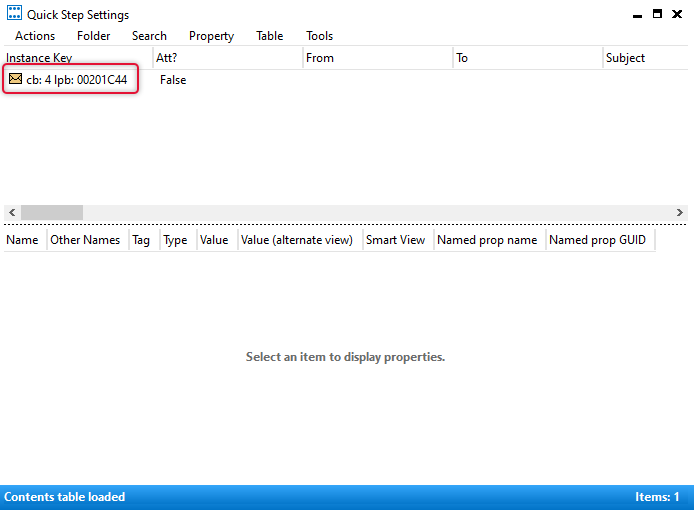
The Quick Steps Settings Folder content will list the quickstep message that we have import. If there are multiple files import them one by one.
The Quick-Step is imported, and it would be listed on the New email account profile as below.

Conclusion:
In this article, we have gone through the steps required to import Quick-Step that is on the email account in one profile to another or import to a new computer using the MFCMAPI tool.
It is immense pleasure for me to receive feedback from you all and I reply to it as soon as possible. I recommend you to take a look at a similar Article How to Import Outlook Categories. Thank you and see you on a different article.

Preface
How can we get the categories from an old profile to a new profile or an old computer to a new computer? I had recently intervened in a difficult situation for our CEO categories missing on his Exchange Server mailbox. We all know that the categories are stored within the mailbox, but for this user, because of a corrupt database and mailbox missing on the database the mailbox had to be created on the new database, and emails are moved from an old DB and his OST file. When our CEO started the outlook and started working, he found his categories were missing and he contacted me to get them restored. I went to his PC and opened the old profile and did the following to Import outlook categories.
Open Outlook on your old profile or your old PC and click on the notes icon at the quick launch section.
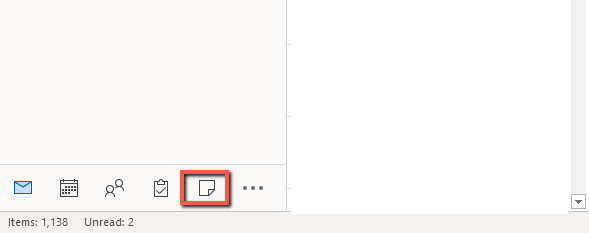
From the Ribbon menu click New note.
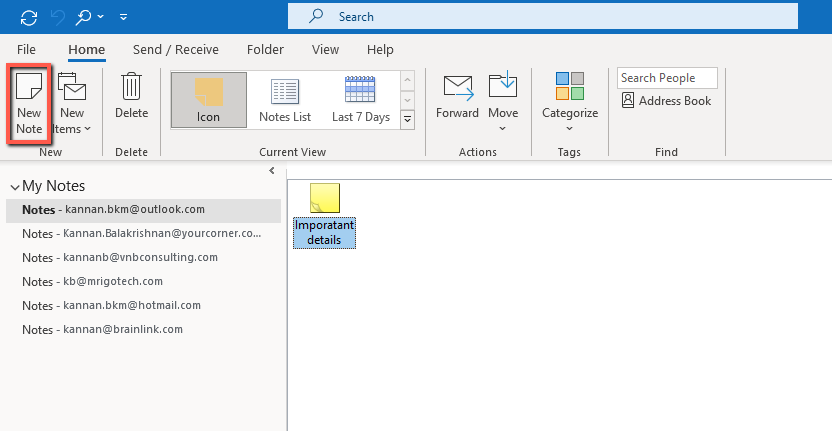
Create a New note called categories
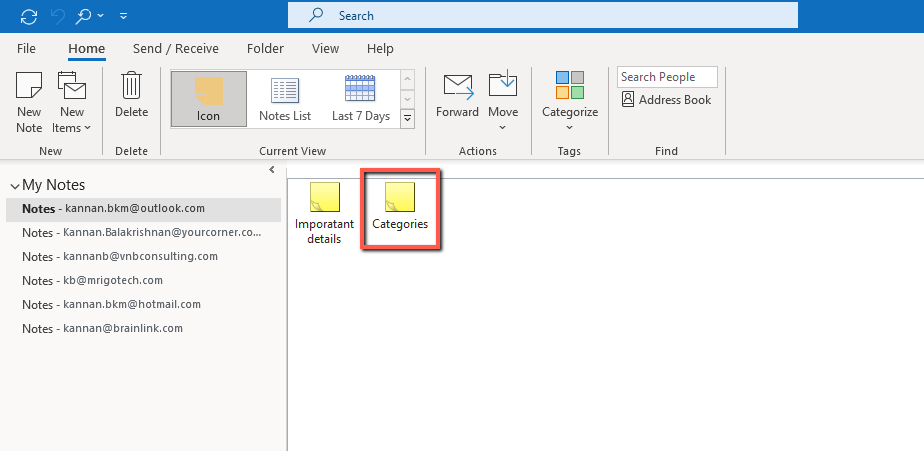
Right-click the Categories icon and click on categories and All categories
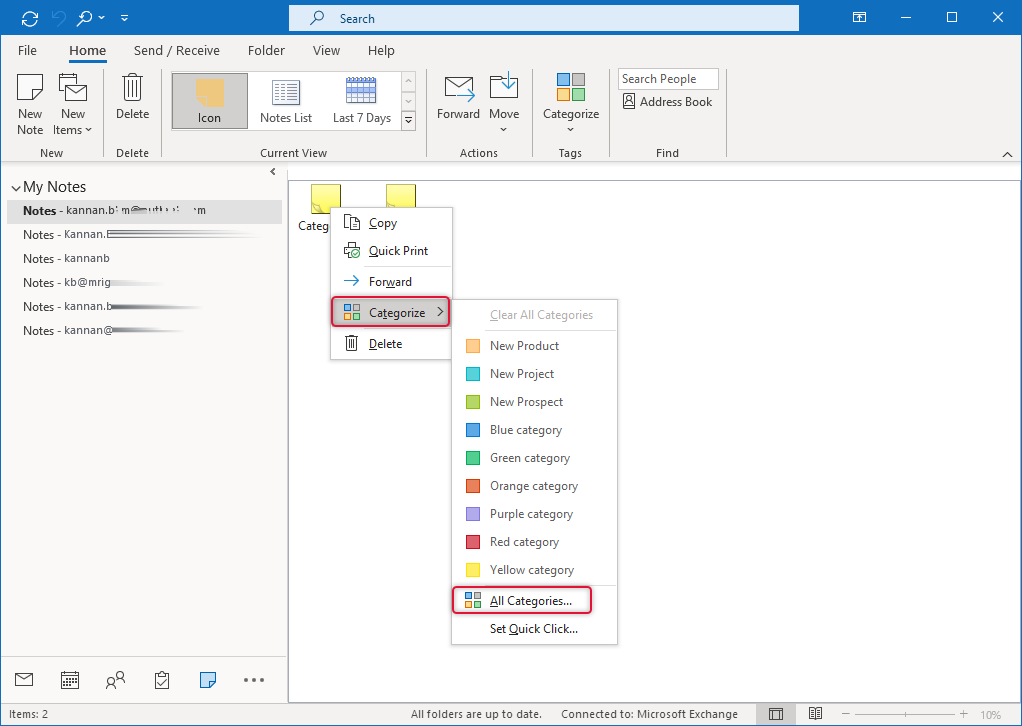
Select the categories you want to import to the new profile.
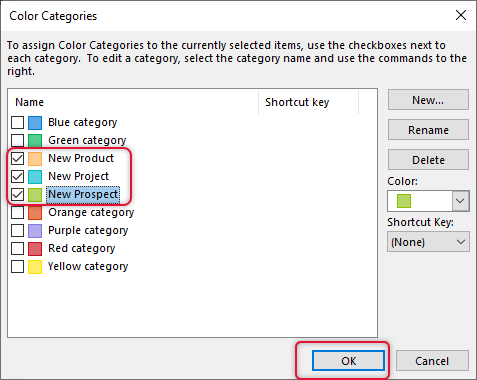
Select the Categories icon and from the file menu, click save as and save as msg extension file.
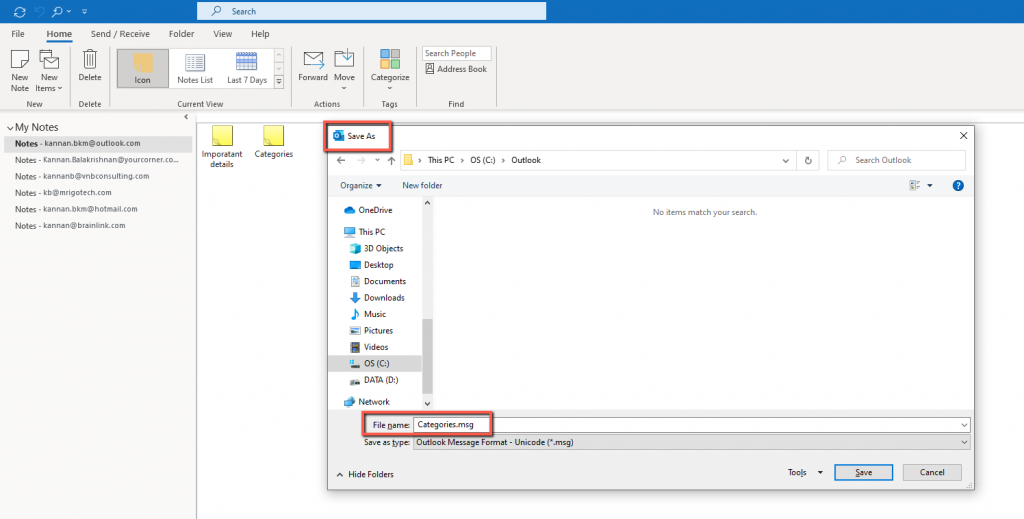
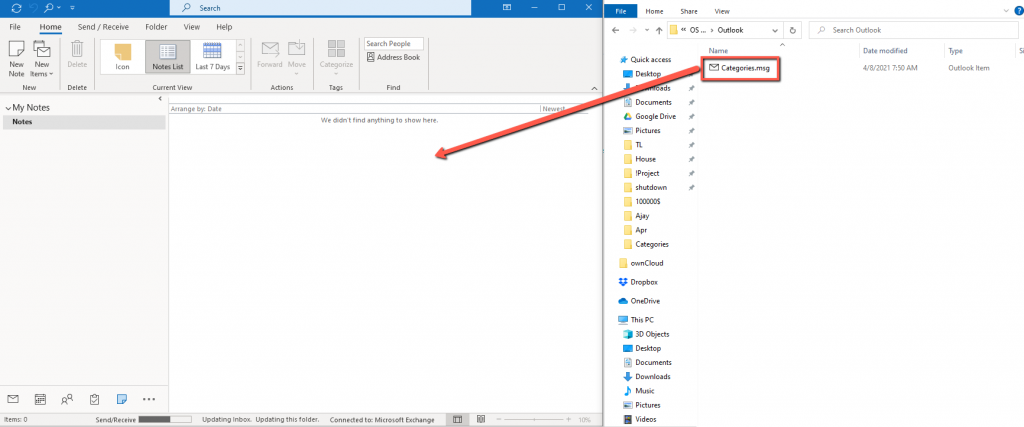
We have saved the categories list as a msg file, now launch the new profile if it is in new PC take the file to new PC and launch the Outlook App. On the new profile go to Notes and drag the categories.msg file saved previously to the Notes pane.
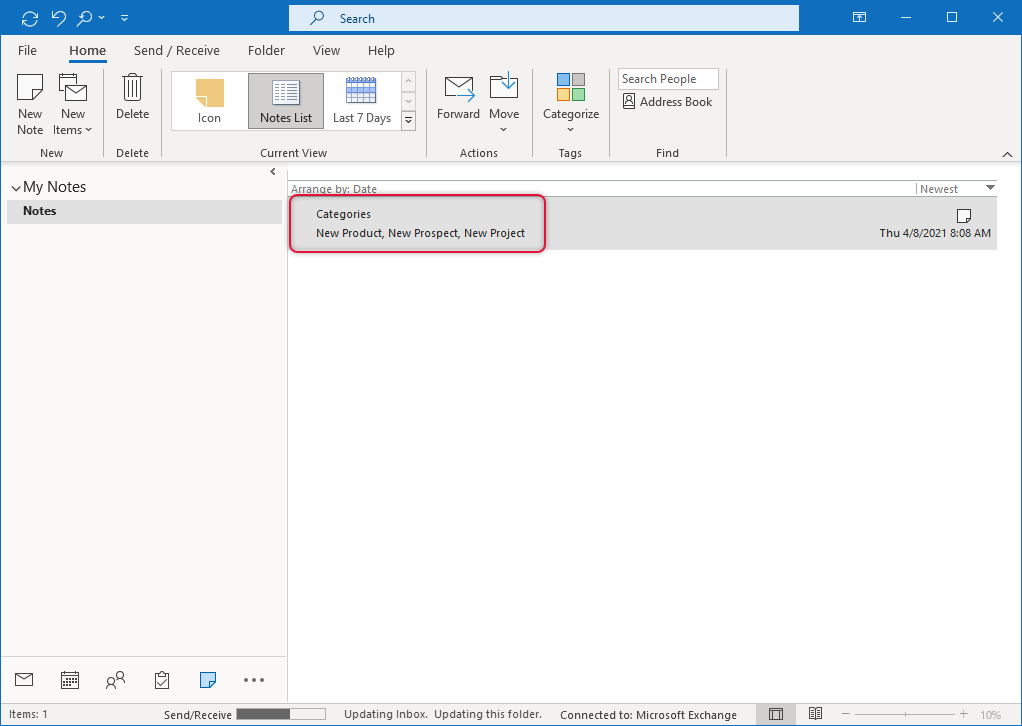
Now you would see the categories note dragged and the categories that you have selected previously showed on the bottom of the note.
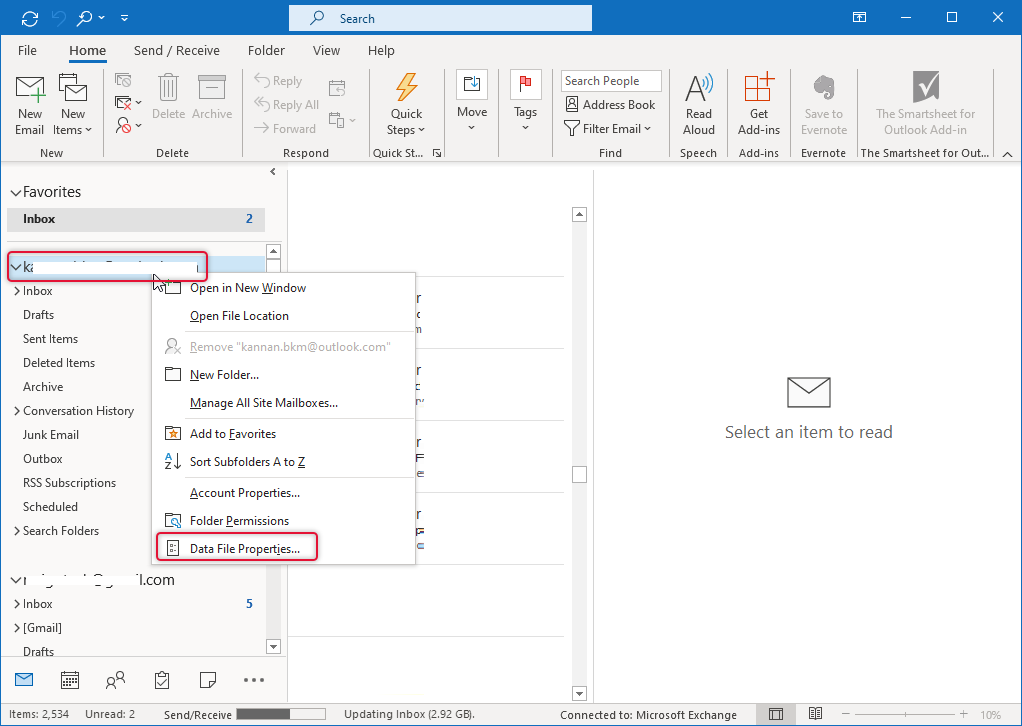
Right-click the top of the data file and select Data File Properties.
On the properties, window click “Upgrade to Colour Categories” and click OK
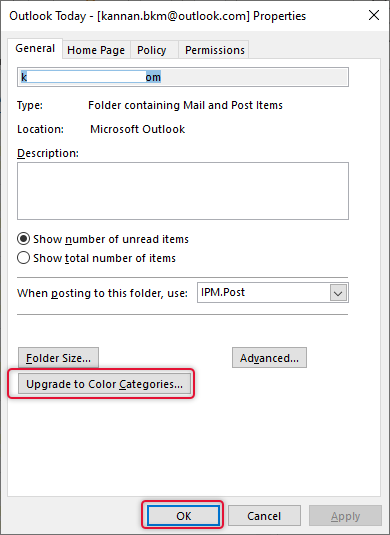
Click Yes to pop up asking for confirmation.

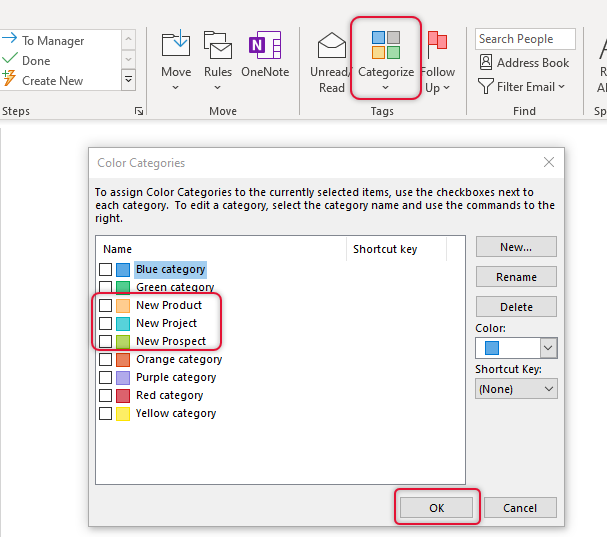
Now if you go to Categorize, you would see the imported categories in the list.
Conclusion
In this article, we saw how to import Outlook Categories from the old profile to the new one. I’m glad to receive your feedback and suggestion, you can send them through the comments box below.