Category Archive : Windows Server 2019

How to Easily Install Microsoft SQL Server 2019

Preface

Microsoft SQL Server 2019 is a new personification of the familiar relational database management system. The latest version of the Transact-SQL system gives a mission-critical performance and lowest vulnerabilities among other RDBMS servers. Microsoft SQL Server is a leading product in the database engine and management arena and used in the various level of need from SOHO environment to high transaction database server such as enterprise requirements. SQL Server 2019 Installation will be covered in this article with SQL server management studio installation access.

There are different editions of the SQL server from free express edition to Enterprise edition. The following list shows the different editions of SQL server 2019.

Express editions

Developer

Web

Standard

Enterprise

Express edition is a free and entry-level usage edition, and Enterprise is most robust in performance and data handling for high-level database transactions.

In this article, we are going to demonstrate the SQL server 2019 evaluation that gives 180 days trial to test and plan for your database needs. The installation of Microsoft SQL Server 2019 is straight forward and can be installed by any junior-level system administrators. We are also going to download and install SQL Server Management tools (SSMS) after the installation Microsoft SQL server database engine.

SQL Server 2019 Installation

You can download Microsoft SQL server 2019 from the link here https://www.microsoft.com/en-us/sql-server/sql-server-downloads#. Before starting the SQL server 2019 installation, make sure the Windows update is up to date, and the windows server is fully patched.

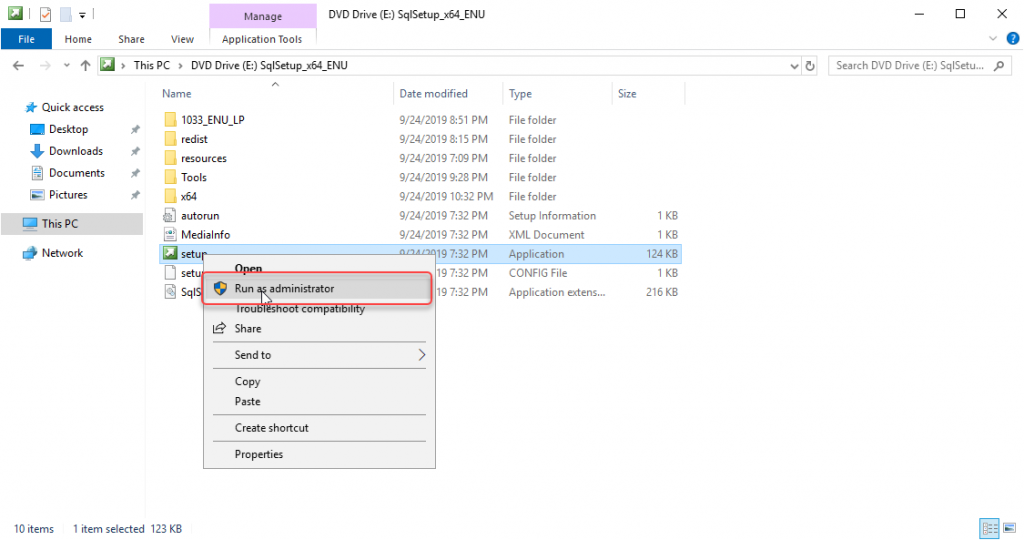
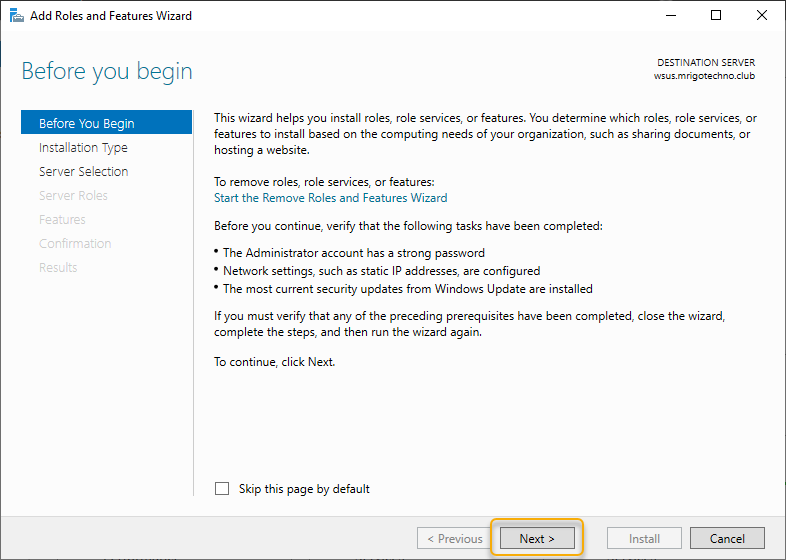
Once download the ISO, mount it as a DVD drive on the server that you are planning to install SQL server 2019. Double click the ISO file on the Windows server will mount the ISO file as a drive. Once the ISO file mounted, you can expand the directory on the windows explorer and right-click the setup executable file and run as administrator to start the installation.

A screenshot of a social media post

Description automatically generated

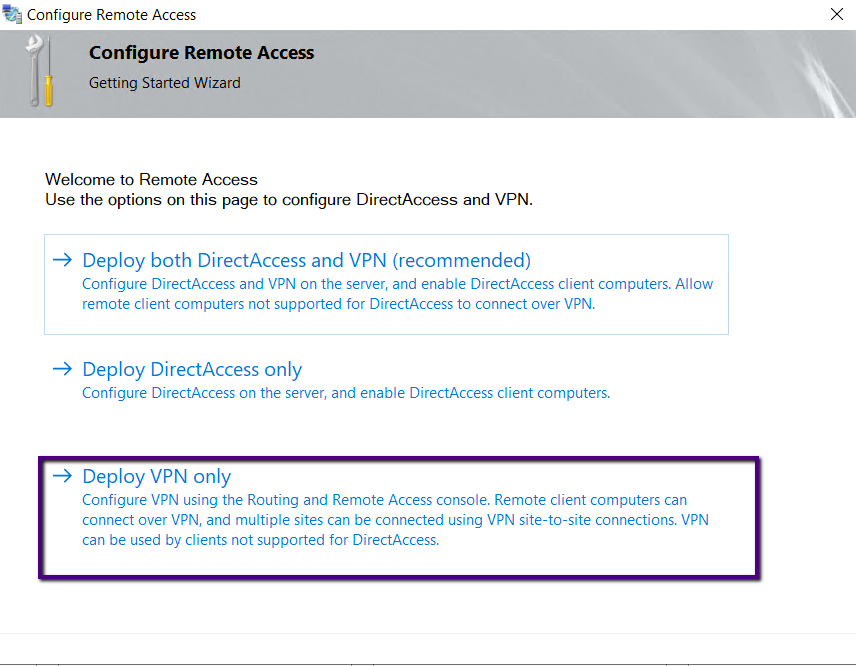
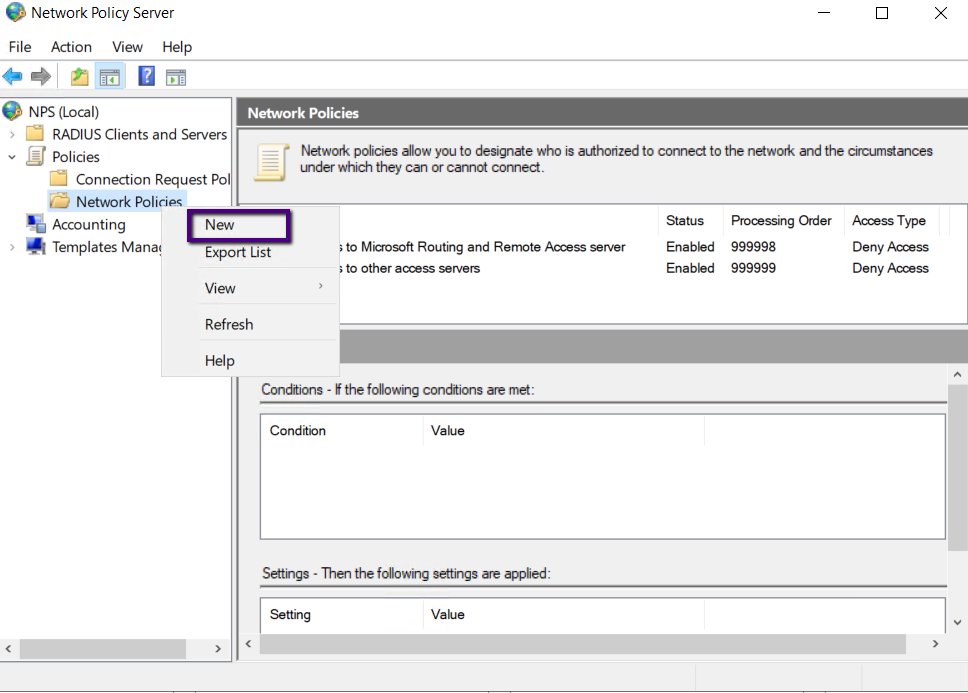
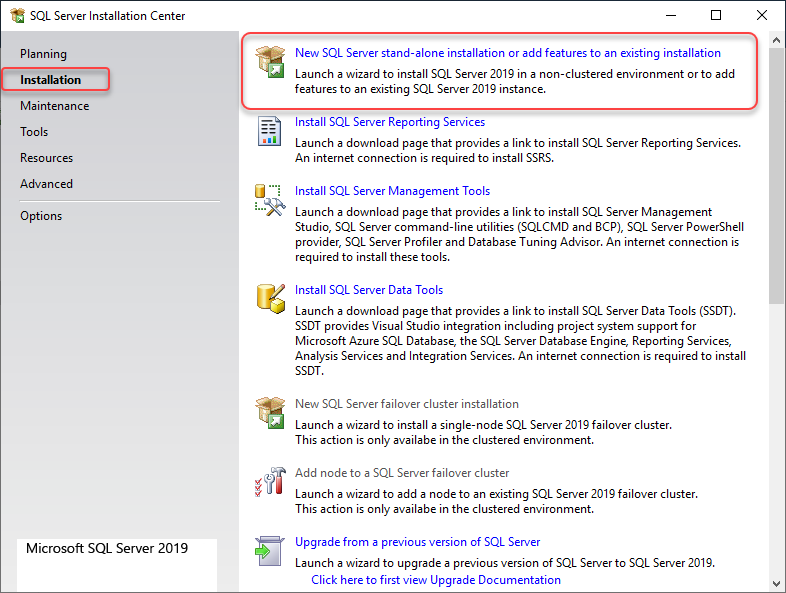
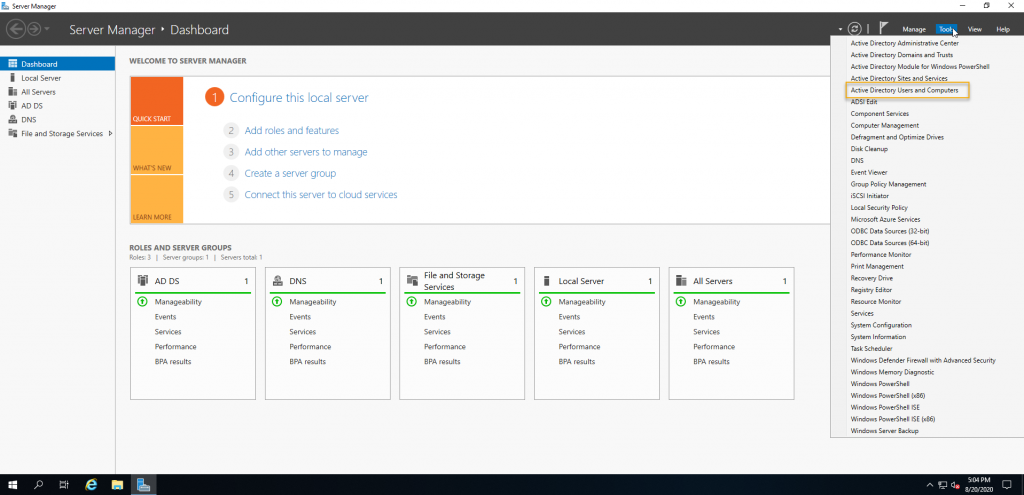
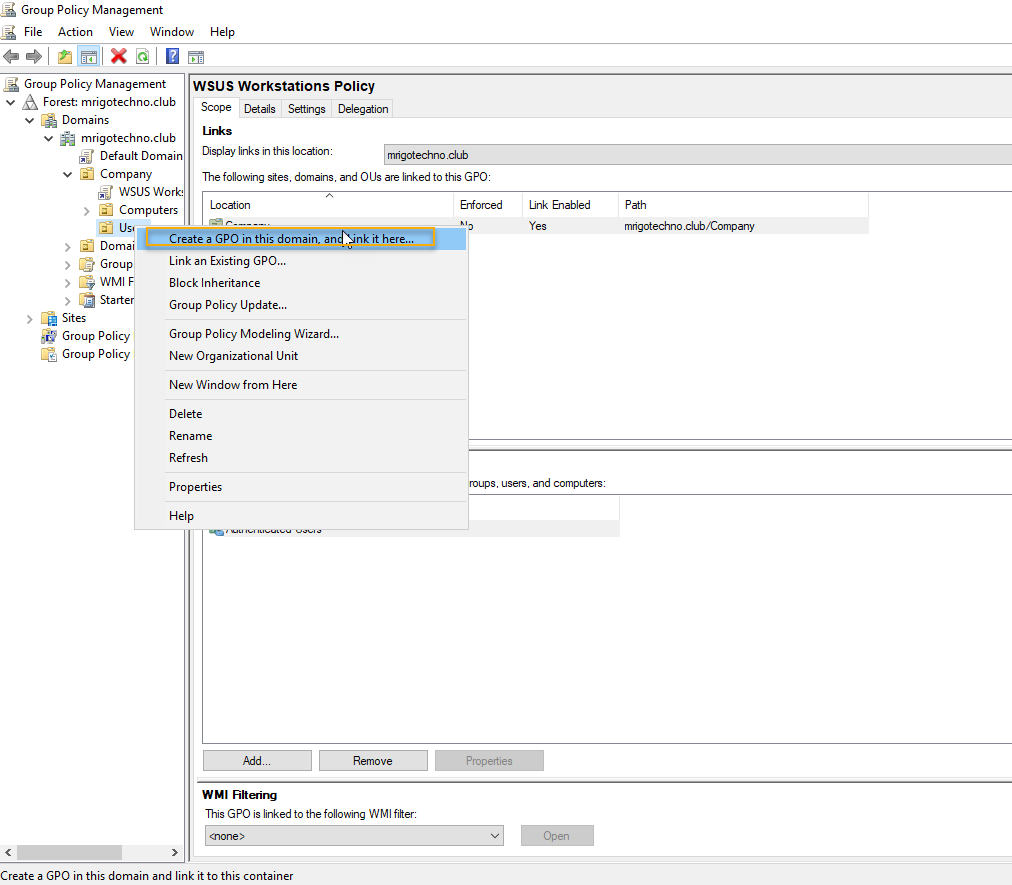
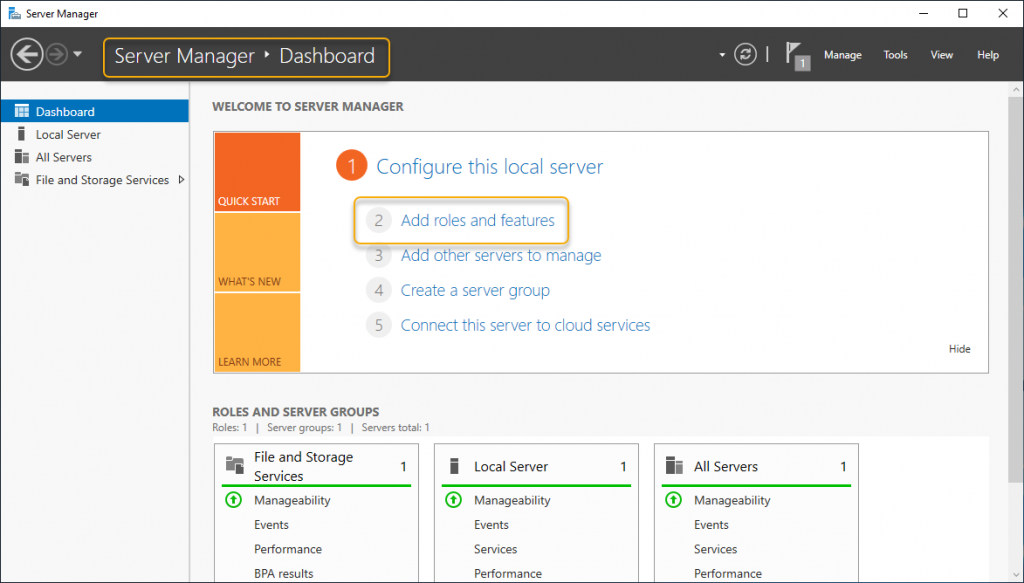
The setup executable will open the SQL Server Installation center, as shown below. On the SQL server installation center, select an installation from the left side navigation and click on the link with the description “New SQL server standalone Installation or add features to an existing installation.” Clicking on the link will start the installation.

A screenshot of a cell phone

Description automatically generated

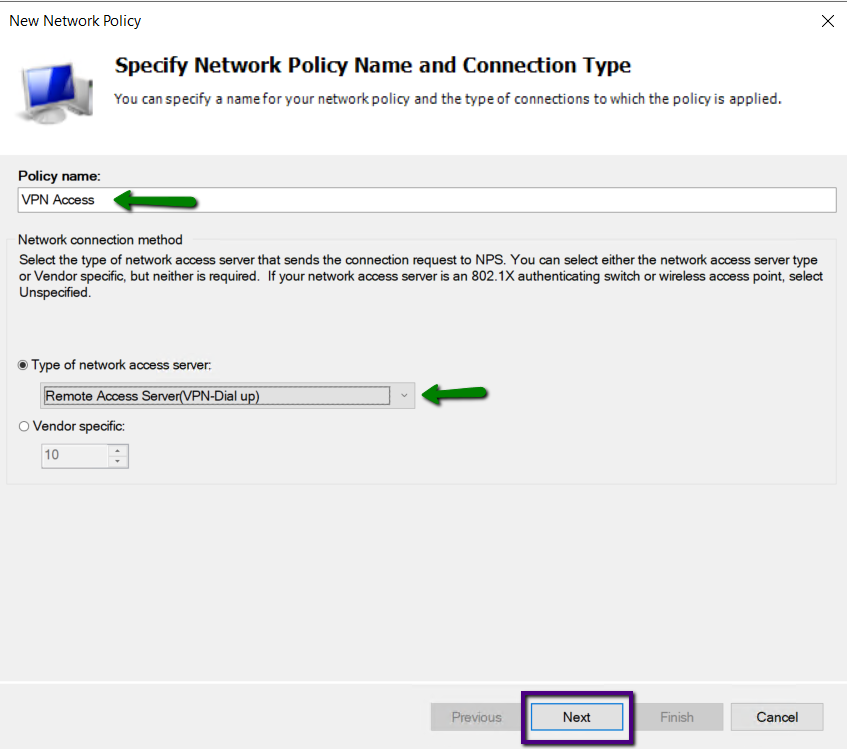
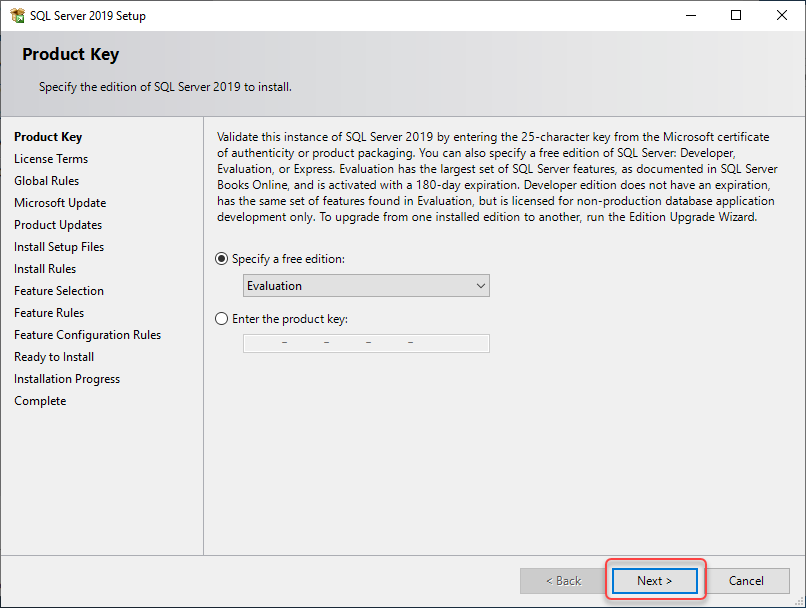
If you have already purchased one of the SQL Server editions, you can enter the product key and continue the installation, or you want to try the SQL server before buying the software, you can select Evaluation and continue with the installation. This is just a demonstration, so I choose Evaluation from the dropdown. Click Next to continue once the proper installation edition is selected.

A screenshot of a social media post

Description automatically generated

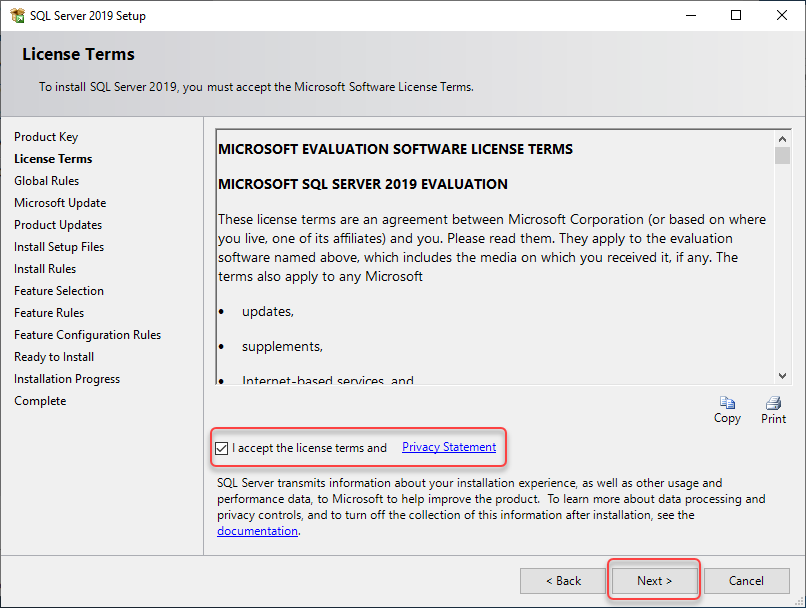
The next page is agreeing to license terms, and you need to go through the license terms before continuing the installation. Once you have gone through and agree to the license terms, select the “I accept license terms and privacy statement” checkbox and click Next.

A screenshot of a cell phone

Description automatically generated

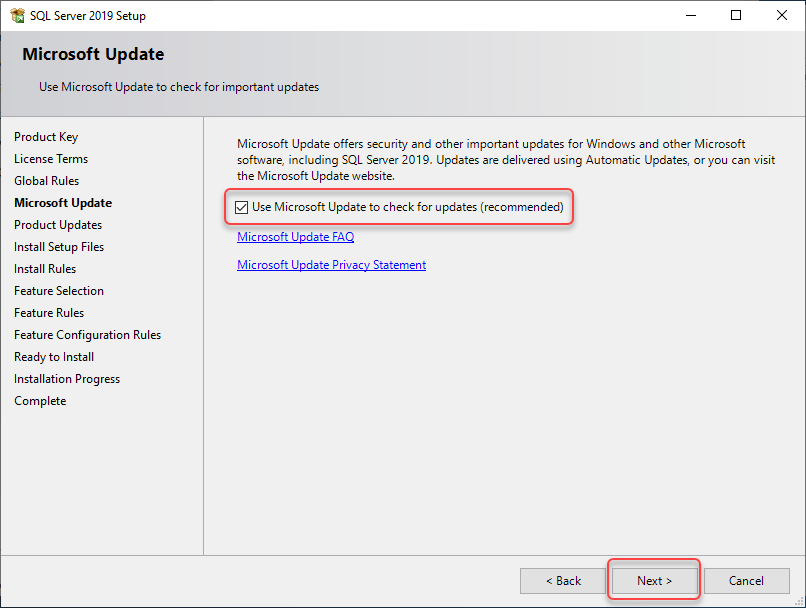
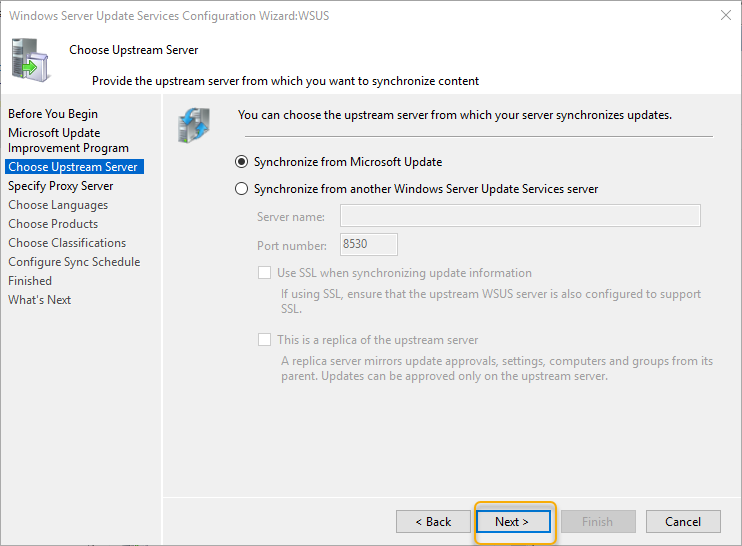
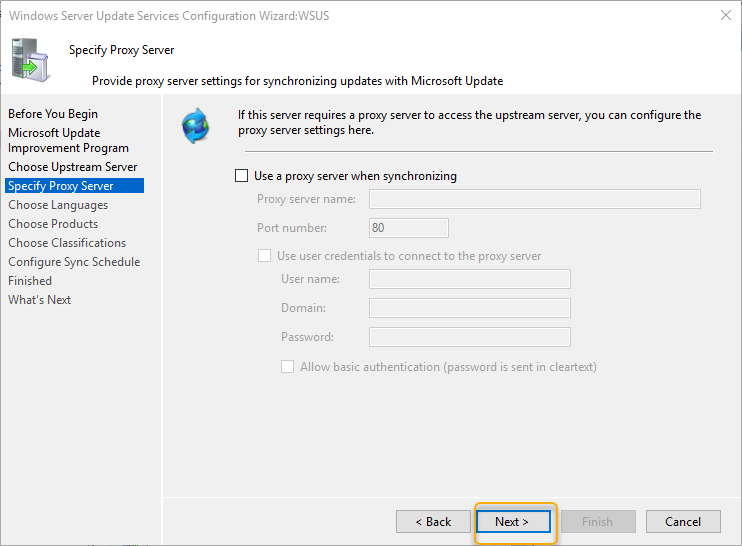
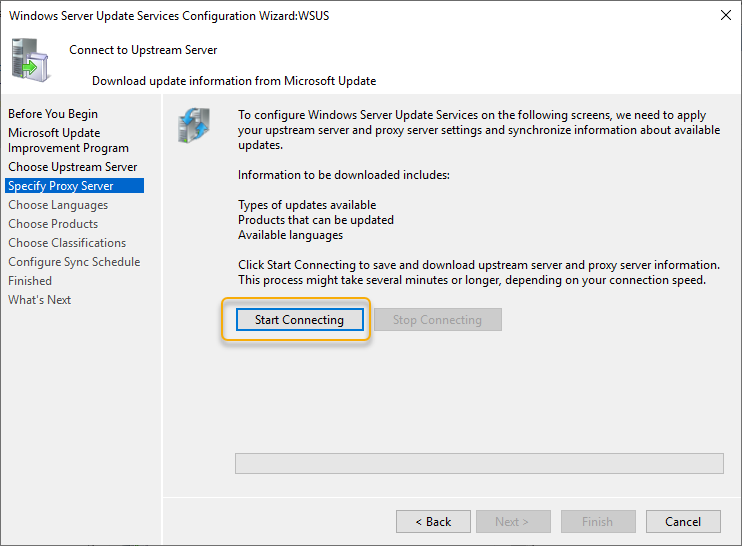
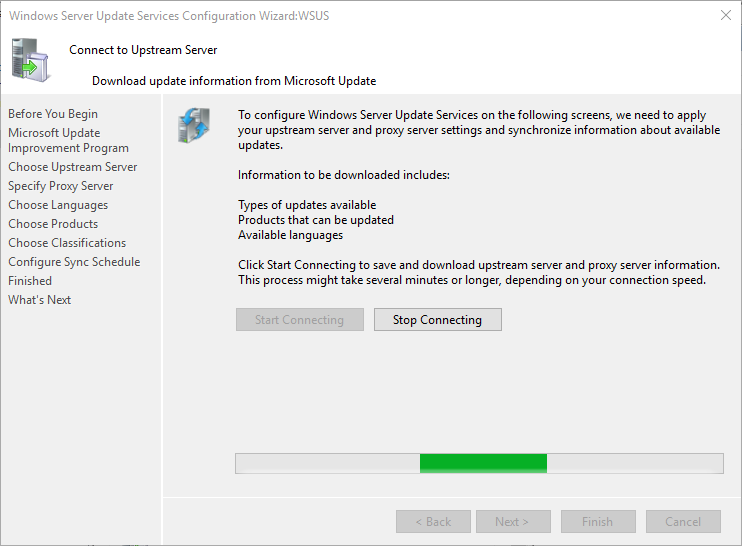
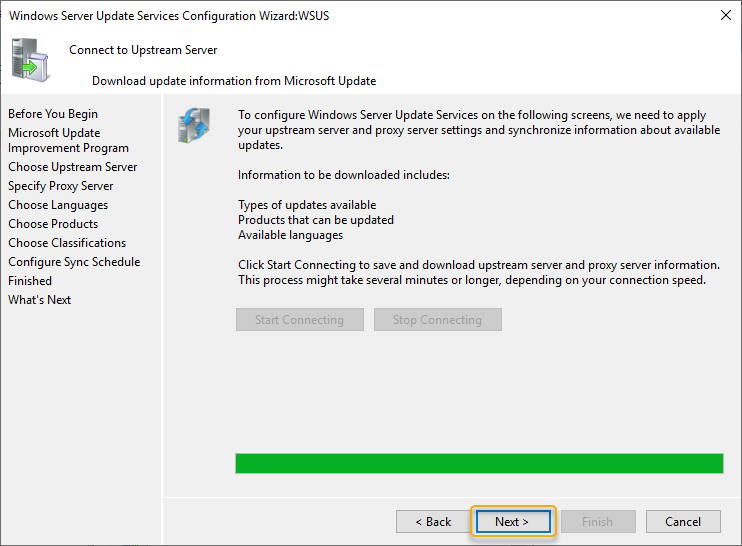
It is recommended to check for Microsoft updates before starting the installation, check the box neat to “Use Microsoft Update to check for updates” and click Next.

A screenshot of a cell phone

Description automatically generated

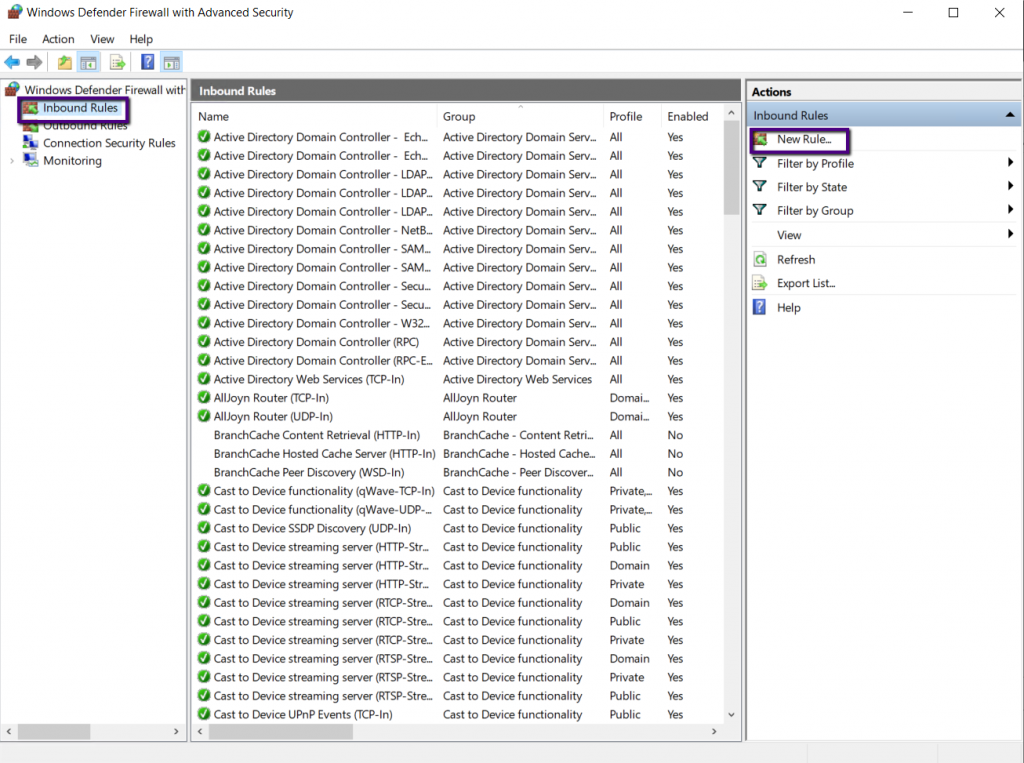
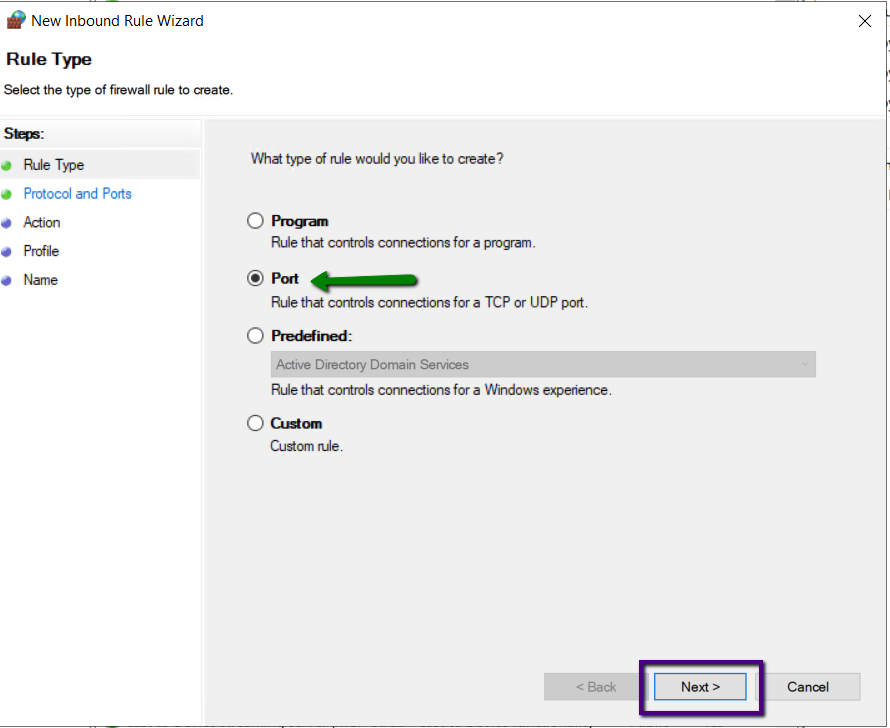
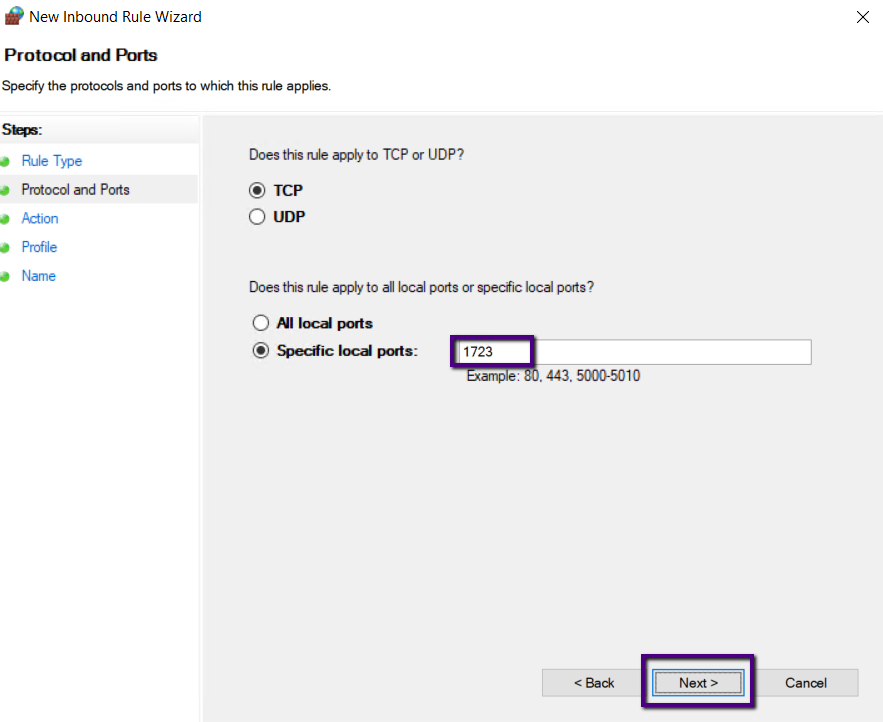
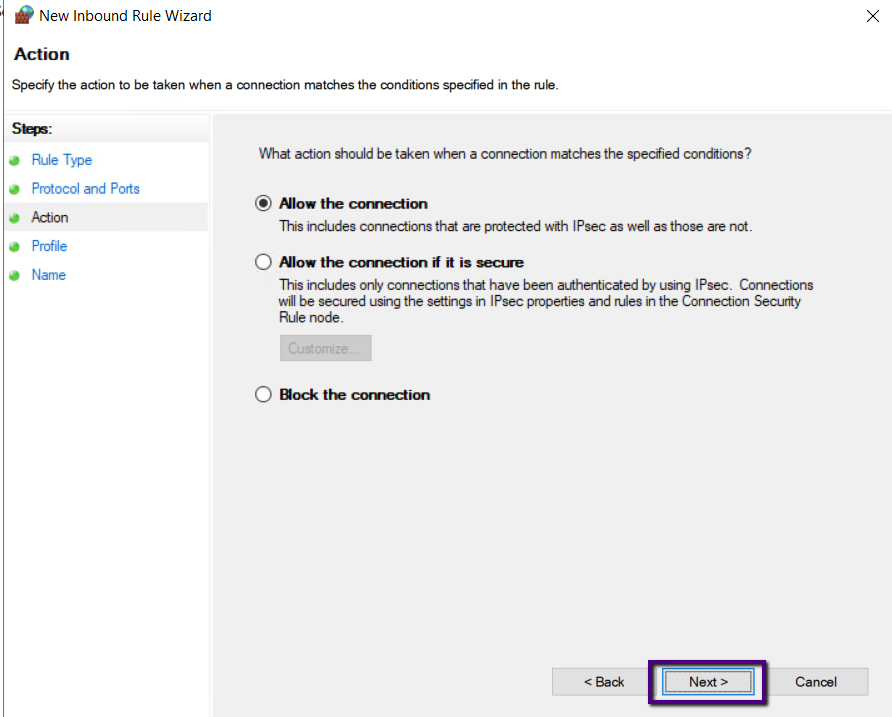
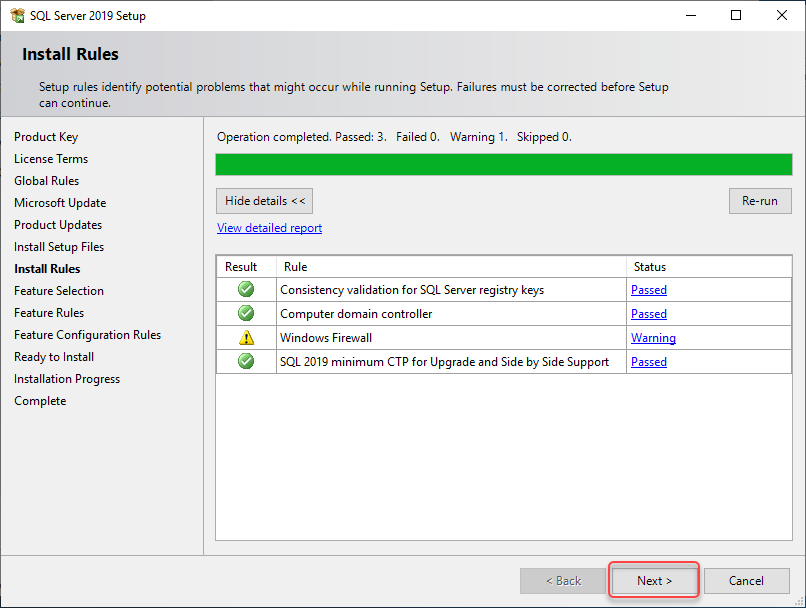
On the next screen, Install Rules would check various problems. In this demonstration, Install rules warned about the 1433 inbound rule on the Windows firewall to open for SQL server accessed from other servers or client computers. Click Next to continue the installation.

A screenshot of a cell phone

Description automatically generated

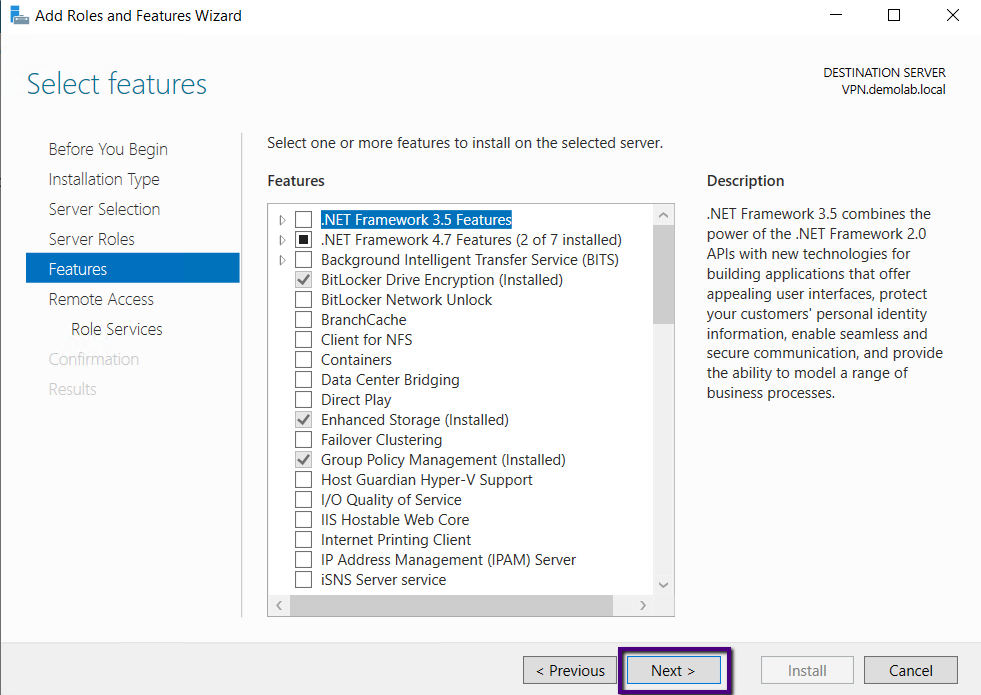
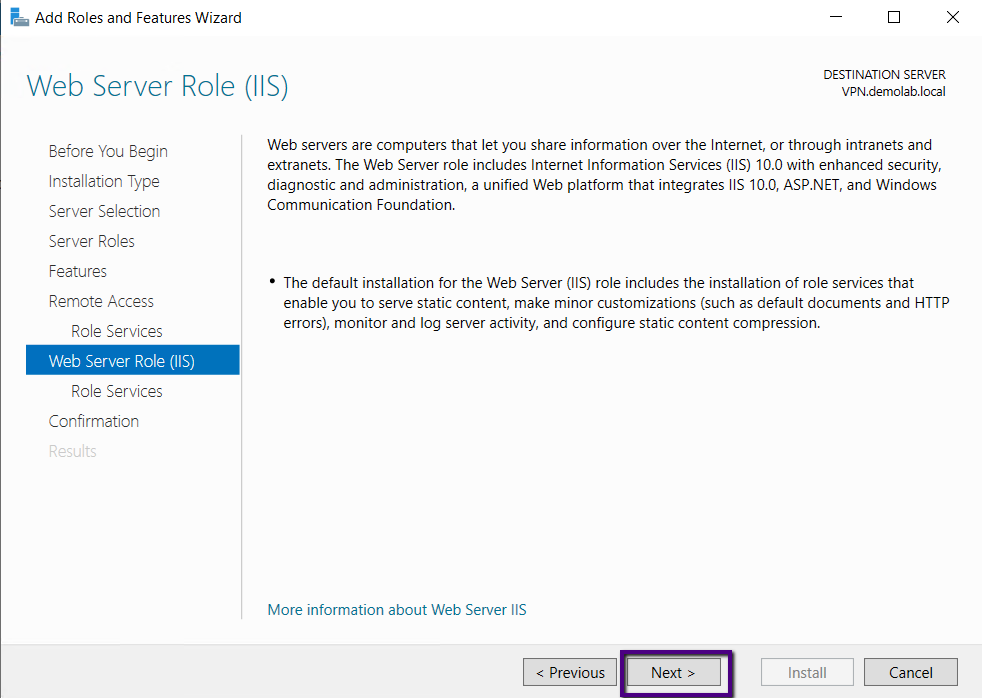
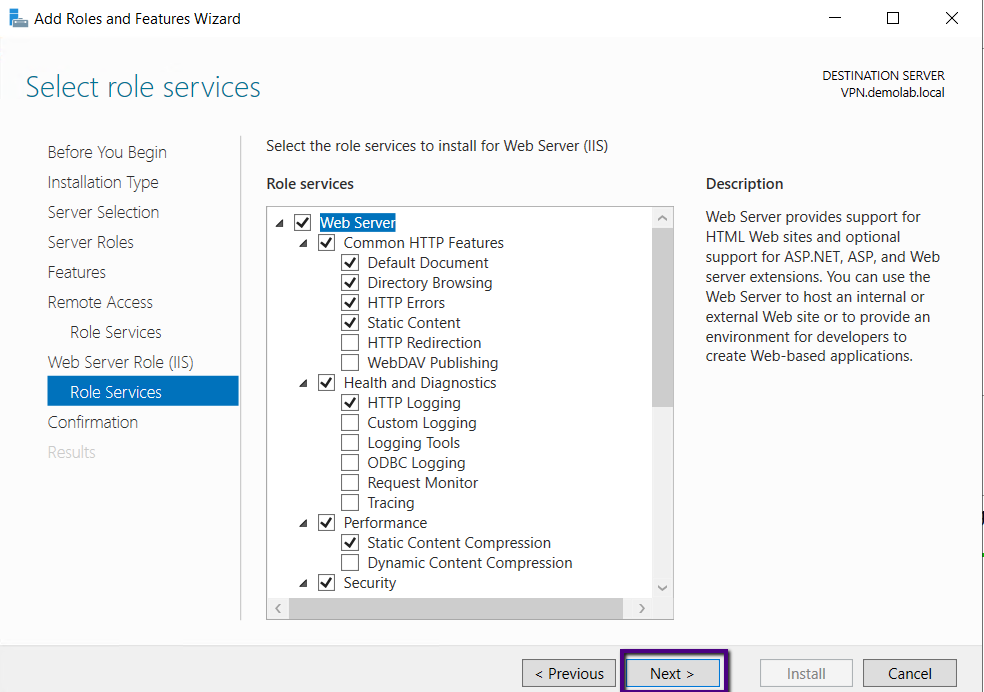
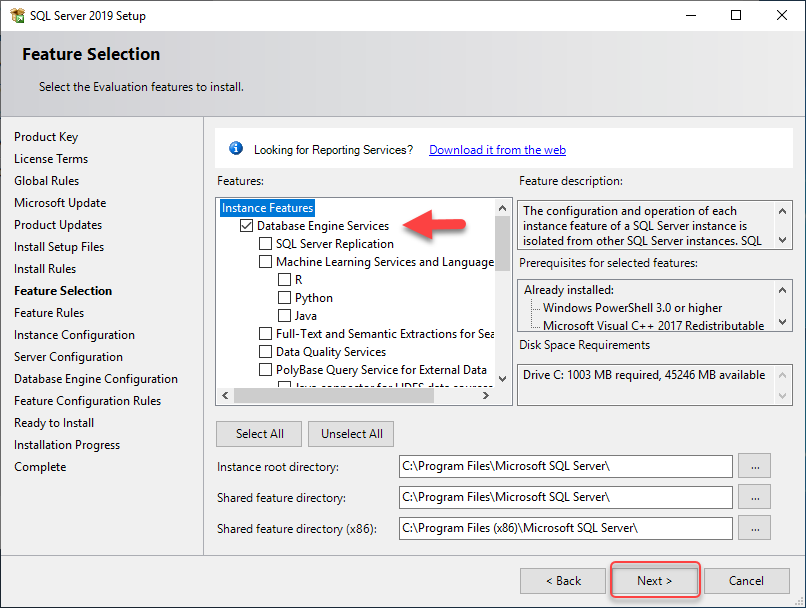
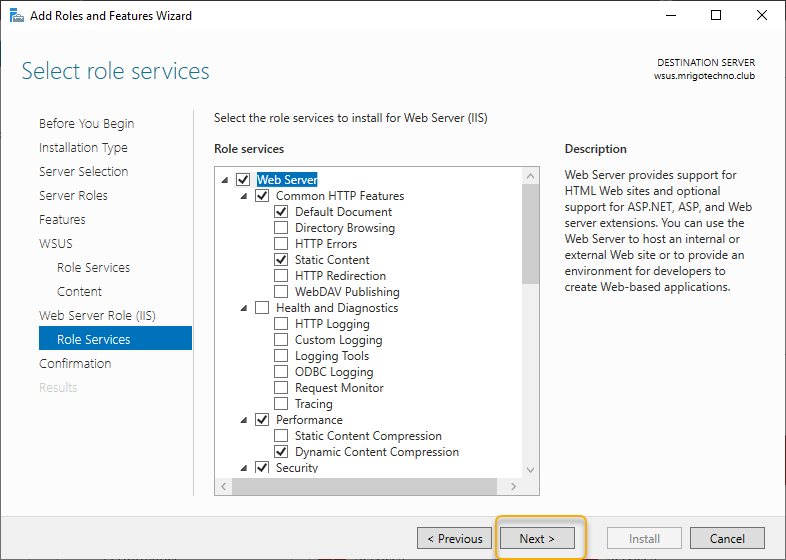
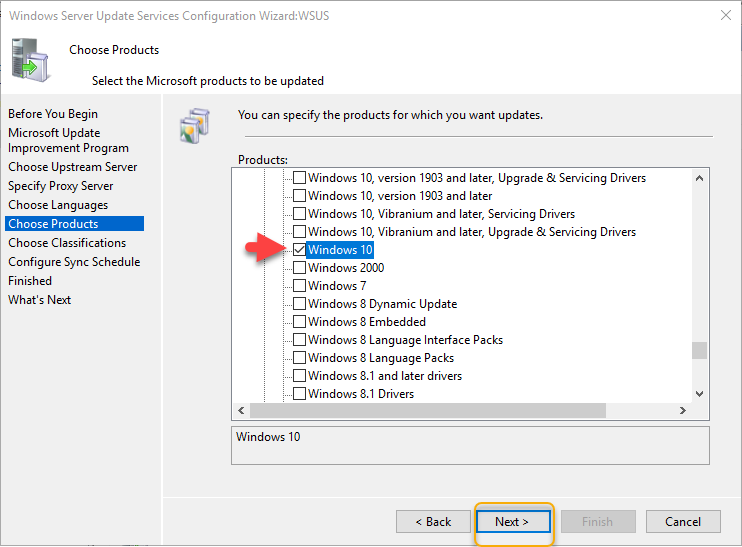
On the Features selection of setup wizard select the database engine feature and the installation path, you can also select the other features as you need. For this demonstration, we are only focused on the installation of a database engine, select the database engine feature, and click Next.

A screenshot of a social media post

Description automatically generated

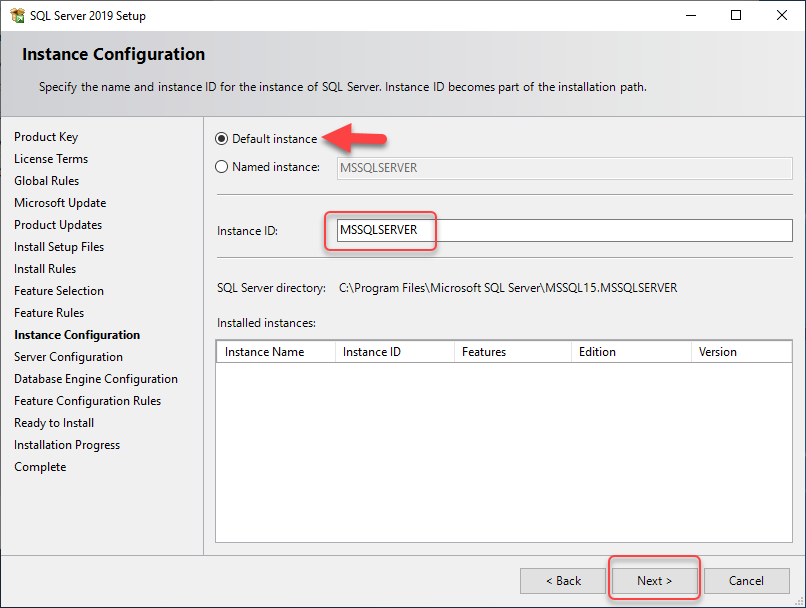
On the Instance configuration, we either go with default instance, or you can name the instance as you want. The default instance name is MSSQLSERVER, to make administration simple, we are going to select the default instance and click Next to continue.

A screenshot of a social media post

Description automatically generated

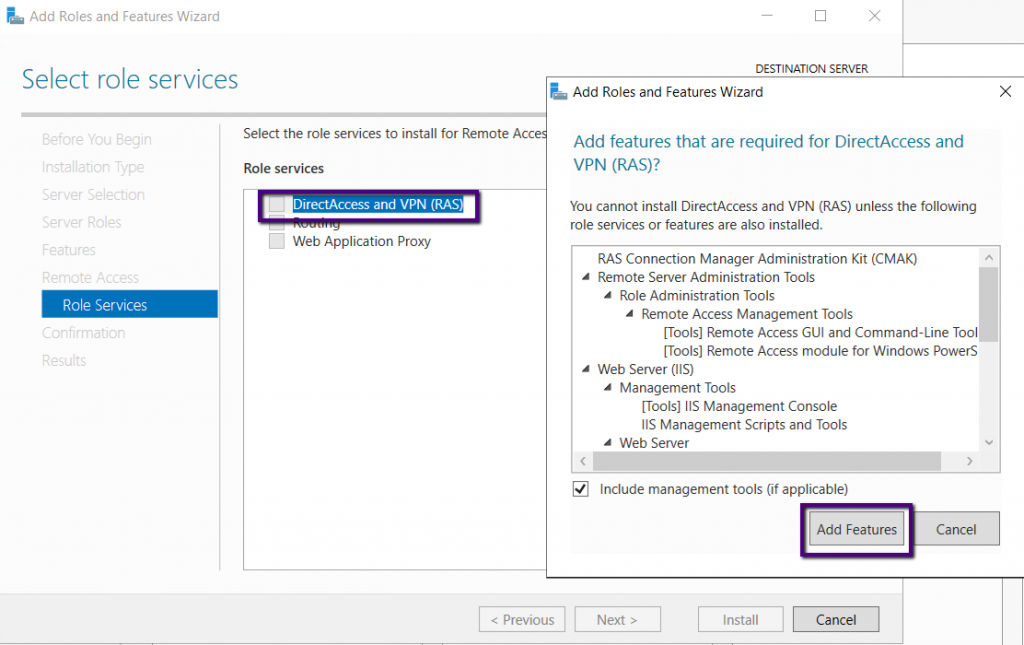
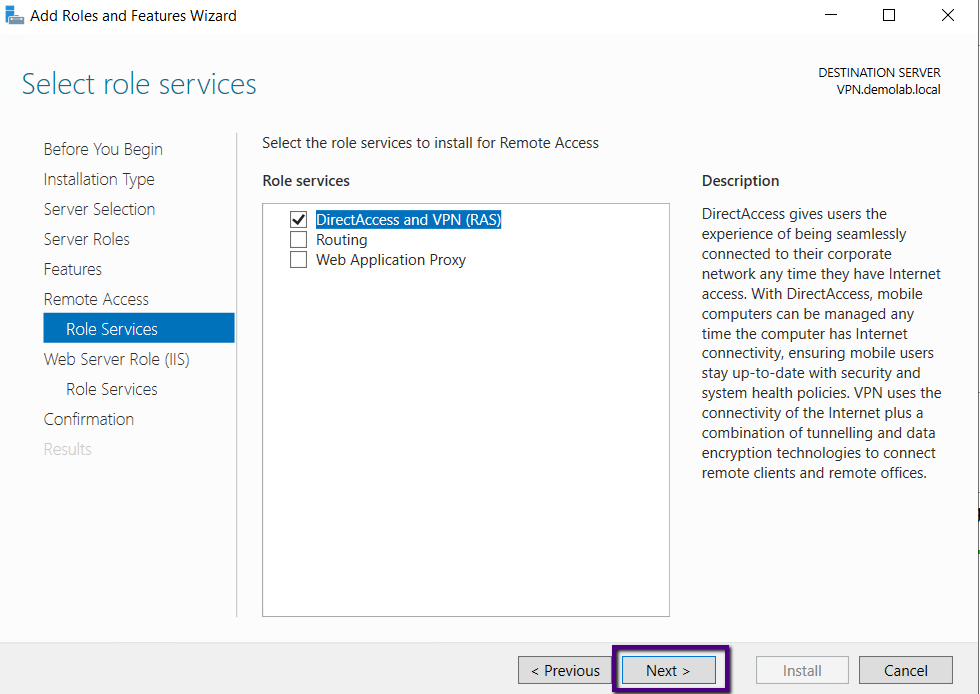
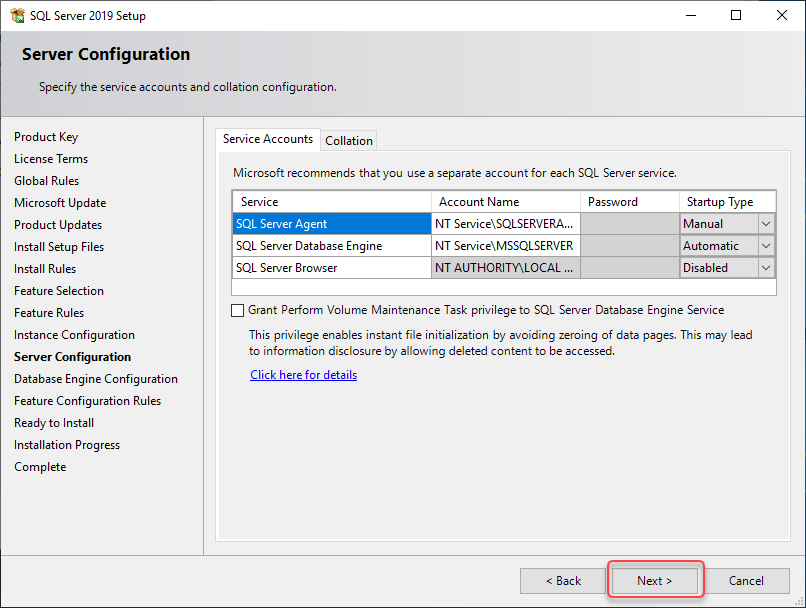
Service accounts are utilized to make the SQL server database engine services more secure. You must create service access on Active Directory if you are in a domain environment and provide that service account here with the credentials. We leave the service account no utilized and click Next to continue.

Step by Step SQL Server 2019 Installation

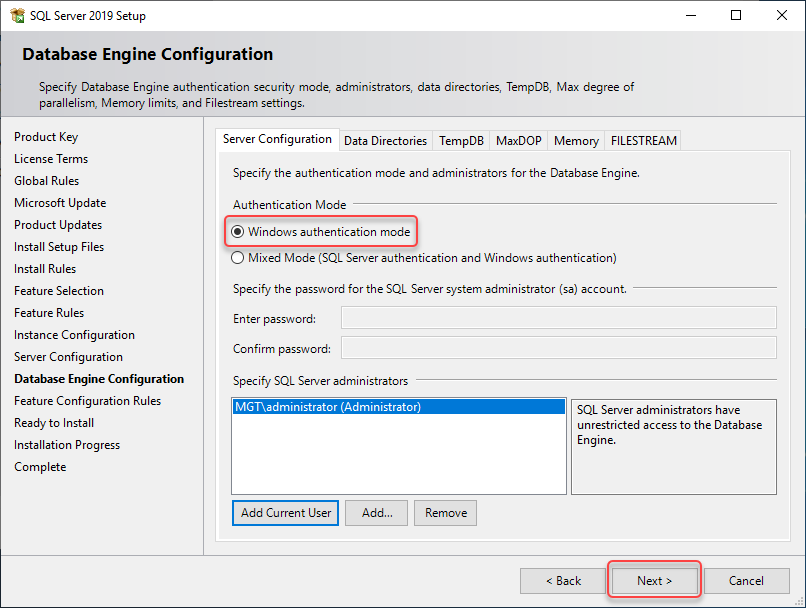
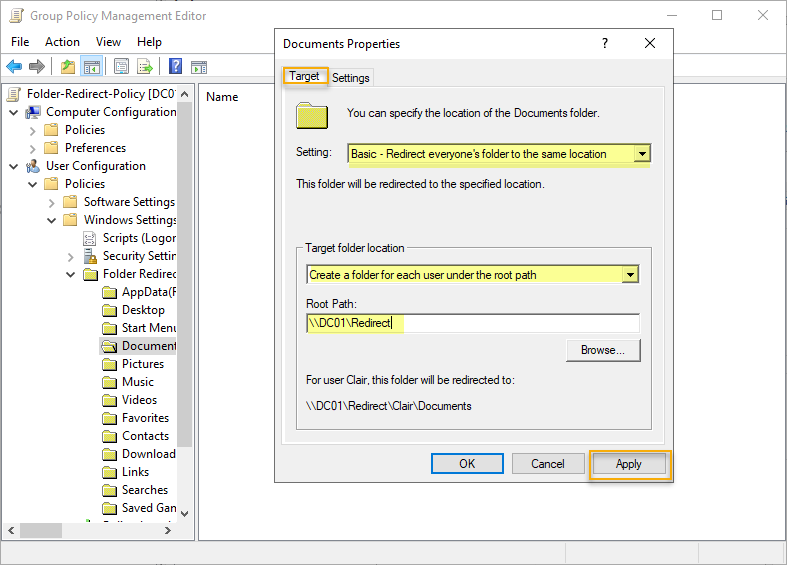
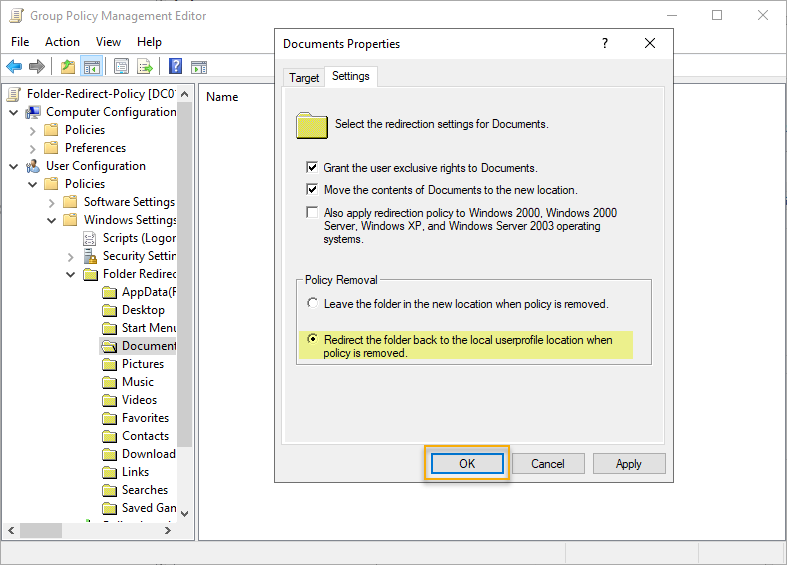
On the database engine configuration, you can select an access-mode which is suitable for your need. There are two authentication modes on the SQL server. The Windows authentication mode is allowed authentication happens only with the Windows credentials, for example, Active Directory environment. In contrast, Mixed Mode will give you the ability to authenticate using Windows authentication as well as the SQL server authentication. You can change the authentication mode on the SQL server properties after the SQL server installation. Add current logged in user as a SQL server administrator and select relevant mode and click Next to continue, in this demonstration we stick with Windows Authentication.

Step by Step SQL Server 2019 Installation

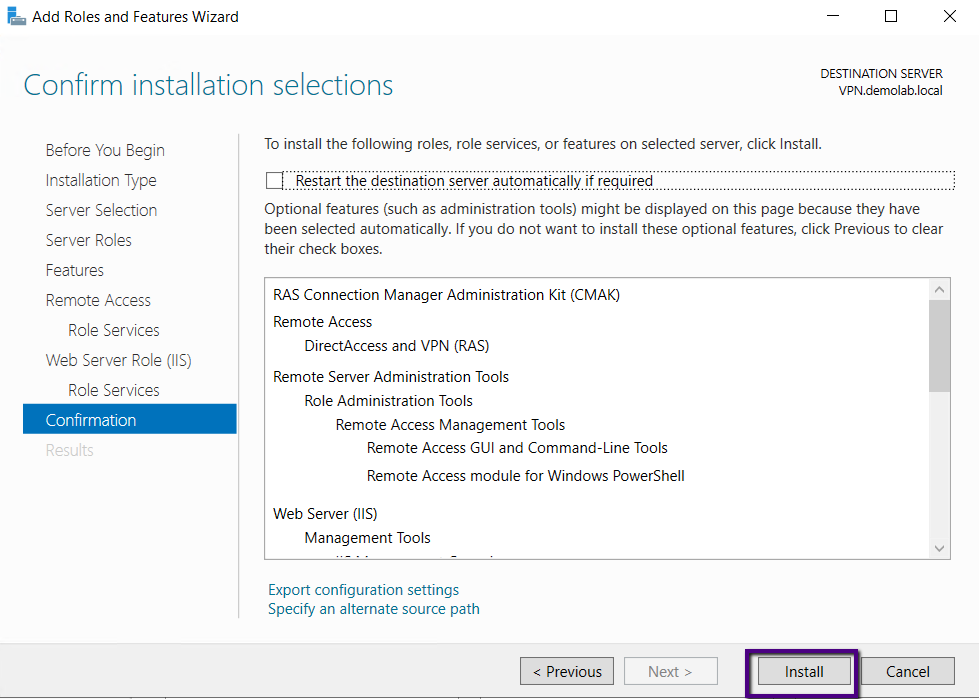
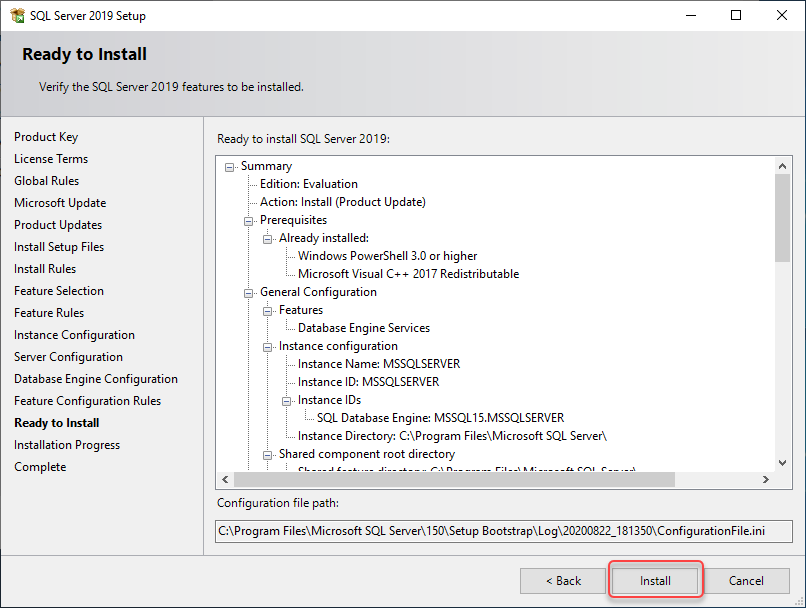
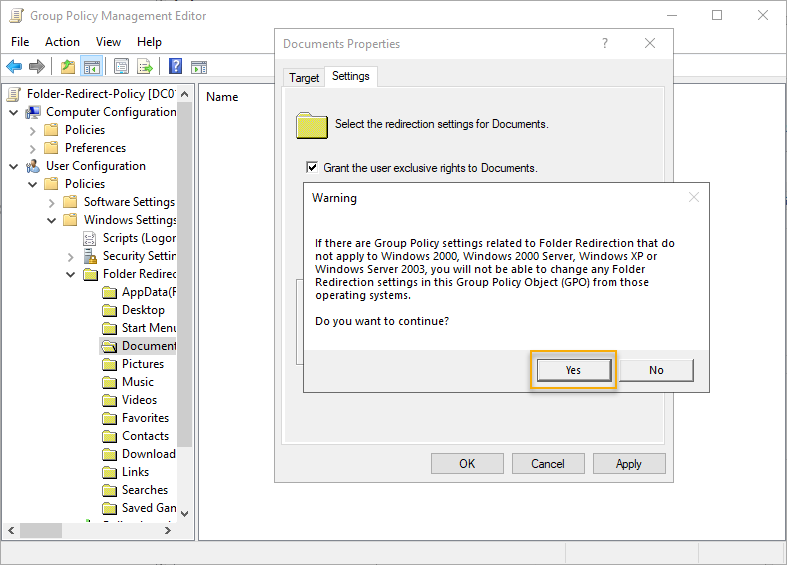
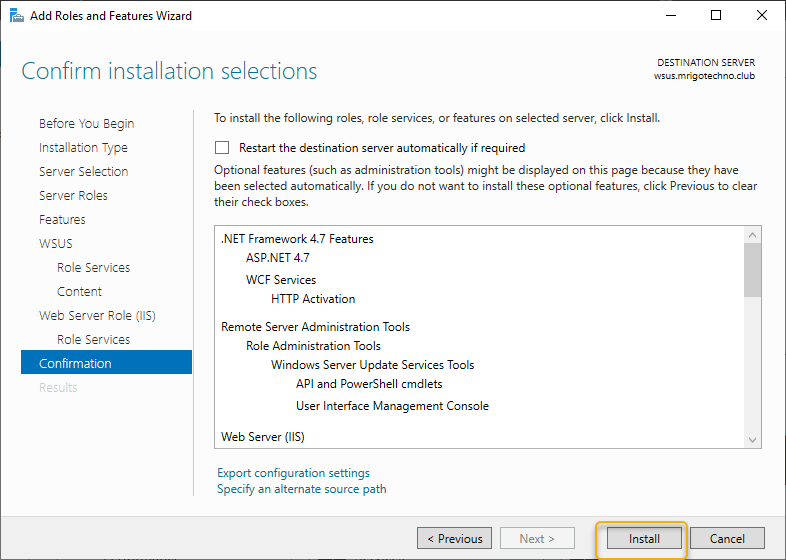
Verify the features selected for installation, if you are not happy with the features you may always go back and change the selected by adding or removing features and come back here and click install to start the installation.

Step by Step SQL Server 2019 Installation

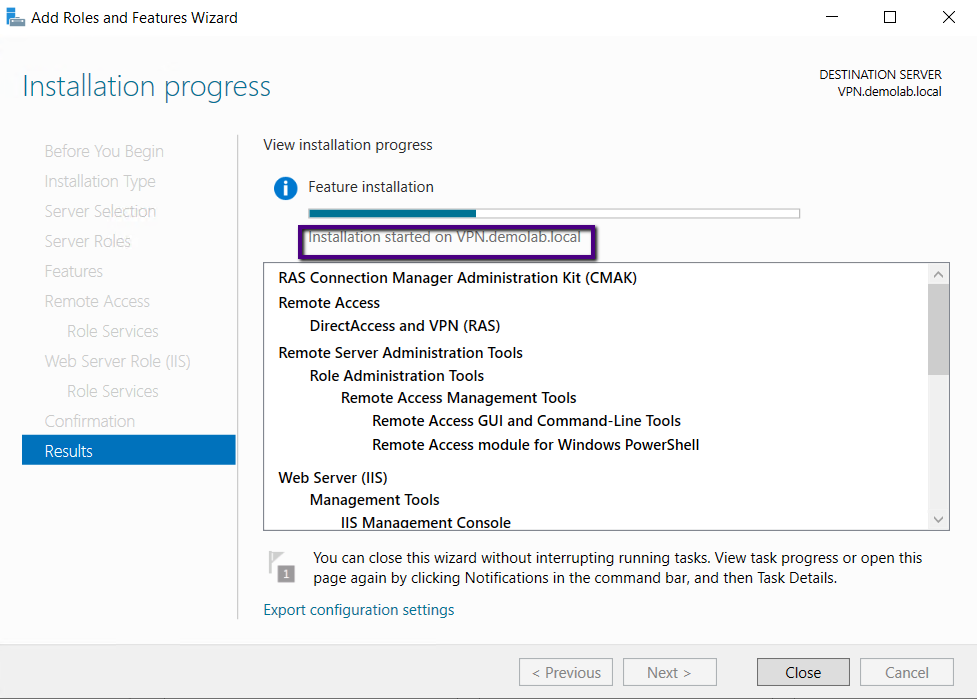
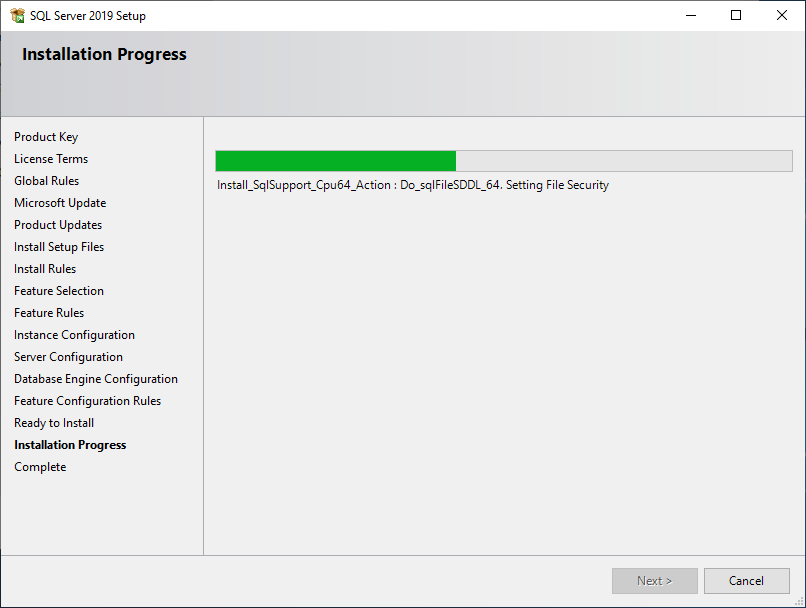
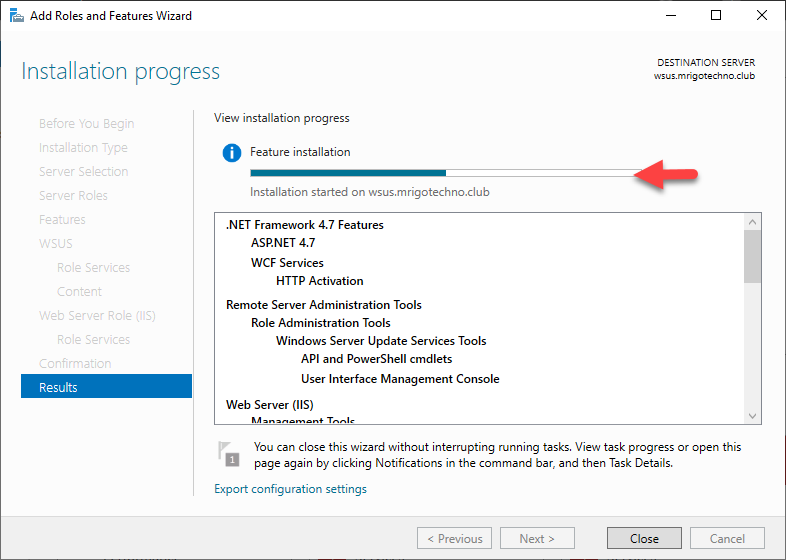
The installation progress screen helps you check the progress of the installation, and you should wait until the installation shows 100% completed.

Step by Step SQL Server 2019 Installation

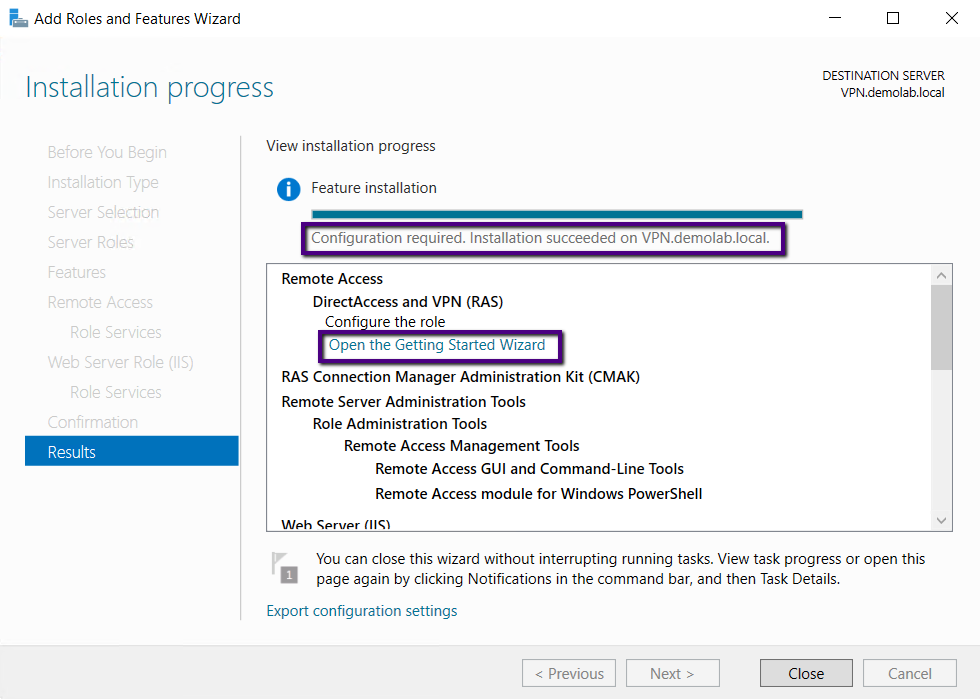
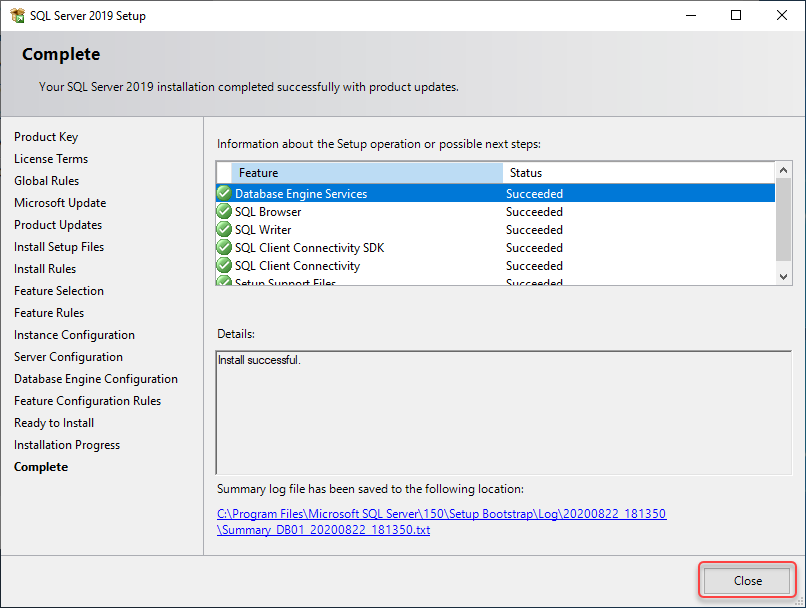
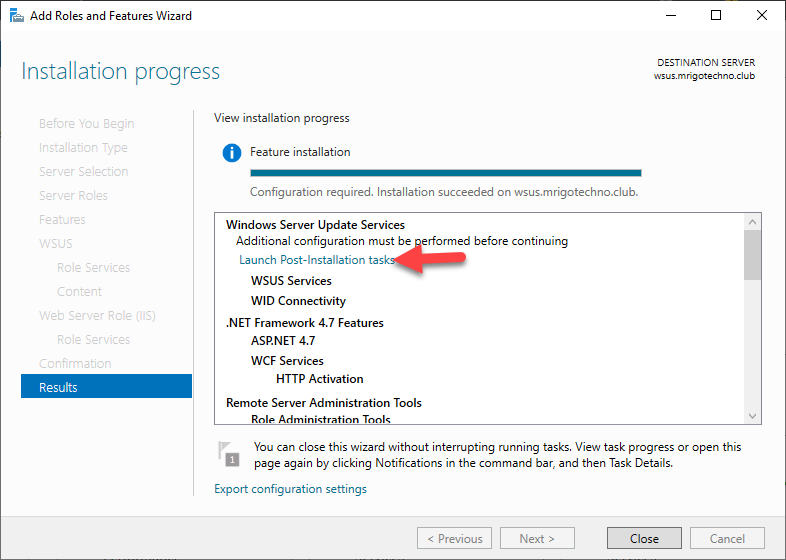
Once the status of features installation complete, you can close out the installation wizard.

Step by Step SQL Server 2019 Installation

Install SQL Server Management Tools

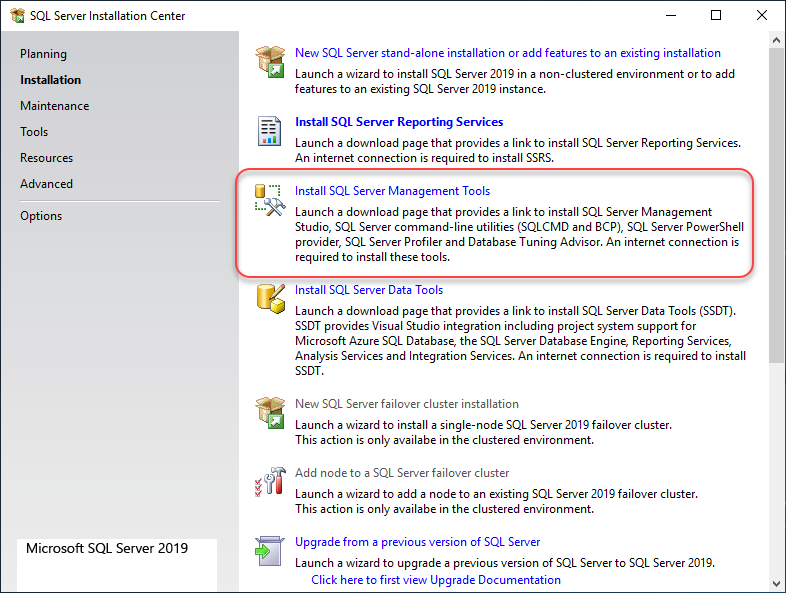
The next step in setting up the SQL server is to install SQL Server Management Tools. Go back to the installation center and remain on the installation tab on the left side navigation and select SQL Server Management tools. You will get to the download page of SQL Server Management tools.

Step by Step SQL Server 2019 Installation

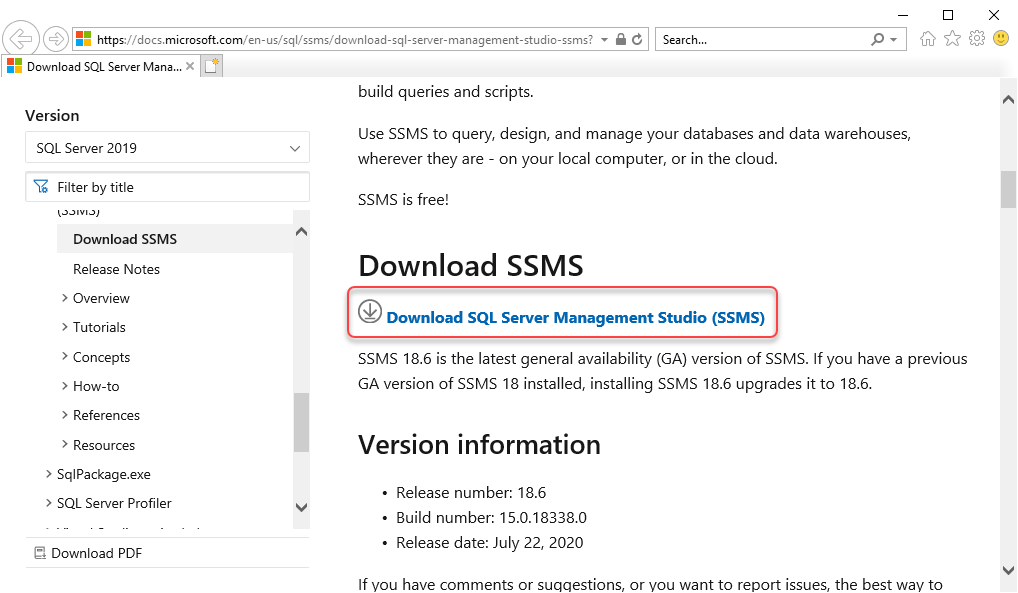
On the download page will open on the web browser of Microsoft site. Click on download SQL Server management studio, which will download the latest version of SQL Server management tools binaries.

Step by Step SQL Server 2019 Installation

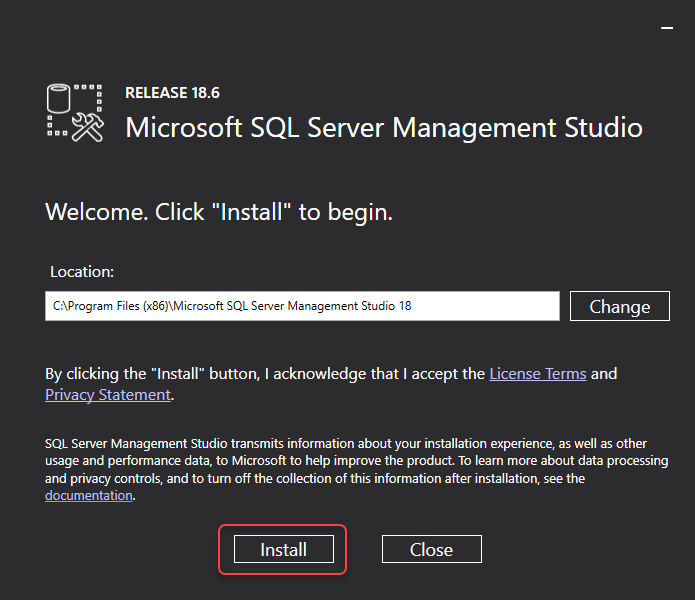
On the Install page of SQL server management studio, either leave the default installation path, or if you want to install other installation, you need to specify here. Once the installation path has been pointed, click Install to start the installation.

Step by Step SQL Server 2019 Installation

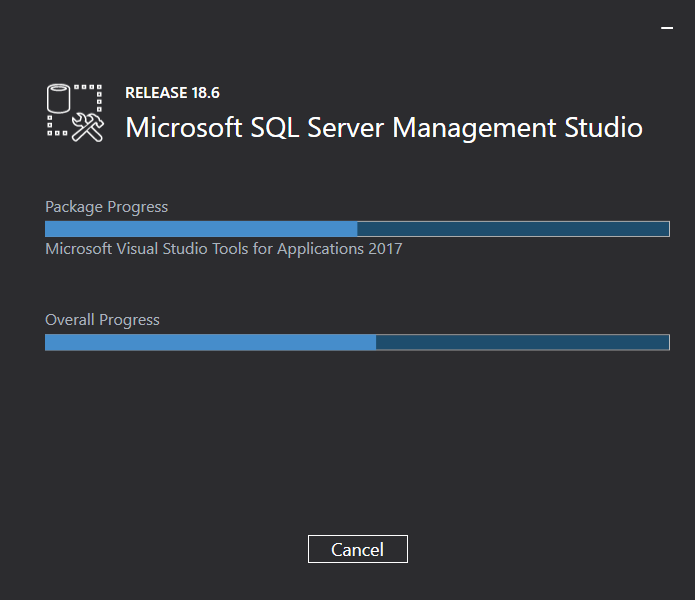
The Microsoft SQL Management Studio installation progress will give you the status of installation and the progress of the installation.

Step by Step SQL Server 2019 Installation

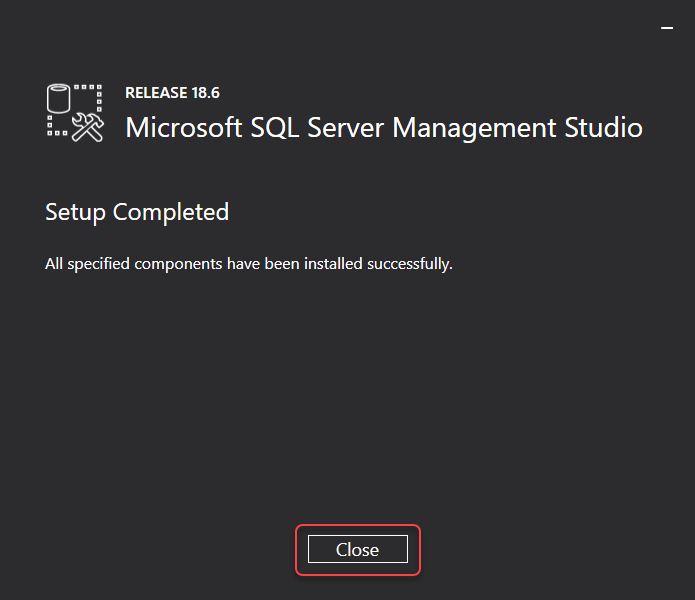
Once the installation is completed, you will get a message saying setup completed. Click close to closeout the installation wizard.

Step by Step SQL Server 2019 Installation

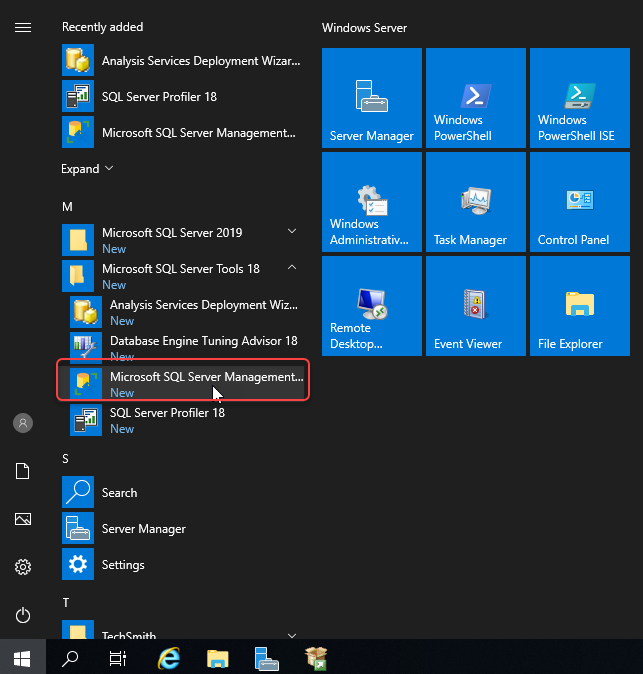
The SQL server management studio can be accessed from the Start menu of the Windows server. The management tools can also be installed on a desktop computer installed with Windows client operating system such as Windows 10.

Step by Step SQL Server 2019 Installation

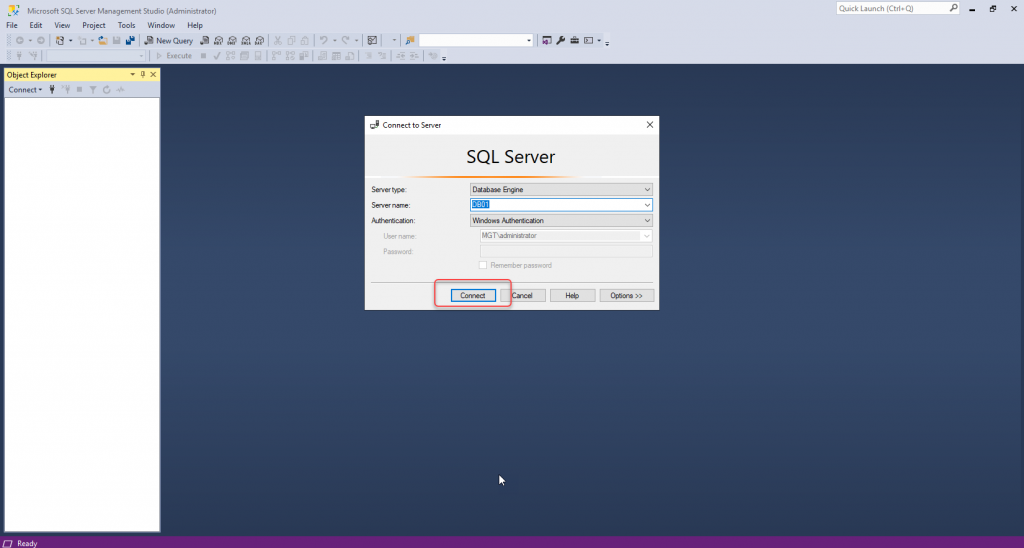
The SQL Server Management Studio will prompt for administrator login as in the screen below. It will use the currently logged in user to access the database engine on the windows server. Click connect to open SQL server database engine.

Step by Step SQL Server 2019 Installation

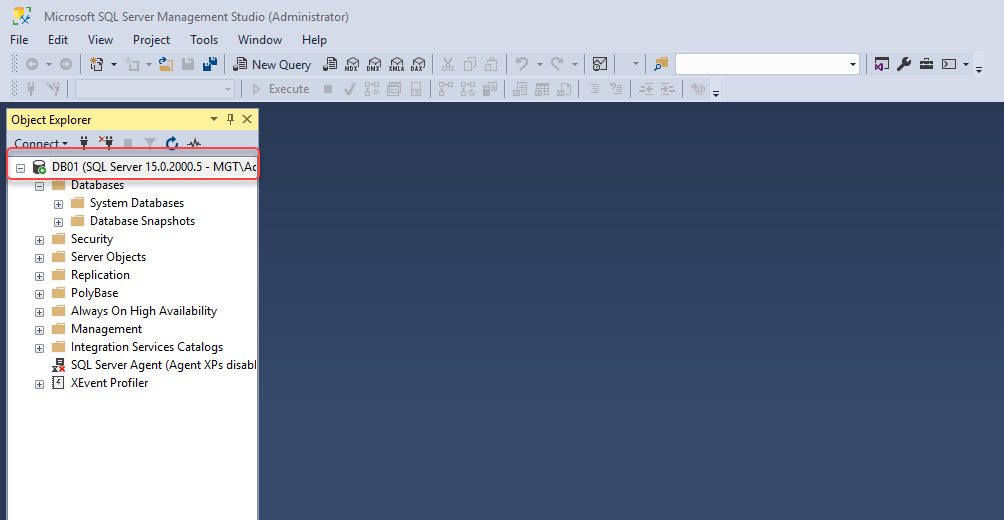
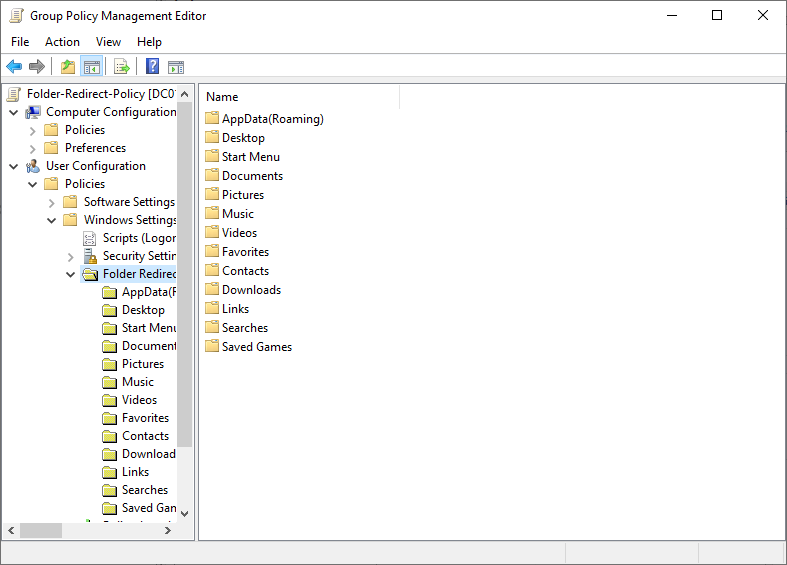
Once the object explorer of the SQL server opened on the SQL Server Management Studio, you can access the various SQL server management features to control and configure them.

Step by Step SQL Server 2019 Installation

Conclusion

In this article, we have demonstrated the installation of SQL Server and SQL server management tools. We have gone through the installation elements one by one, and the primary selection is SQL server edition and features.

We have posted a lot of other Windows server roles and server products on the Blog site here. You may have some questions or feedback to share with me, please click the comments below and share your thoughts. I am so happy to answer your questions.

How to Easily Redirect Folders in Windows Server 2019

Preface

Folder redirection is a group policy setting which used to store user data on the profile, usually Documents, Desktop, and so on stored on a server share. By using these policy settings, the domain users assigned to the folder redirection will get the same data when they log in from a different computer. So, the users can move from one computer to another computer and retain the data stored on the profile. Folder redirection is also helpful to back up the user’s data at the server level, so the user’s data will not be scattered and lost when the user computer is down or disk problem. Let’s get to how to Redirect Folders in Windows Server 2019

In this article, I have demonstrated the folder redirection setup with redirect folder shared on the domain controller and applied group policy to a domain-joined client computer.

The following key points demonstrated and explained to setup folder direction on your environment.

  • Create a security group and add test user as a member
  • Create a folder to store the redirected file
  • Configure security settings and share the folder
  • Create group policy and link it to company users OU
  • Redirect documents folder with offline access
  • Test folder redirection policy with Windows 10 client computer

Create a security group and add test user as a member for Folder Redirection

We are going to create a security group in Active Directory and add a test user as a member to it assign permission for redirect folder shared on the server and filter the group to permit group policy settings to apply. To create a security group, we need to launch Active Directory Users and Computers from the tools menu of the Server Manager.

A screenshot of a cell phone

Description automatically generated

The security group can be created on the OU that is relevant to your environment. In this demonstration, there is an OU called Users under Company OU. Right-click on Users OU and point to New and click group.

A screenshot of a social media post

Description automatically generated

Type a descriptive group name, her I named Folder-redirect-Users, and leave the group scope to Global and group type to security and click OK.

A screenshot of a cell phone

Description automatically generated

Right-click on the group just created, and go to properties to add members to the security group.

A screenshot of a social media post

Description automatically generated

Go to Members tab and click add to add members to the group.

A screenshot of a social media post

Description automatically generated

I have added a test user for this demonstration, once users are added click OK and close out the Active Directory Users and Computer management snap-in.

A screenshot of a social media post

Description automatically generated

Create a folder to store the redirected file

The folder redirection needs a shared folder on the server. Share it with the security group so that the user’s data will be stored in that folder. On windows explorer, go to the home tab and click New folder to create a folder. You can right-click on the windows explorer pane and create a new folder as well.

A screenshot of a computer

Description automatically generated

A new folder with the name Redirect is created on the data drive, as in the picture below.

A screenshot of a social media post

Description automatically generated

Configure security settings and share the folder

We are going to set permission for the folder to store the user’s data with the highest level of security. Right-click the Redirect folder and click properties and go to the security tab and select advanced.

A screenshot of a computer

Description automatically generated

On the advanced properties disable inheritance, you will get a popup window to select a type of permission option you want to have for ease of further permission assignment.

A screenshot of a social media post

Description automatically generated

To retain some of the permissions to tweak, select “Convert inherited permissions into explicit permissions on the object.” And click Add to go to permission entry for the redirect folder.

A screenshot of a social media post

Description automatically generated

On the Permission entry, select the principal to add the security group that we had created before. In this case, Folder-Redirect-Users is the group name and click OK.

A screenshot of a social media post

Description automatically generated

The permission type is Allow and applies to the folder that we are in and its subfolder and files. On the basic permission, leave full control and select all other checkboxes and click OK.

A screenshot of a social media post

Description automatically generated

As we have added the security group and disabled inheritance, click OK and go to the Sharing tab on the same property settings.

A screenshot of a cell phone

Description automatically generated

On the Sharing tab of properties, click advanced sharing to share this folder and give share permissions to the security group.

A screenshot of a social media post

Description automatically generated

Remove Everyone share permission and add the security group and check Full Control that will add remaining sharing permission.

A screenshot of a computer

Description automatically generated

Click on the Advanced sharing tab and closeout folder properties. We have set security permission and share permission.

A screenshot of a computer

Description automatically generated

Create group policy and link it to company users OU

The next step in the folder redirection setup is to create a GPO and link it to the OU where the active directory user object resides. To launch the Group policy management console, go to the server manager,  click the Tools menu, and select Group Policy management as in the picture below.

A screenshot of a cell phone

Description automatically generated

Expand the group policy management until the Users OU and click Create a GPO in the domain, and link it here… to create a new Group Policy Object and link it to the Users OU.

Folder Redirection

Give New GPO a descriptive name and click OK. In this demo, I have given Folder Redirect Policy.

Folder Redirection

Redirect documents folder with offline access

Once GPO created, right-click and edit the policy to modify the settings of the folder redirection policy settings.

Folder Redirection

Before going into group policy settings go back to the folder that we had created for folder redirection properties and on the sharing tab take down the Network path to use it on the folder redirection policy settings.

Folder Redirection

Return to the Folder-redirect-policy GPO and expand the GPO until Folder Redirection policy settings.

The path is User Configuration -> Policies -> Windows Settings -> Folder Redirection

In this demonstration, we are going to see the Folder redirection for the Documents folder. To make it simple and understandable, we are going to set up only one folder here. These settings apply to all other folders and have to go through the same settings to set them up.

Right-click Documents folder and go to properties, and on the target tab, choose a setting basic or advanced, in this demo basic is selected under settings property, that is “Redirect everyone’s folder to the same location.” On the Target folder location, the option “Created a folder for each user under the root path” selected and Root path is the one we have taken down in the previous step, which is the shared folder created earlier. Click Apply and move on to settings.

Folder Redirection

On the settings tab following option is selected and explained below. The option

Grant the user exclusive rights to Documents – This checkbox is for the user data on the shared folder only exclusively available for the particular user to access, for the administrator to access, the owner’s permission has to be set.

Move the contents of Documents to the new location. This checkbox is for if the folder on the local path has some documents or files in it that will be moved to the respective shared folder.

Redirect the folder back to the local user profile location when the policy is removed. This option is for offline access to the files, and also, when the policy is removed, the user will have the documents on the local profile.

Click OK to accept the settings modified so far.

Folder Redirection

There will be a warning message popped out as we have not selected the support for the older client operating system. Select yes and closeout the group policy management console, go to Windows 10 client computer to test the folder redirection.

Folder Redirection

We have returned to Group Policy management editor, so we can either set up other folders as we want or if we have completed, we can close the management edit and management console and test the Windows 10 client.

Folder Redirection

Test Folder Redirection policy

We are on the Windows 10 client computer and try to login as a test user with credentials.

Folder Redirection

Once logged on to the Windows 10 client computer, open command prompt window, and type below command.

Gpupdate /force

The command will prompt to logoff and login as the user to apply the policy. Click ‘y’ on the prompt and let the client system logoff.

Folder Redirection

Now, to confirm folder direction work, right-click documents folder, and click properties.

Folder Redirection

If you look closely, the location of the documents folder is on the shared drive.

Folder Redirection

We are going to do one more test whether we can create a file and save them, we have created a test file and save it to the documents folder.

Folder Redirection

If you goto the network share and the user Redirect folder, you can see the file created in the folder under network share.

Redirect Folders in Windows Server 2019

Conclusion

In this article, we have gone through the settings of redirect folders in Windows Server 2019 using a group policy object. On demonstrating the concept, we created a folder and shared it with a security group. A new GPO has been created and set up the folder redirection for the documents for the user’s profile data. We also have demonstrated the folder redirection test with Windows 10 client.

If you want to go through my other articles about Windows Server 2019, you can visit the link Get an Admin

You can use this article to setup folder redirection in your environment. You may have some questions or feedback to share with me, please click the comments below and share your thoughts. I am so happy to answer your questions.

How to Guide Windows Server Update Services on Windows Server 2019

Preface

Windows server update services (WSUS) retrieves Windows and other Microsoft products (such as office application products) updates and store them internally as a distribution point. So, it is not hectic for bandwidth consumption as each Microsoft device does not have to contact Microsoft servers for the update. WSUS is also a valid source if we consider a security point of view as well. The WSUS is a distribution point for local Windows servers and workstations to get the security and other updates from Microsoft servers. The WSUS servers can act as replica servers where the replica copies of Microsoft updates fetch from a central WSUS server and distribute the updates for a subnet or site. WSUS services can be used for testing updates before it approved for a server or workstation.

In this article, I am going to demonstrate how to deploy Microsoft Windows Server Update Services from the Windows server role group and configure to synchronize patches from Microsoft update servers. We are also going to look at how to configure Group Policy Object to auto-update the approved windows patches from the WSUS server and schedule the restart after the update installation. We are going to configure client-side targeting to group the computers to a specific target name so that it will be easier for administrators to troubleshoot or update the systems.

The following points are discussed in this article while demonstrating the WSUS role installation. I would recommend going through this article step by step for the audience who are new to this concept called WSUS. But for experienced administrators, you can go to the configuration step where you are stuck at configuring. Let us begin the installation and when you are ready with the server installed Windows server 2019 and joined to the Active Directory domain.

  • Add Windows Server Update Services role
  • WSUS Configuration Wizard
  • Launch Windows Server Update Services Console
  • Configure the Group Policy object for WSUS Clients
  • Testing WSUS Client

Add Windows Server Update Services role

The demonstration begins with installing the WSUS role from the Windows server 2019 role group from the server manager snap-in. Launch server manager and click on Add roles and features to start adding the server role.

A screenshot of a cell phone

Description automatically generated

The wizard instructions give you a gist of how the Add roles and features wizard help you install the roles or features to your local or remote computer. You may go through the instruction if you are new to add roles and features of Windows Server. If you don’t want to see “before you begin page” anymore, click skip this page and click next to move on to the next page of the wizard.

A screenshot of a social media post

Description automatically generated

The WSUS role comes under role-based or feature-based installation. So, click Role-Based or Feature-Based installation and click Next.

A screenshot of a social media post

Description automatically generated

On the server selection, the local server listed, and our intention is also to install the WSUS role on the local server. Click Next to continue.

A screenshot of a social media post

Description automatically generated

From the server roles list, select Windows Server Update Services, and when you click on the role, you will be prompted to choose the features to install, leave the default selection and click Add Features to return to the role selection window.

A screenshot of a social media post

Description automatically generated

As the Windows Server Update Services role with checkbox selected, click Next to continue.

A screenshot of a social media post

Description automatically generated

The next screen is to select features related to the role, leave the default selection, and click Next.

A screenshot of a social media post

Description automatically generated

On the WSUS page, the instruction of WSUS would be given, go through the WSUS instruction, and click Next to continue.

A screenshot of a cell phone

Description automatically generated

On the select role service page, leave the WID connectivity and WSUS roles selected, and move on to the next page by clicking Next.

A screenshot of a cell phone

Description automatically generated

On the content location selection, give a path to a drive that has at least 50 GB disk space and enough space to grow as your update selection. It is also a good idea to select a keep the content away from the system drive. As this is a demonstration, I have pointed C:\WSUS as a content path. Type the folder path and click Next to continue.

A screenshot of a cell phone

Description automatically generated

The WSUS clients such as Windows client workstations and Windows Servers mostly depend on Web services of WSUS for connectivity. For detailed information, you may go through the details on this page and click Next to continue.

A screenshot of a cell phone

Description automatically generated

On the Role Services page, leave the default selection and click Next to continue.

A screenshot of a cell phone

Description automatically generated

On the confirmation page, you would see all the roles and features selected so far to install the WSUS role, click install to start the installation.

A screenshot of a social media post

Description automatically generated

The view installation progress, let you know the installation progress of the installation, leave the WSUS installation to complete.

A screenshot of a cell phone

Description automatically generated

Once the installation completed, you would see launch post-installation, click post-installation to start.

A screenshot of a cell phone

Description automatically generated

Click the notification flag to check the post-installation progress and status of it. After about two minutes, you would get the state as installation succeeded.

A screenshot of a cell phone

Description automatically generated

WSUS Configuration Wizard

Select the WSUS role from the left side navigation and right-click the server and click Windows Server Update Services to start the WSUS configuration wizard.

A screenshot of a computer

Description automatically generated

On the before you begin page, there are some questions prompted to check if the firewall allowed to access the clients, connectivity to the internet to access the Microsoft servers to download the updates, and in there is any proxy server credentials to access the Microsoft servers. Go through the questions and get on them if required and click Next to continue.

A screenshot of a cell phone

Description automatically generated

As this is a demonstration, I have unchecked the Microsoft update improvement program to participate. You can choose either to join or not, whatever you wish. Click next to continue.

A screenshot of a social media post

Description automatically generated

This server is going to get the updates from the Microsoft Server, so select synchronize from Microsoft update and click next.

A screenshot of a social media post

Description automatically generated

If you are using a proxy server to access the internet, type the proxy server details. Mostly the internet is connected directly, click Next to continue.

A screenshot of a cell phone

Description automatically generated

The next page is to connect the upstream server; this will take about ten minutes to complete the connection, wait for the server to connect to the upstream server.

A screenshot of a social media post

Description automatically generated

The connection progress will give you the status of the connectivity, wait for the connection to happen to the upstream server.

A screenshot of a cell phone

Description automatically generated

Once the connectivity has completed connection to the upstream server, click Next to continue.

A screenshot of a cell phone

Description automatically generated

As all Microsoft systems installed with the English language in my lab network, I have selected English. In your installation, if multiple languages are needed or any specific language to choose, select the appropriate language, and click Next.

A screenshot of a social media post

Description automatically generated

In this demonstration, I’m using a Windows 10 computer to test the Windows update settings, and you can go through the list and choose the appropriate selection for other windows to update such as Windows Server 2019, Office pro plus, and so on. Click Next to continue.

A screenshot of a cell phone

Description automatically generated

Select the updates as you need, I have selected Critical, definition, and security updates. You may also choose updates such as upgrades, drivers, and so on. Click Next to continue.

A screenshot of a cell phone

Description automatically generated

On the Synchronization schedule, select “synchrone automatically” and choose a time suitable for synchronization to happen, also windows update synchronization per day, default is 1. Select a time in the early morning window will be a good idea. Click Next to continue

A screenshot of a cell phone

Description automatically generated

On the Finished page, Select Begin initial synchronization and click Next.

A screenshot of a cell phone

Description automatically generated

On the what’s next page, click finish to end the WSUS configuration wizard and launch WSUS.

Windows Server Update Services

Launch Windows Server Update Services Console

The next is to go to the server manager and select the WSUS role on the left side navigation and right-click the server from the middle pane and click Windows Server Update Services.

Windows Server Update Services

On the updates tab, expand it and select critical updates and change the status to any on the top filtering options and click refresh. You would see the critical updates available for installation.

Windows Server Update Services

Same way, select security updates, and you would see the security updates ready for installation as in the below screen.

Windows Server Update Services

On the Computers hierarchy, we are going to create a group called workstations where all the workstation computers are grouped by client-side target GPO, which we are going to look at in the upcoming demonstration. On the All Computers node right-click and click Add computer Group and type a name, I am creating a group called workstations. Click Add to add the computer group.

Windows Server Update Services

Apart from already configured from WSUS configuration wizard, we are also going to do a slight configuration change on the options navigation under computers. Double click Computers and select User Group Policy or registry settings on computers to assign the computers to the group with the help of client-side targeting to assign the computers to the group.

Windows Server Update Services

Configure the Group Policy object for WSUS Clients

To configure client computers automatically get the configuration details of the WSUS server, we are going to use the Group Policy object to update the configurations.

Login to Domain Controller and launch server manger. On the server manager snap-in click on tools and Group Policy Management to open Group Policy management console

Windows Server Update Services

Right-click the OU where the Computer objects of the computers to which you want to configure WSUS and click create and link Group policy object to create and link a new Group Policy object. The Group Policy object happens to be Computers OU under Company root OU in this demonstration.

Windows Server Update Services

As this is Workstations Policy, I have given name as WSUS Workstations Policy. Type a name descriptive and click OK.

Windows Server Update Services

Right-Click the Policy created just before, and click Edit.

Dutta has so far authored 16 books for adults, 13 of which are non-fiction while three are fiction.[5] His non-fiction books are based on a diverse range of subjects like The Brahmaputra published in 2001 by the National Book Trust; Cha Garam: The Tea Story revised and reprinted in 2013 by Orchid Publications; Unicornis: The Great Indian Rhinoceros published in 2001 by Konark; and The Roving Ministrel a biography on musician, singer and filmmaker Bhupen Hazarika, published by Rupa Publications in 2002.[6]

Anagarika's Swansong published in 2009 is a fictional novel by Dutta. Anagarika's Swansong is a satiric takeoff on the novel genre. This anti-novel debunks all the conventional elements that a novelist would otherwise employ, including a linear narrative, structural integrity, naturalistic characterization, emotional or situational conflict et al.

Anagarika in Sanskrit is one who renounces society and materialism in search of truth. In the book the author alludes to Prince Siddhartha who gave up his princely life to seek out in search for existential truths and to transform into Gautama Buddha, the enlightened one. The protagonist of The Anagarika's Swansong, is nameless and undertakes journey similar to that of Prince Siddhartha in the modern age to find the meaning of existence. However, because of his inferior intellect and he lives in Kaliyuga or "the era of untruth", he first lands up in to a local lunatic asylum, but finally stumbles into "poor man's enlightenment"![7]

The Ahoms published in 2016 is a historical fiction the delineates setting up of the Ahom Dynasty that ruled a large piece of Northeast India including all of present-day Assam. In 1228 A.D. an event occurred in the northeastern region of India, which not only changed the destiny of the Brahmaputra Valley and the surrounding mountains, but also of South East Asia. A group of Shan or Tai warriors, led by a brave leader named Sukapha, having left its original home in the Shan country in Myanmar, entered Upper Assam and set up the nucleus of what was later to become the powerful Ahom Empire. From the time Sukapha entered this region till it was annexed by the British in 1826, for nearly six centuries, his descendants reigned over a greater part of the Brahmaputra valley. Few dynasties in the world, let alone Asia, had enjoyed such a long period of almost unbroken rule. It was primarily due to the Ahom dynasty that the pre-colonial Assamese nation was born. Its reign witnessed the synthesis of the disparate tribes inhabiting the Brahmaputra Valley and the evolution of a distinct Assamese language, culture and nationalist identity. The Ahom Dynasty was one of the greatest political entities in medieval Asia, equal if not greater than the more well known counterparts in China or Japan. Its history is replete with tales of war, bravery, brutality, love, loyalty, treachery and treason. This book, The Ahoms, seeks to imaginatively acquaint readers with the saga of this fascinating dynasty and provide a glimpse of the major events during its six hundred year rule.[8]

Red Camellia Green published in 2016 is Mr Dutta's second fictional novel. Henry David Esscombe, a pioneer tea planter, comes to Assam in the latter half of the 1850s and opens out the Dhanboa Tea Garden. However, the unhealthy Assam environment takes its toll and, gravely ill, he summons his son David to take over the plantation. His daughter, Cordelia, desperate to see her dear papa again, accompanies her brother to Assam. As the brother-sister duo struggle to adapt to the changed circumstances, a host of individuals, including the phlegmatic Michael Bailin, the devilishly charming Christopher James Buckingham, the self-confessed anarchist Reverend Garry Swanson, the Assamese nobleman Gokuldeva Barua, the defiant conscripted tea workers Bircha and Meghu and a host of others, intrude into their lives. Against a backdrop of tea plantation life in the 1860s and the barbarous conditions whereby migrant workers were lured and enslaved, a chain of events unfold in this epical novel, leading to an unexpected, explosive climax which turns red the green leaves of Camellia.[9]

We are going to enable three Group Policies in the following GPO Section.

Computer Configuration -> Policies –> Administrative templates-> Windows Component-> Windows Update

The first one we are going to edit is “Specify Intranet Microsoft update Service location,” double click on it.

Windows Server Update Services

Click enable to enable this setting and type the URL of the WSUS server. In this demonstration, the server name of WSUS is WSUS.mrigotechno.club. Replace this hostname as per your installation and add 8530 to it. So the URL to provide on Set the intranet  update service for detecting update and set the  intranet statistics server is http://wsus.mrigotechno.club:8530

Windows Server Update Services

The Next setting is “Configure Automatic Updates,” double click to edit the setting.

Windows Server Update Services

Click Enabled to enable the setting, and in the options section, select one of the four options which match your environment. The auto downloads and schedule the install under configure automatic updating is the good option as there is less overhead on the administration point of view. Also, select a time to schedule install. Click OK to go back to the GPO settings list.

Windows Server Update Services

The third setting is client-side targeting. Double click on the “Enable Client-Side Targeting” setting.

Windows Server Update Services

On the Client-Side Targeting settings, click enabled to enable these settings and type the group name that we created for the group created on the WSUS console previously. The group name was workstations, and you type the name that you have created and click OK

Windows Server Update Services

Testing WSUS Client

We have completed setting up Group Policy. Now I’m going to start the Client computer installed with Windows 10 and joined to the Active Directory domain. Open a command prompt and type the following command to get the group policy update.

gpupdate /force

You can see the command output as in the screen below on the Windows 10 computer.

Windows Server Update Services

Once the group policy is updated on the client computer, the client’s computer name and update status visible on the WSUS console under Computer Group, which happens to be client-side targeting.

Windows Server Update Services

Conclusion

This is the end of the Windows Server Update Services demonstration. In this article, we have covered installing the WSUS role and Configuring WSUS using configuration wizards. Once the WSUS installed and configured computer group created and Group Policy Object created on the Group Policy Management console on the domain controller. The Windows client computer tested with WSUS as the final verification of the WSUS deployment.

I have demonstrated other roles of Windows Server 2019 in Get An Admin article. You may have some questions or feedback to share with me, please click the comments below and share your thoughts. I am so happy to answer your questions.

How to Setup VPN using PPTP on Windows Server 2019

Preface

We already posted an article to set up a VPN on Windows Server 2019 using Secure Socket Tunneling Protocol (SSTP) using a third-party certificate. This one, we are going to discuss ‘How to Setup VPN using PPTP’ based article . The Point to Point Tunneling Protocol using the Generic Routing Encapsulation feature along with tunneling over TCP/IP wrapped transmission. The PPTP creates a tunnel on TCP/IP and transfer the packets securely—this very old and reliable method of transferring or accessing the private network over the internet. We can deploy this method to connect a Home or a user with a laptop to access their home network or small office network efficiently and quickly.

Configuring Point to Pointing Tunneling Virtual Private Network on a Windows Server 2019 is straightforward. We can use this method of deploying a VPN where the Secure Socket Layer type of VPN is not possible. In this method of configuring VPN, we need to open the port 1723 and enable a feature called Generic Routing Encapsulation (GRE) on the edge firewall or router under security settings. I am going to explain the step by step and cover the entire setup process from install and configure Remote Access Role to configure Client device to connect the network where we have installed the PPTP VPN.

So, let get to the server and start the Remote Access Role installation and subsequently look at configuring VPN policy on the Network Policy Server on the Windows Server 2019. If you are ready to take a configuration task, we are here, to begin with, so let us get started.

  • Add Remote Access Server Role
  • Configure Remote Access with VPN Access
  • Configure Remote Access Settings for VPN
  • Configure Dian-in connection on the user object
  • Configure Dial-in policy on Network Policy Server
  • Crete VPN network connection on Windows 10 device
  • Connect VPN Server over the Internet

Add Remote Access Server Role

The first step in deploying a VPN server is Adding the Remote Access Server Role on the server—the remote access server role to be installed by going to the Server Manager Dashboard. Once the Server Manager windows would open, click on the Add Roles and Features, and the ‘Add Roles and Features’ wizard would start, and we can go through this wizard to complete the Remote Access role installation.

A screenshot of a social media post

Description automatically generated

The wizard will start with instructions on using this tool to add the roles and features. If you don’t want to see this page, you can click the checkbox next to ‘Skip this page by default,’ and you won’t be prompted with this page anymore.

A screenshot of a social media post

Description automatically generated

In this wizard, we are going to use the role-based installation to add this role, so select Role-based or Feature-based Installation to begin with and click Next to continue.

A screenshot of a cell phone

Description automatically generated

Make sure the local server in the server pool and select it and click Next.

A screenshot of a social media post

Description automatically generated

In the Select Server Role page, select Remote Access checkbox, and click Next.

A screenshot of a social media post

Description automatically generated

On the next page, leave the Features as it is and click Next.

A screenshot of a social media post

Description automatically generated

If you need more details, you may go through the details about remote access on this page, and once you are ready to move, click Next.

A screenshot of a cell phone

Description automatically generated

This step is significant, select the Direct Access and VPN (RAS) alone, and you would be prompted with related features on the pop-up and click Add Features, which will return to select the role services page.

A screenshot of a social media post

Description automatically generated

We have selected the roles services and its feature, and we are right to move to continue, click Next.

A screenshot of a cell phone

Description automatically generated

The next page is an information page, and it describes that adding this role service also install the Web Server (IIS) role, Click Next to continue.

A screenshot of a cell phone

Description automatically generated

The Web Server (IIS) role will install this role services, leave the default selection, and click Next.

A screenshot of a social media post

Description automatically generated

On the confirmation page, verify that the Roles mentioned above and Role Services correct and click Install to start the Remote Access role installation. Sit back and relax for a few minutes to get the installation to complete.

A screenshot of a social media post

Description automatically generated

The Remote Access role installation started. Let wait till the installation complete, and then we start the configuration.

A screenshot of a cell phone

Description automatically generated

You would notice the installation succeeded message and there is a link to open the getting started wizard to start the configuration of the Remote Access Role, click the link.

A screenshot of a cell phone

Description automatically generated

Clicking the link will start Configure Remote Access Wizard, on the wizard click Deploy VPN only tab as in the screen below.

Configure Remote Access with VPN Access

A screenshot of a social media post

Description automatically generated

On the Configure Remote Access prompt select the Deploy VPN Only to define the Remote Access multiple configuration methods.

The Routing and Remote Access management console will be opened and right-click on the server node and click ‘Configure and Enable Routing and Remote Access.’

A screenshot of a social media post

Description automatically generated

The Routing and Remote Access Server Setup Wizard will start with a Welcome Screen, Click Next to begin the wizard.

A screenshot of a cell phone

Description automatically generated

Select the Radio button next to Custom Configuration and click Next.

A screenshot of a social media post

Description automatically generated

On the Custom Configuration page, select the checkbox next to VPN Access and click Next.

A screenshot of a cell phone

Description automatically generated

The VPN Access configuration selected on the wizard, and that is the end of the wizard and click Finish.

A screenshot of a cell phone

Description automatically generated

Click OK to the warning message that the Remote Access Configuration couldn’t open the required port. We will open the port on the Windows Firewall manually.

A screenshot of a cell phone

Description automatically generated

As we have configured Routing and Remote Access services with VPN Access and the wizard will end by prompting to start service.

A screenshot of a cell phone

Description automatically generated

Once the Routing and Remote Access Service Started, you will see a green arrow on the server node implying that the service started and running.

Configure Remote Access Settings for VPN

There are specific settings we need to update to set the VPN to function securely and get the IP4 IPs to the client system.

Right-click the server node and click properties as in the screen below.

A screenshot of a social media post

Description automatically generated

On the Remote Access, Server Properties go to the IPV4 tab and Select the Static Address pool radio button under IPv4 Assignment and click add to add IP address pool. Choose an IP address Pool and type start and end IP address of the pool. The IPV4 address pool is a static one, and if you are running the DHCP server on the server, you can leave the IP address to assign from the DHCP server. As we are not running a DHCP service, we are creating a static address pool in this example.

A screenshot of a cell phone

Description automatically generated

Choose IP address pool and type start and end IP address on the Add dialog box. We have chosen 172.16.1.1 to 172.16.1.10 range to assign the IP addresses to the VPN clients.

A screenshot of a cell phone

Description automatically generated

Click OK once the IP address properly typed.

A screenshot of a cell phone

Description automatically generated
How to Setup VPN using PPTP

Configure VPN Policy on Network Policy Server

Open the Server Manager window and on the Tools menu select Network Policy Server to begin with configuring VPN Policy

A screenshot of a cell phone

Description automatically generated

Expand the Network Policy Server and select New to create a new policy for VPN access.

On the New Network Policy Window type VPN Access as Policy Name and in the drop-down list of typer of network access server select Remote Access Server (VPN-Dial Up) and Click Next.

On the Specify Condition page, select Windows Group and Click Add.

I have already created an Active Directory group called “vpngroup” for this purpose, and we are going to add that group. Please note that we are adding all users who need VPN access to this group.

How to Setup VPN using PPTP

Once we confirmed the group added, click Next to continue.

As we are granting access to this AD Group users, we are selecting Access Granted and Clicking Next.

On the Configure Access methods, select Add and Microsoft Secure Password (EAP-MSCHAP v2 as Extensible Authentication Protocol on the list of authentication methods.

Also, uncheck the boxes near Less Secure Authentication methods.

How to Setup VPN using PPTP

Once the Authentication method has been selected, click Next.

How to Setup VPN using PPTP

On the Configure Constraints page, leave the defaults and click Next.

How to Setup VPN using PPTP

Also, Configure Settings page leave the default and click Next.

How to Setup VPN using PPTP

Click Finish to end the wizard.

How to Setup VPN using PPTP

Create a Windows Firewall rule to open port PPTP VPN

Go to Control Panel>System and Security>Windows Defender Firewall and click Advanced settings.

How to Setup VPN using PPTP

Select Inbound Rule from the left navigation and New Rule on the Actions Menu

How to Setup VPN using PPTP

Select Port as Rule type and click Next

How to Setup VPN using PPTP

The PPTP port number is 1723, Select Rule “Apply to TCP” and Specific local ports 1723 and, click Next.

How to Setup VPN using PPTP

Select Allow Connections and click Next.

How to Setup VPN using PPTP

Select all the Network Locations and click Next.

How to Setup VPN using PPTP

Type a name for the Rule and Click Finish

How to Setup VPN using PPTP

Create VPN Network Connection

So, we have completed all server configurations, now is the time to create a VPN connection on the Windows 10 client computer.

Right-click network Icon on the taskbar and select ‘Open Network & Connection Sharing.’ On settings, windows click ‘Network and Sharing Center’ that will open the ‘Network and Sharing Center’ where we need to select ‘Set up a New Connection or Network’ as in the steps provided on the screenshot below.

How to Setup VPN using PPTP

Select the steps as in the steps below.

  1. Open Network & Internet Sharing
  2. Network Sharing Center
  3. Set up a New Connection or network
How to Setup VPN using PPTP

There is a Wizard start, and in the connection options, select ‘Connect to a workplace’ and click Next.

How to Setup VPN using PPTP

In the destination name type, a name implies the connection purpose. I left the default name in this example.

Leave the selection of ‘Remember my credentials’ and click create.

  1. Type the VPN server’s internet hostname or IP address.
  2. Give a name to the VPN Connection.
  3. Click Create to create a workplace connect.
How to Setup VPN using PPTP

To change the type of VPN, right-click newly created Network Connection and select properties.

How to Setup VPN using PPTP

On the Security tab, select Point to Point Tunneling Protocol (PPTP) and click OK.

How to Setup VPN using PPTP

Click Network icon on the taskbar and the newly created VPN connection will appear on the list of connections, click that, and there will be a credentials box open.

How to Setup VPN using PPTP

On the Sign-in prompt type, the AD user and password and click OK.

How to Setup VPN using PPTP

The VPN connection will show connected. Now we can access the internal devices on the office network using their private IP address.

How to Setup VPN using PPTP

Conclusion

In this article, we have gone through step by step instructions on how to 1. Install and configure Remote Access VPN role 2.  Network Policy Server VPN policy 3. Creating windows firewall rule and 4. Making a VPN Connection on the Windows client system and connected to Office network remotely using PPTP. Also, we have one more step to that on the router or Firewall device connecting to the internet we need to add a port forwarding rule to point the VPN server connecting port 1723. On the security settings on the firewall, we need to enable Generic Routing Encapsulation to connect the VPN from remote windows client to the VPN Server that we just configured.

You may have some questions or feedback to share with me, please click the comments below and share your thoughts. I am so happy to answer your questions.

Setup a Secure VPN (SSTP) on Windows Server 2019

Read More