Tag Archive : Cloning Virtual Machines in Hyper-V – mohitgoyal.c

How to Easily Clone a Virtual Machine in Azure

Preface:

In this article, we are going to demonstrate how to create a VM clone both portal and PowerShell script way. Using this guide, you can choose the portal or script to clone an Azure virtual machine based on your requirement and what you are comfortable with. The original virtual machine has been cloned by creating the Snapshot of OS disk and Data Disk using the portal.

The snapshots have been used to create managed disks and virtual machines created by attaching the managed disks. In the first part of the demonstration, we have created a virtual machine using the portal, and in the second part demonstration, we have created the virtual machine using the script and running it on the cloud shell. This tutorial is created to show the audience how it relates portal and PowerShell script to create the VMs, and you can use any one of these two methods to create VM. The portal method will be quick and easy, but PowerShell script would be granular, and you can automate the VM cloning.

The following topics discussed in this article; The parameters given in the demonstration are just examples; you can replace the parameters which is relevant to your environment and create cloned VMs. We start the article with VM cloning using the portal, and, in the end, we are going to discuss how to use the script to accomplish the same.

  1. Cloning VM using Azure Portal
  2. Cloning VM using Cloud Shell (PowerShell)

We have started this article with VM cloning using the portal, and, in the end, we are going to discuss how to use the script to accomplish the same.

Cloning VM using Azure Portal

Log in to https://portal.azure.com and go to the VM, which needs to be cloned. From the dashboard, select Virtual machines and the VM name to go to the VM object.

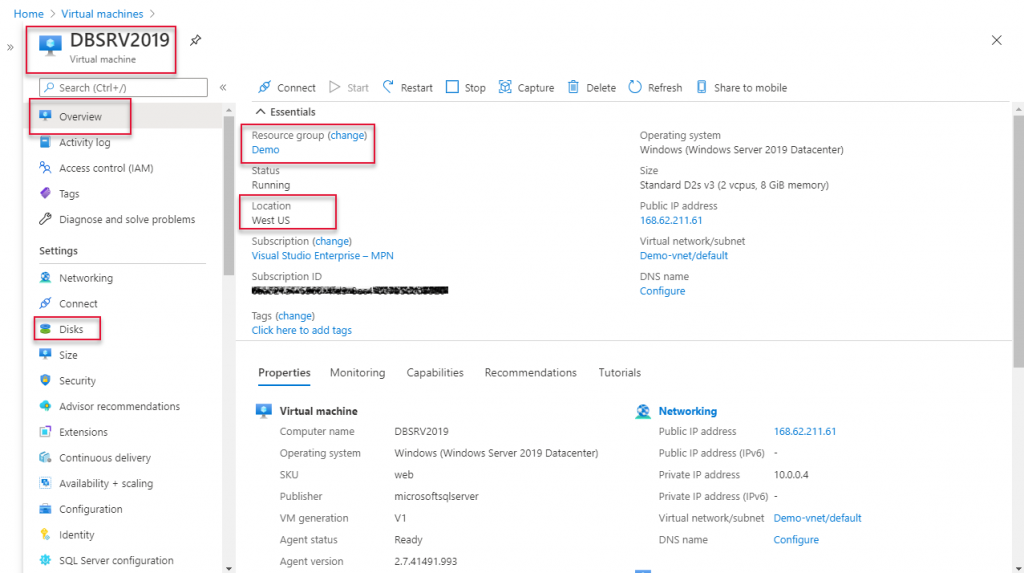
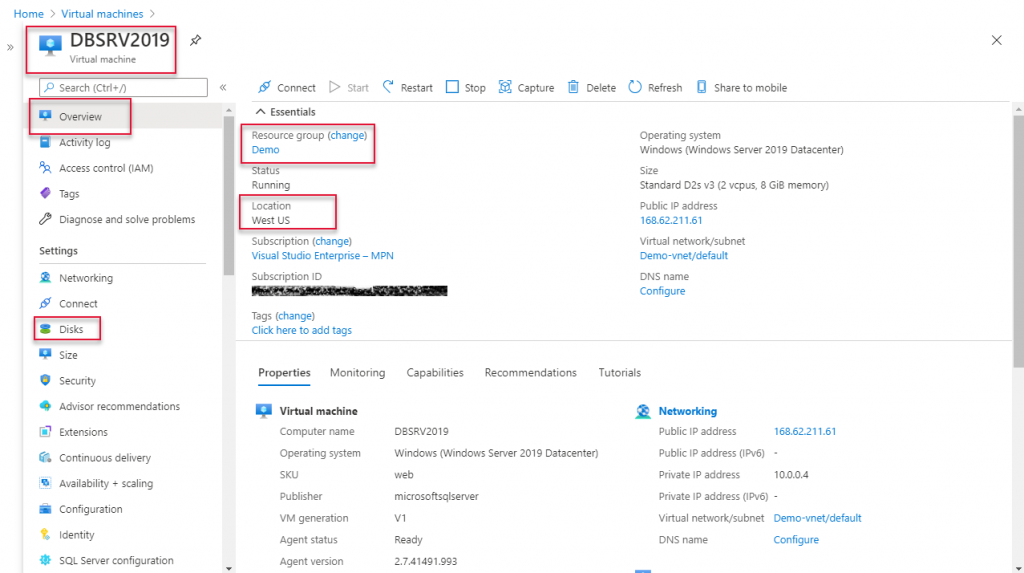
On the VM object, you can see the resource name, VM size, and Geo-Location, and so on. From this VM, we are going to take a snapshot of the OS and Data disks. So we are interested in navigating to Disks from the left navigation.

Create snapshot of OS Disk
Graphical user interface, application

Description automatically generated

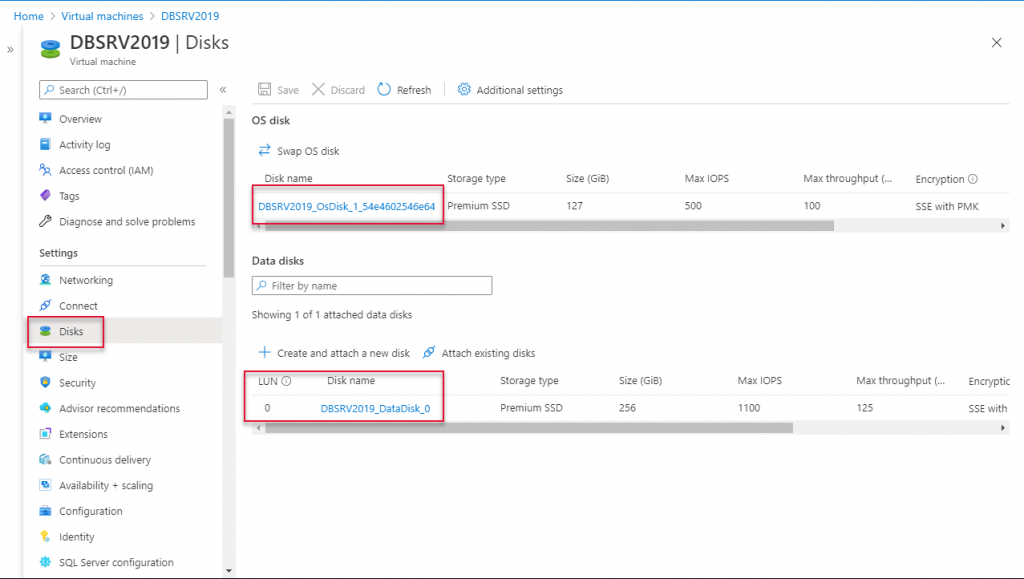
This parent VM is a Microsoft SQL Server 2017 on Windows Server 2019. From the parent, on the disks view we see two disks. one disk is the Operating system disk, called OS disk, and another disk is the Data disk where the databases and its logs are stored. Click on each disk one by one and create a Snapshot of the disks.
Graphical user interface, application

Description automatically generated

From the previous image step, we selected the OS disk, and we are going to create a Snapshot of the OS disk first and, subsequently, the Data disk. Click on OS disk and get the OS disk management properties.

Graphical user interface, application

Description automatically generated

Click Create Snapshot to create an OS disk snapshot.

On the “create a snapshot window,” we will provide the details such as resource group name, snapshot name, and so on. It is good to create the clone VM in a separate resource group, away from where the original VM exists. Once the cloned VM purpose is over, delete that resource group to remove all the related resources to make it clean tidy.

Once a resource group has been created or selected based on your scenario, type Snapshot name, and select storage type. As this is a demo, I have chosen Standard HDD.

Graphical user interface, application

Description automatically generated

Creating OS snapshot will be started once you confirm the validation check is passed and Create Snapshot clicked.

Graphical user interface, text, application

Description automatically generated

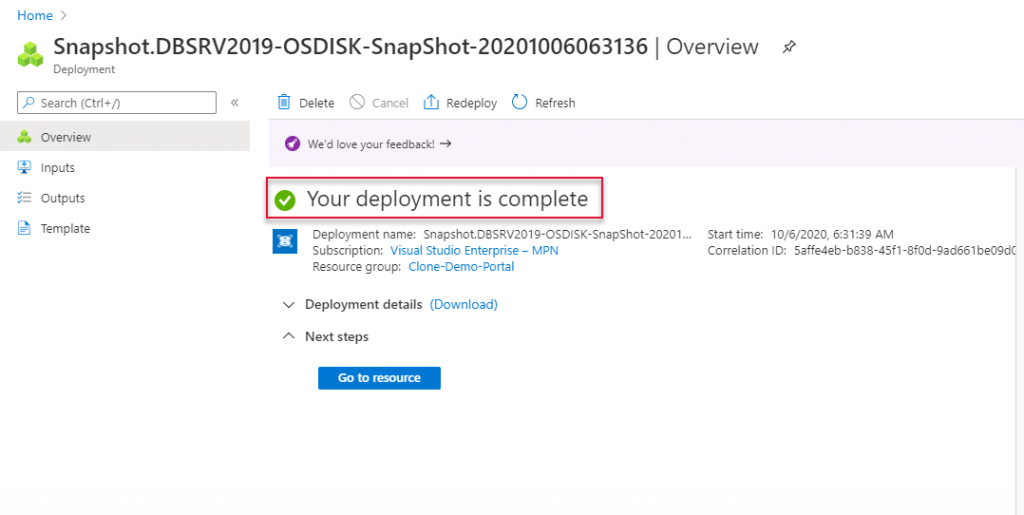
On the next screen, the deployment of the resource is complete. In this case, the creating of OS disk snapshot.
Graphical user interface, text, application, email

Description automatically generated

Create a snapshot of Data Disk

As the OS disk snapshot is created, we are making the Snapshot of the data disk, go to the Disks navigation on the VM management page and click on data disk as shown in the image below.

Click Create Snapshot, this time we are create data disk snapshot.

Graphical user interface, text, application, email

Description automatically generated

Select the same resource group you have created or selected in the previous Snapshot of OS disk snapshot and move on to naming the data disk snapshot. Same as the last occasion, we are choosing the Standard HDD as this is just a demonstration.

Click on the Review + Create button to move on to create the Snapshot.

Verify the validation passed by checking the green tick mark and click on Create.

Graphical user interface, application

Description automatically generated

The Data disk snapshot also completed, as shown in the image below, you would get the deployment completed message, so you have finished creating a Snapshot of OS disk and Data disk.
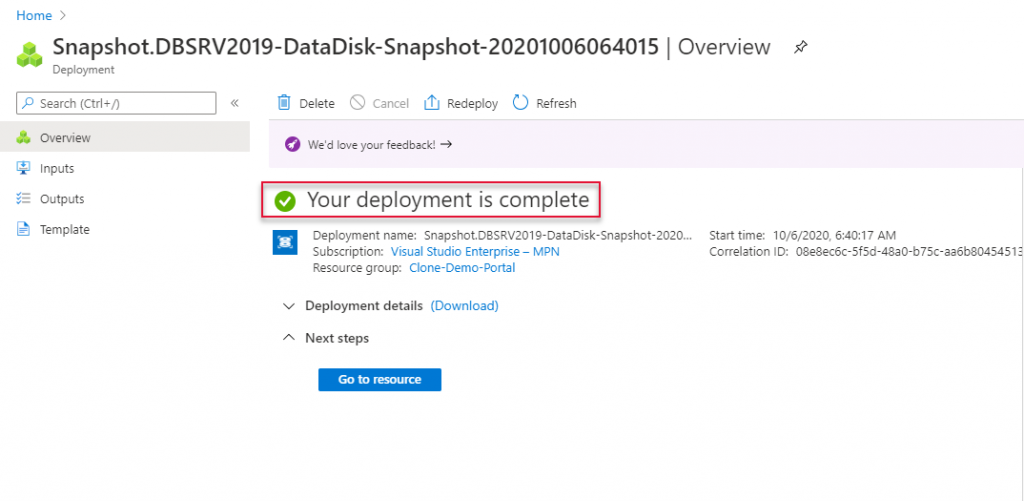
Graphical user interface, text, application, email

Description automatically generated

Create Managed Disks from Snapshots

The next step in this process is creating managed disks from the snapshots. Select the menu icon (three horizontal lines) on the Azure portal and click “Create Resource.”

Search the key word “Managed Disks”

Graphical user interface, application

Description automatically generated

You will see the managed disks option and click create from the bottom of it.
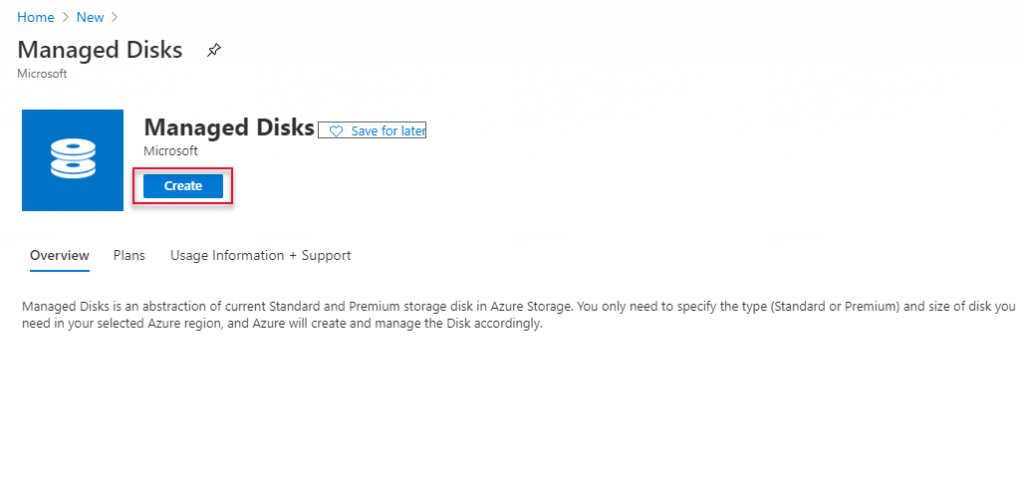
Graphical user interface, text, application, email

Description automatically generated

Select the Resource group where the snapshots exist.

Type a name for the managed disk for OS disk snapshot

Select Source type as Snapshot

Select the OS disk snapshot Source snapshot

The size of the managed disk must be the size of the original OS disk.
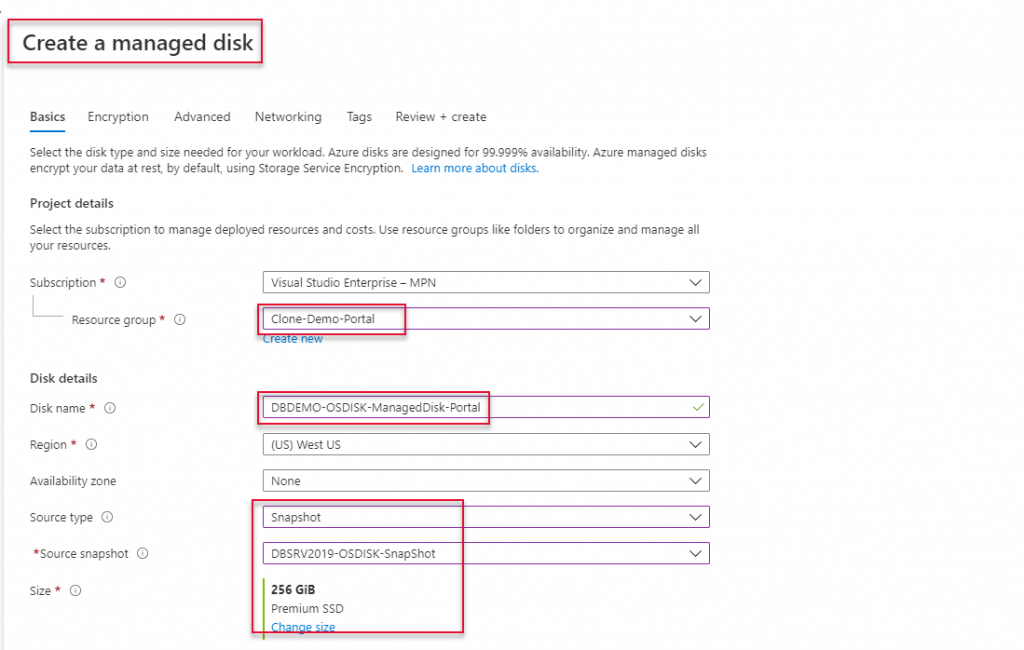
Graphical user interface, application

Description automatically generated

Once you enter the details, go to Create and Review and check for ‘validation passed’ indication and click Create.

Graphical user interface, application

Description automatically generated

You will get the message deployment is complete.
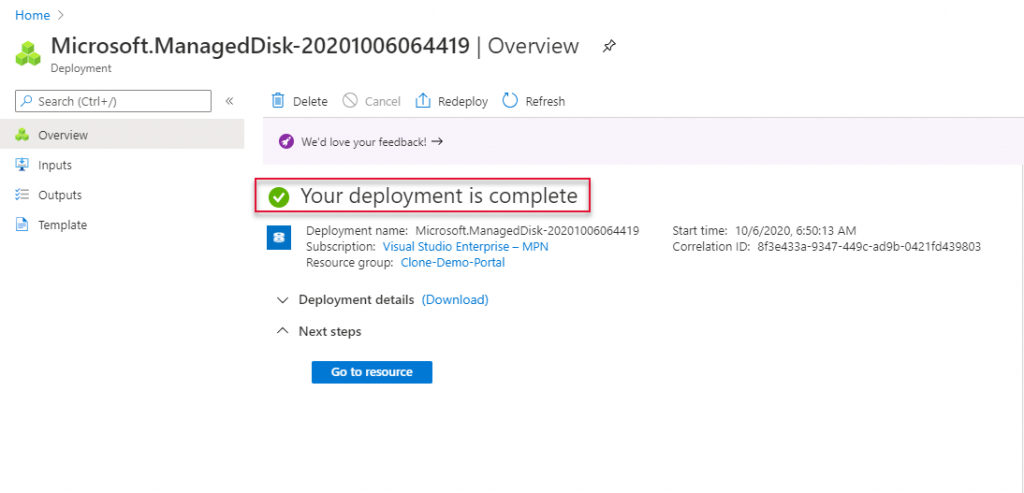
Clone a Virtual Machine

Same way, create a managed disk from the data disk snapshot.

Select the Resource group where the Snapshot exists.

Type a name for the managed disk for Data disk snapshot

Select Source type as Snapshot

Select the Data disk snapshot Source snapshot

The size of the managed disk must be the size of the Original Data disk.

Click Review + Create, and it will run validation.
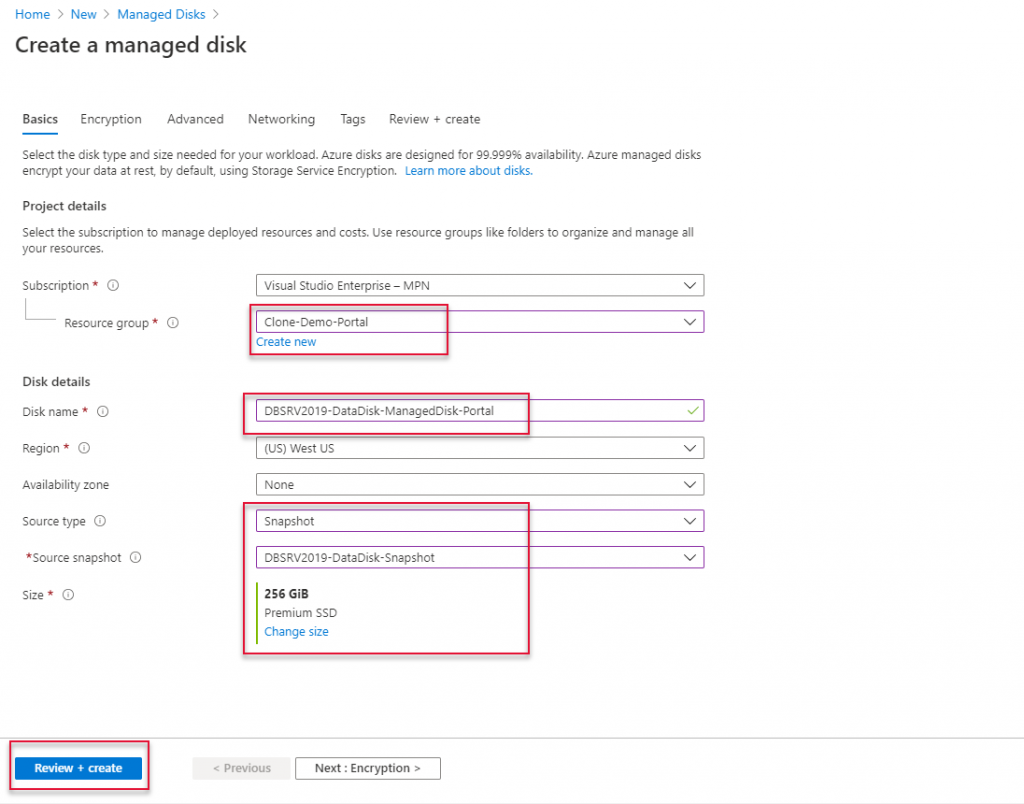
Clone a Virtual Machine

You will get the ‘validation passed’ indication click create the Data managed disk.
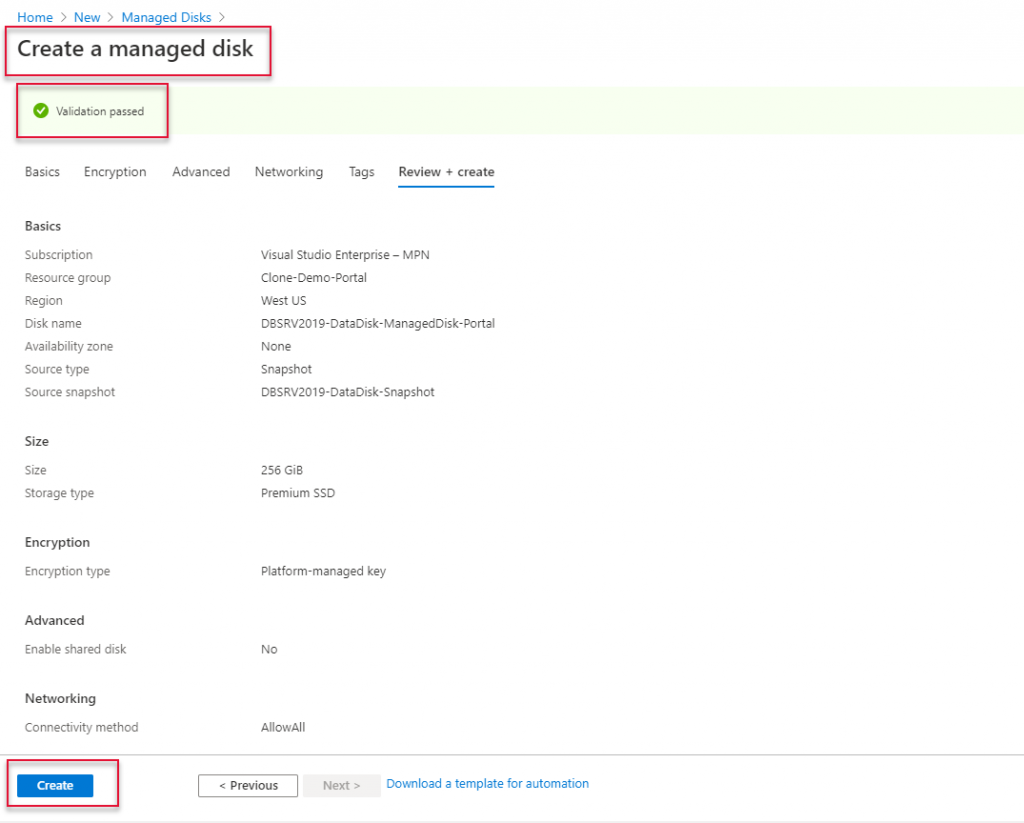
Clone a Virtual Machine

Upon the completion of Data managed disk creation, you will get “Your deployment is complete” message.
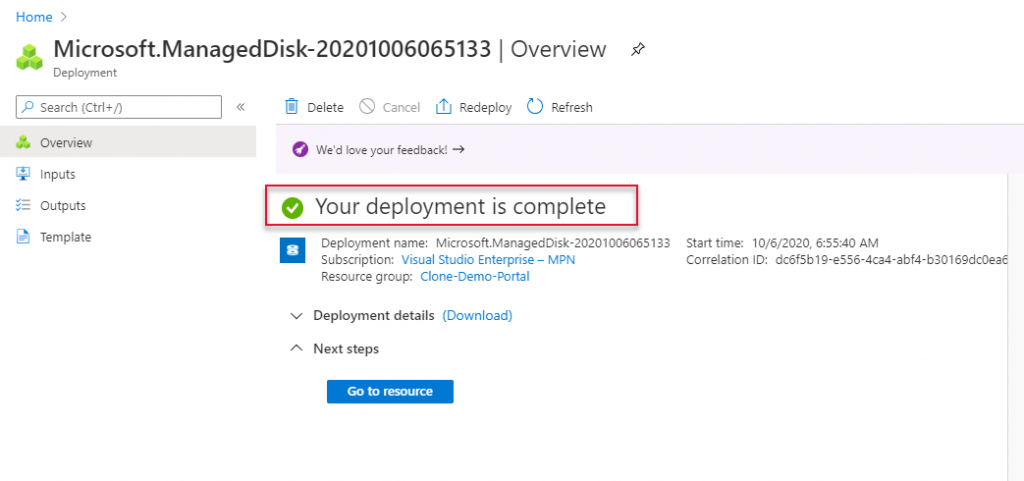
Clone a Virtual Machine

Go to the Resource Group, where the managed disk created, and open the OS managed disk.

Create VM clone from Managed Disk

Clone a Virtual Machine

From the OS disk managed disk control, create VM as in the image below.
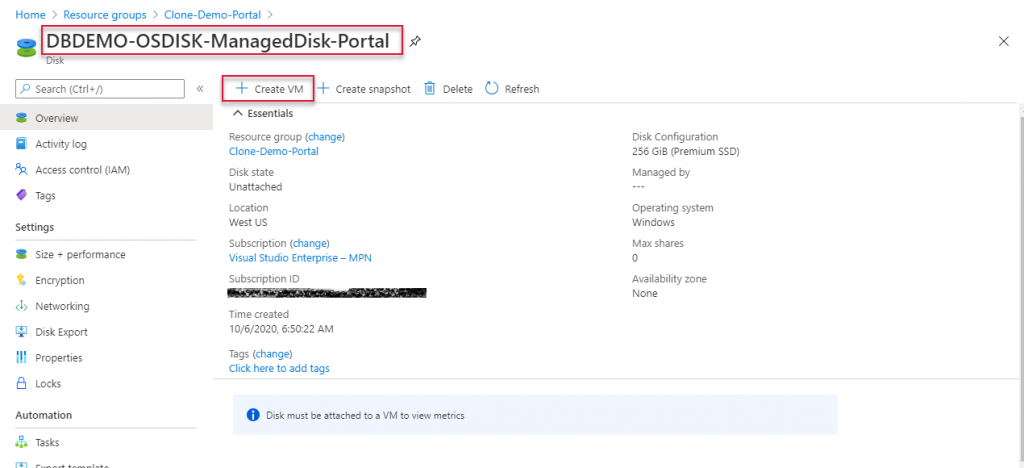
Clone a Virtual Machine

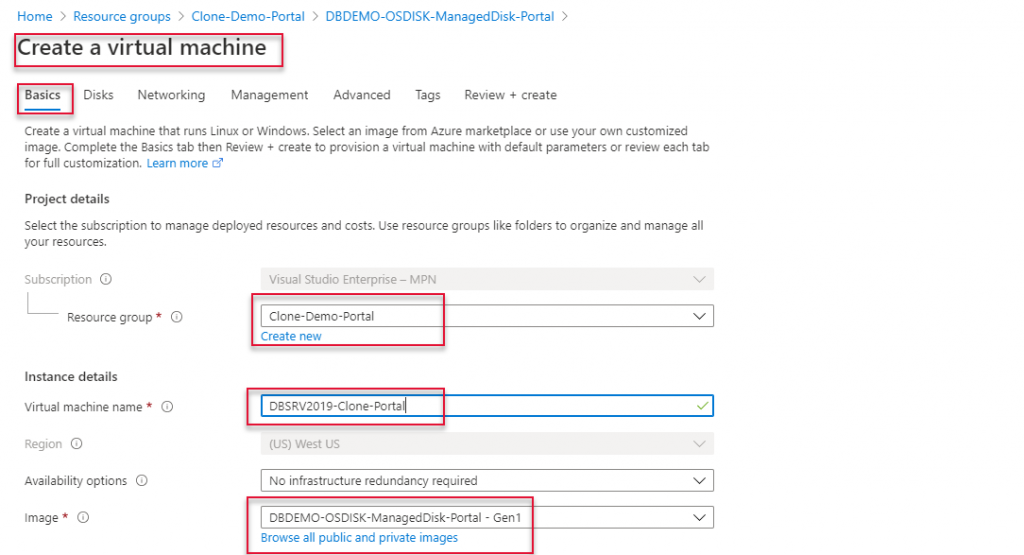
On the Create Virtual Machine window,

Select the Resource Group where managed disk exists

Type a name for the virtual machine

Select the OS disk managed disk as Image
Clone a Virtual Machine

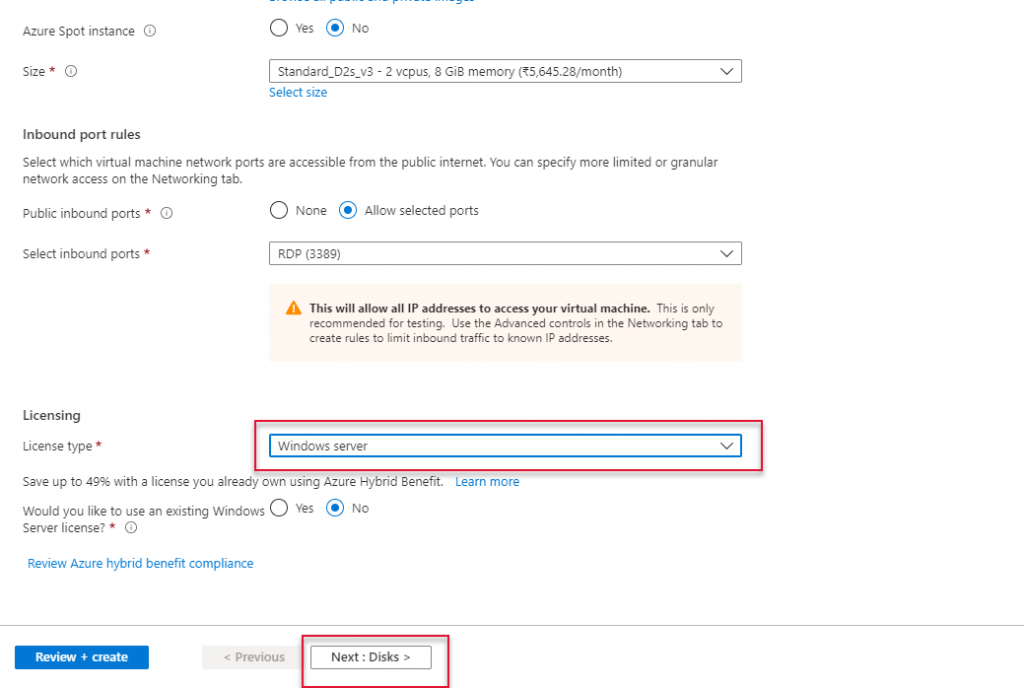
Select the VM size from the drop-down list, recommended using the same size as the original VM.

Choose Windows Server as License type

And select the option whether you have a license or not. If you are not sure about this, click No.

Click Next Disks to go to disk selection.
Clone a Virtual Machine

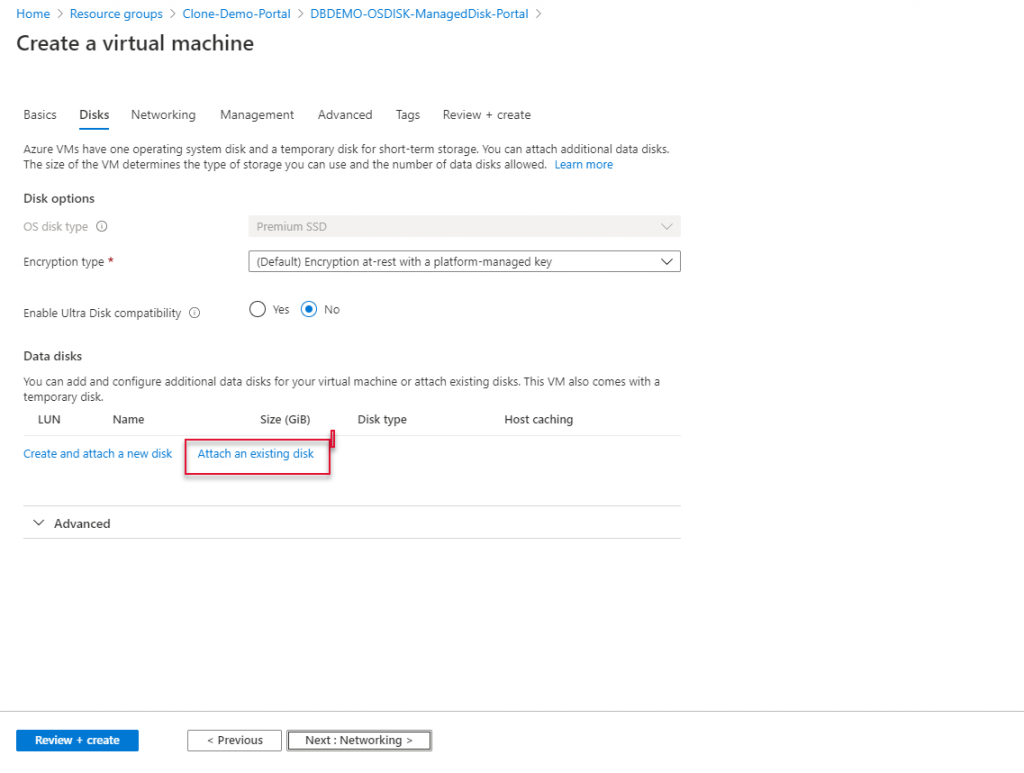
On the Disks page, select attach on the data disk attach column.
Clone a Virtual Machine

On the existing disks list, select the data managed disk.

Graphical user interface, application

Description automatically generated

Once the data disk is selected, select read-only from the host caching drop-down.

Clone a Virtual Machine

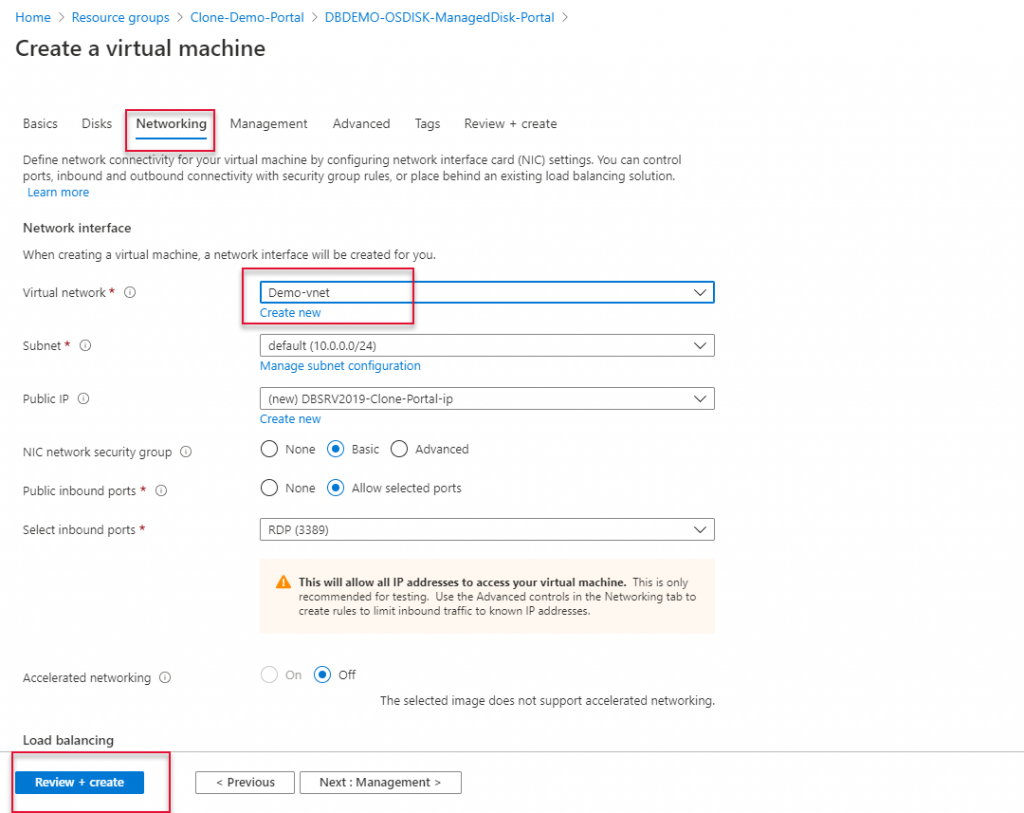
On the virtual network page, select the Virtual network of the original VM or the one assigned on VPN, if point to site is configured to access the VMs.

Select the subnet that is matching to original VM.

And leave the public IP to create an IP.

Click Review + Create and wait for validation to complete.
Clone a Virtual Machine

Once you see the validation passed prompt click create to create the VM.

Clone a Virtual Machine

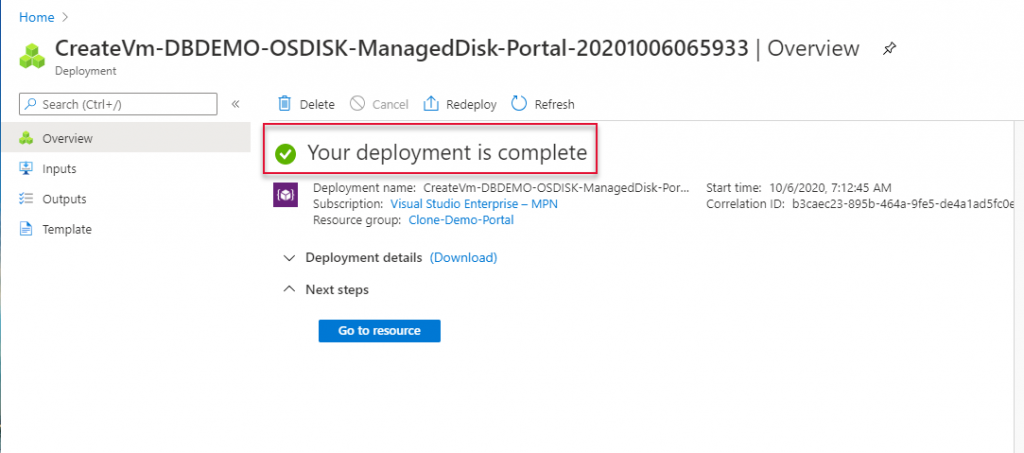
After the virtual machine’s deployment is complete, click Go to Resource to go to the VM management page.
Clone a Virtual Machine

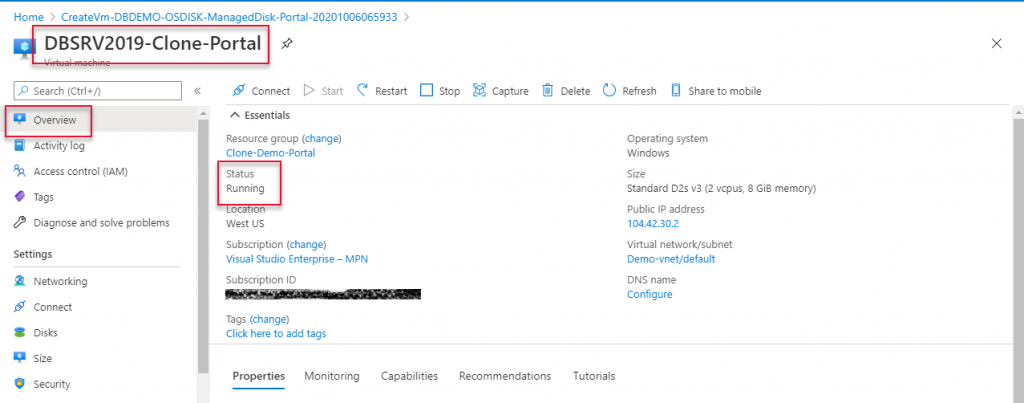
You can now copy the public IP and login to the VM with the Original VM user account.
Clone a Virtual Machine

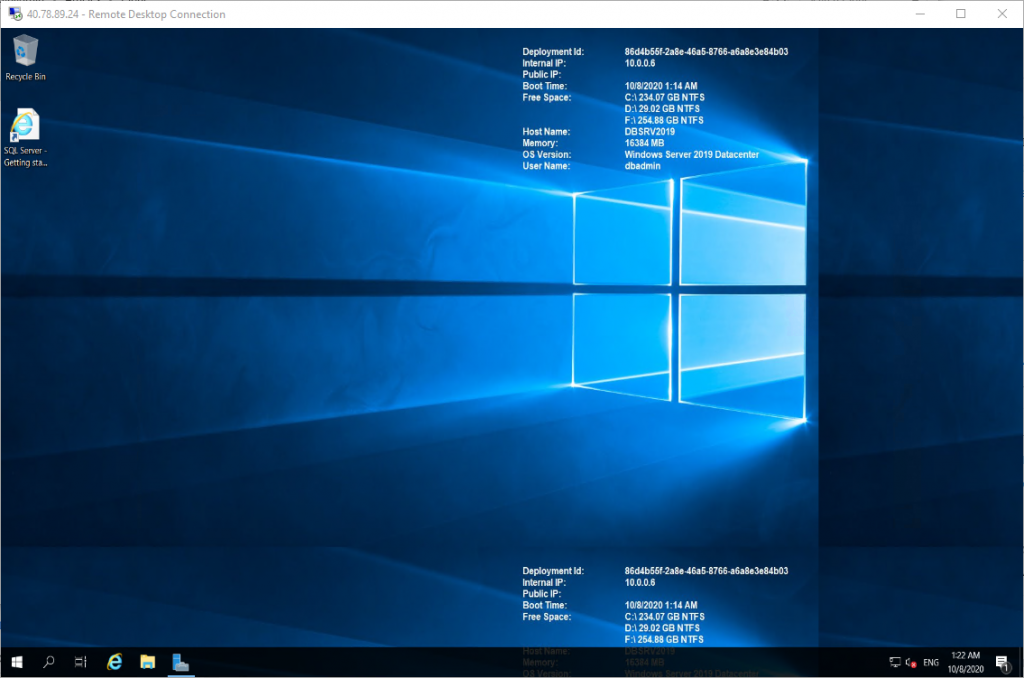
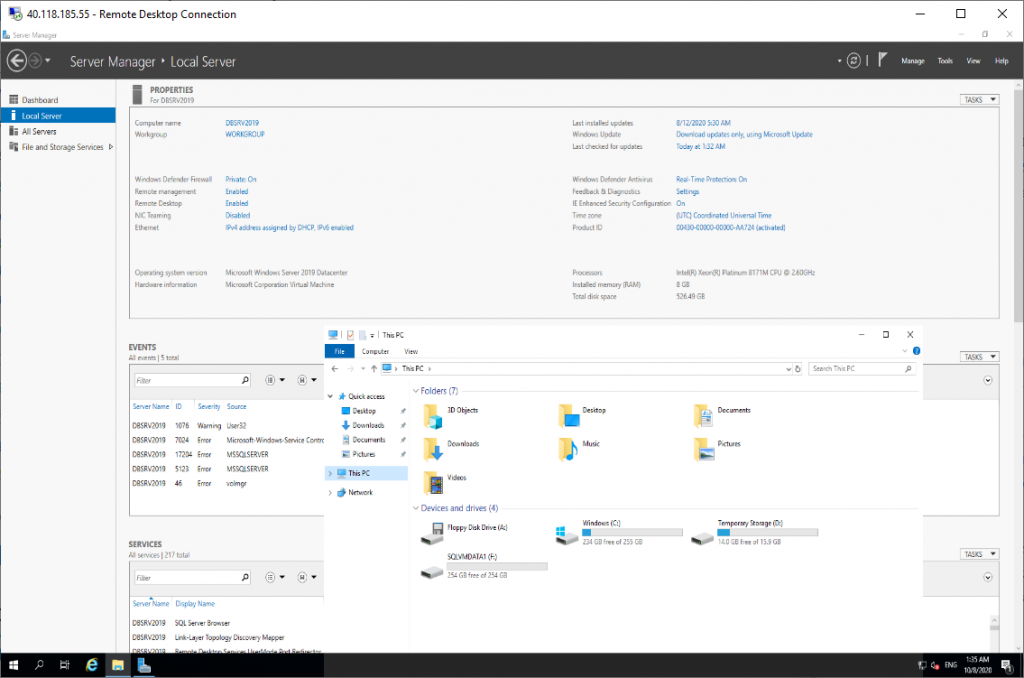
The RDP screen of Cloned is VM shown in the below screenshot.
Clone a Virtual Machine

Conclusion

In this demonstration, we have walked through the steps to create a cloned Virtual Machine using the Azure portal. We created Snapshot of OS disk and Data Disk and created managed disks from those snapshots. If your Virtual machine has only OS disk, ignore the data disk part while creating Snapshot and managed disk. Also, create the cloned VM only with OS disk. Most of the scenario requires data disks also to be cloned. So, having that in my intention, I have created a cloned VM with a Data disk. Your mileage may vary.

I hope the portal way of creating a cloned Virtual Machine is comprehensive. We will do the same type of cloning using a cloud shell (PowerShell). Click the link below to go to “Cloning VM using PowerShell” Cloning VM using PowerShell demonstration. I will be right with you in that article.

If you have any comments or feedback, please feel free to send it to me in the comments. I will reply to you when I get it.

How to Automate Cloning Virtual Machines in Azure using PowerShell – Part 2

How To Automate Cloning Azure Virtual machine

Overview

In the previous article of this two-part series, we have demonstrated Azure Virtual Machine cloning using the Azure portal. If you have not seen that article, click on the link above and come back to this part as you may want to use the GUI way of cloning as most Azure administrators like the GUI method as it will cover most of the things graphically and easy for you to follow. If you are a PowerShell script person, you continue reading and creating the VM clone, taking the given script, modifying the parameters, and applying it to your environment or need. Guess what, you clone Azure Virtual Machine without any difference from the GUI method.

The snapshot name is the same as the Azure portal method of creating clone and I thought we do not use the same snapshot for this article. But I changed my mind as it will be easy for advanced Azure administrators, but it would be hard to follow for new Azure administrators as they might not know how the snapshot created and the steps to follow. Creating a snapshot for this article would also help viewers not go back and forth between parts 1 and 2 to create a snapshot.

In this part 2 of the two-part article, we will look at creating snapshots of OS and Data disks, a deep explanation about each command on the PowerShell script given on the line above it. When you are ready, let’s look at this demonstration’s breeze, and bingo, the Azure cloned VM is ready to use.

Clone Azure Virtual Machine using PowerShell

The virtual machine used in part 1 to create cloned VM is the one we will use here to create a clone on a new resource group. The Azure VM that we are cloning with PowerShell is the one shown in the below screenshot. We will use the same method to create a snapshot for this demonstration, also. I would recommend following the same steps that I have outlined below for creating a clone using PowerShell.

Graphical user interface, application

Description automatically generated

On the Virtual machine management page, click disks at the left side navigation, and you would find two disks. One disk is the OS disk, and another is the Data disk. If you have only one disk, i.e., OS disk, take a snapshot of the OS disk and don’t run the script’s data disk-related commands. As most VM uses one or more data disks, I have decided to demonstrate the cloning for an Azure VM where the data disk is included.

Graphical user interface, application

Description automatically generated

As we will create a snapshot for the OS disk first, click the OS disk on top and create a snapshot.

On the OS disk overview page, click Create snapshot, as shown in the screen below.

Create a new resource group which is relevant to your scenario,

Type a name for the snapshot

Select the storage type and click the Review + create button.

Clone Azure Virtual Machine

Verify the validation is passed on the review page and click create to create a snapshot of the Virtual Machine’s OS disk.

Clone Azure Virtual Machine

Once the OS disk snapshot deployment is complete, you would see a deployment status, as shown below.

Clone Azure Virtual Machine

We have created a snapshot of the OS disk successfully. The next step is to create a snapshot of the Data disk. Go to the disks page of VM, and you would find the data disk and select it.

Clone Azure Virtual Machine

On the Data disk overview page, the same as we did the OS disk snapshot, click Create snapshot to create this disk’s snapshot.

Clone Azure Virtual Machine

Create a new resource group which is relevant to your scenario,

Type a name for the snapshot

Select the storage type and click the Review + create button.

Clone Azure Virtual Machine

Verify the validation is passed on the review page and click create to create a snapshot of the Virtual Machine’s Data disk

Clone Azure Virtual Machine

The Data disk snapshot was created successfully. The below screenshot shows that deployment is complete. So we have completed creating the OS disk and the Data Disk snapshots. The next step is to create a script and run it on the cloud shell.

Clone Azure Virtual Machine

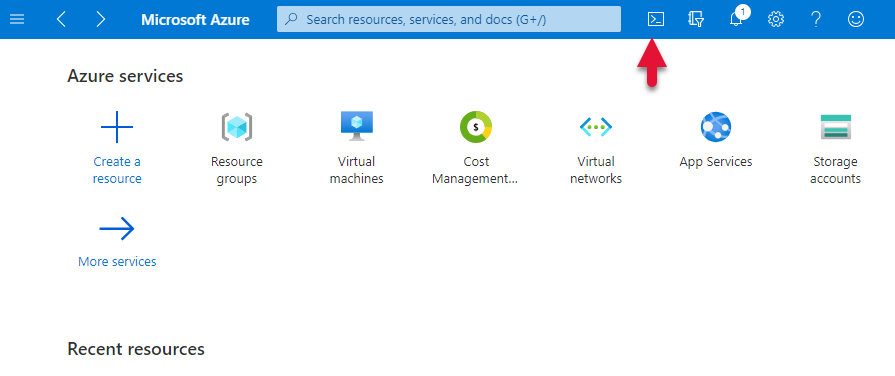
As shown in the screen capture below, click on the cloud shell icon to open the cloud shell on the Azure portal. You can log in to Azure Powershell ISE and run the script. But the cloud shell is good enough for this demonstration.

Clone Azure Virtual Machine

The below script is for the demonstration. I would recommend you modify the script as per your need. I have given the illustration of each command on top of the command.

# Replace the Subscription ID matching to your Azure subscription
Select-AzSubscription -SubscriptionId '7xx23xxx-5874-7da5-b65c-a37b4e78ff23'

# Assign Resource Group name where the snapshots have been created.
$RGName ='Clone-Demo-Shell'

# Assign snapshot name of the OS disk (provided on creating snapshot) to a variable
$OSSnapshotName = 'DBSRV2019-OSDISK-SnapShot'

# Assign a Managed OS Disk name to a variable
$OSDiskName = 'DBSRV2019-OSDISK-Managed_Disk-Shell'

# Choose between Standard_LRS and Premium_LRS
$StorageType = 'Standard_LRS'

# Get the value of Geo location from the snapshot and assign the value to GeoLocation variable
$GeoLocation = 'westus'

# Retrieve the values of snapshot for the OS Snapshot
$OSSnapshot = Get-AzSnapshot -ResourceGroupName $RGName -SnapshotName $OSSnapshotName 

# Create a configurable OS disk object from the details of storage type Geo Location and snapshot ID 
$OSDiskConfig = New-AzDiskConfig -AccountType $StorageType -Location $GeoLocation -CreateOption Copy -SourceResourceId $OSSnapshot.Id

# Create a Managed OS Disk from the OS disk Configuration
$OSDisk = New-AzDisk -Disk $OSdiskConfig -ResourceGroupName $RGName -DiskName $OSDiskName

# Assign snapshot name of the data disk that has been provided on creating snapshot
$DatasnapshotName = 'DBSRV2019-DataDisk-Snapshot'

# Assign a Managed Data Disk name to a variable
$DatadiskName = 'DBSRV2019-DataDisk-ManagedDisk-Shell'

# Retrieve the values of snapshot for the Data Snapshot
$DataSnapshot = Get-AzSnapshot -ResourceGroupName $RGName -SnapshotName $DatasnapshotName 

# Create a configurable data disk object from the details of storage type Geo Location and snapshot ID
$DatadiskConfig = New-AzDiskConfig -AccountType $StorageType -Location $geolocation -CreateOption Copy -SourceResourceId $DataSnapshot.Id

# Create a Managed Data Disk from the data disk Configuration
$Datadisk = New-AzDisk -Disk $DatadiskConfig -ResourceGroupName $RGName -DiskName $DataDiskName

# Assign the value of virtual network name to VNetName variable (replace the name with the one that your virtual network name)
$VNetName = 'Demo-vnet'

# Assign a variable as the Identity of the VM 
$VMIdentity = 'DBSRV2019-Clone-Shell'

# Assign VM size ( for more VM sizes run Get-AzureRmVmSize with location name)
$VMSize = 'Standard_D4s_v3'

# Create a public IP and assign static IP address
$pip = New-AzPublicIpAddress -Name "ClonepublicIP$(Get-Random)" -ResourceGroupName $RGName -Location $GeoLocation -AllocationMethod Static

# Create an inbound network security group rule for port 3389
$nsgRuleRDP = New-AzNetworkSecurityRuleConfig -Name CloneNetworkSecurityGroupRuleRDP  -Protocol Tcp -Direction Inbound -Priority 1000 -SourceAddressPrefix * -SourcePortRange * -DestinationAddressPrefix * -DestinationPortRange 3389 -Access Allow

# Create a network security group
$nsg = New-AzNetworkSecurityGroup -ResourceGroupName $RGName -Location $geolocation -Name CloneNetworkSecurityGroup -SecurityRules $nsgRuleRDP

# The VNET assigned to the clone VM has to be same as Source VM resource Group
$RGNameVnet ='Demo'

# Retrieve the Virtual network details with the Virtual network residing resource group
$vnet = Get-AzVirtualNetwork -Name $VNetName -ResourceGroupName $RGNameVnet

# Create a Network Interface Card
$nic = New-AzNetworkInterface -Name CloneNic -ResourceGroupName $RGName -Location $GeoLocation -SubnetId $vnet.Subnets[0].Id -PublicIpAddressId $pip.Id -NetworkSecurityGroupId $nsg.Id

# Create and assign the value to Virtual machine varriable with the VM identity and VM size
$VirtualMachine = New-AzVMConfig -VMName $VMIdentity -VMSize $VMSize

# Attach Data Disk to the confirguration with the datadisk.id from the data disk maanged disk
$VirtualMachine = Add-AzVMDataDisk -VM $VirtualMachine -Name $dataDiskName -ManagedDiskId $datadisk.id -Lun "0" -CreateOption "Attach"

# Attach OS Disk to the confirguration with the osdisk.id from the OS managed disk and type of operating system on the snapshot
$VirtualMachine = Set-AzVMOSDisk -VM $VirtualMachine -ManagedDiskId $osdisk.Id -CreateOption Attach -Windows

# Add virtual network interface using the NIC ID and assign the value to $VirtualMachine 
$VirtualMachine = Add-AzVMNetworkInterface -VM $VirtualMachine -Id $nic.Id

# Create the virtual machine with above details and Managed Disks
New-AzVM -VM $VirtualMachine -ResourceGroupName $RGName -Location $GeoLocation

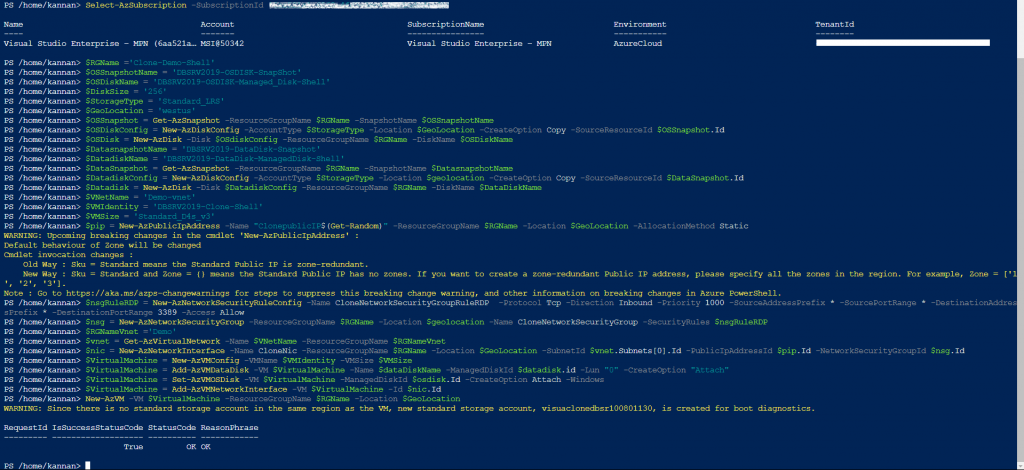
I have run the above script on the cloud shell, and you can see at the end of the script output that the Virtual Machine is created successfully.

Clone Azure Virtual Machine

The newly created cloned VM overview page is shown in the screen capture below. Click connect and use the same credentials that you are using for the original VM to RDP to this cloned Virtual Machine.

Clone Azure Virtual Machine

The RDP screen is shown in the below image that the cloned virtual machine that we have created.

Clone Azure Virtual Machine

Conclusion

Here is the end of a two-part article of clone Azure virtual machine from the original one using the Azure portal and Azure cloud shell (using PowerShell). We have achieved the same result by using the method in the first part and the Azure portal method or GUI way of creating VM and, in the second part, also Cloudshell way of creating Azure VM. So use the method you are comfortable with and your use case.

I’m delighted to create this article to post it on my blog. You may have some questions or feedback on this article. If you have any, send on the comment below to respond to them at the earliest.

How to Easily Clone a Virtual Machine in Azure Using Portal – Part 1