
How to Migrate Exchange Server 2016 to 2019 | Part 2
Migrate Exchange Server 2016 to 2019 | Part 2
Migrate Exchange Server 2016 to 2019 | Part 1
Migrate Exchange Server 2016 to 2019 | Part 2
Migrate Exchange Server 2016 to 2019 | Part 3
This article is the continuation of how to Migrate Exchange Server 2016 to 2019 Part 1, and we are going to discuss the configuration part of the Exchange Server 2019. We have completed installing Exchange Server 2019 and logged into the Exchange Admin Center using the hostname of Exchange Server 2019. The Exchange Server 2019 needs to be set with internal and external hostnames to resolve them from the network where the users accessing with their outlook client. We are also going to set internal and external URLs of Virtual directories such as OWA, OAB, EWS, and so on. We need to set the internal Autodiscover Uri to configure outlook with auto-discovery, this is called service connection point. At the end of this Part 2 article, we are going export the certificate from the Exchange Server 2016 and then import it to Exchange Server 2019. So, let’s start configuring these components on Exchange 2019 Server straight away.
Outlook Anywhere Setup
From the Exchange Admin Center navigate to the server from the left side navigation and on the servers list, we can find both Exchange 2016 and Exchange 2019 servers. Select the Exchange Server 2019 node and click on the edit button to configure Outlook Anywhere.
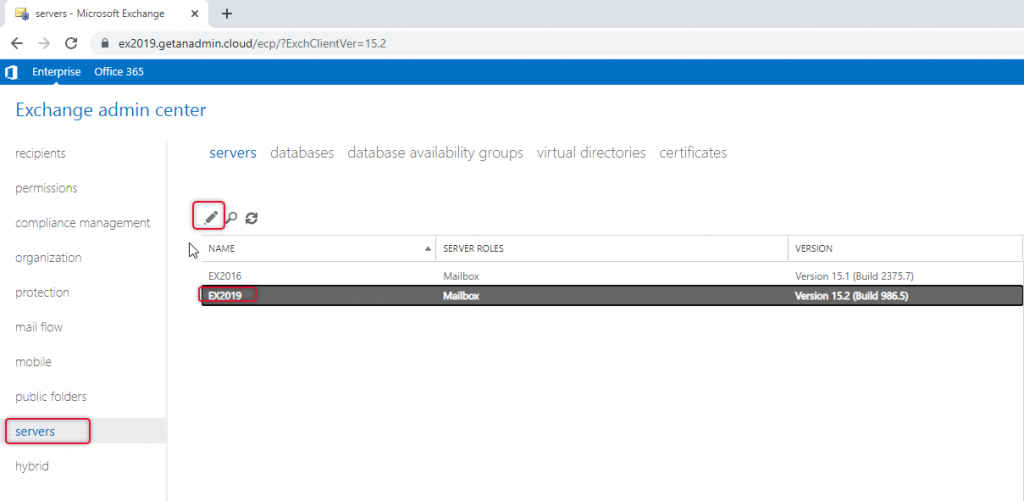
On the Server, configuration go to Outlook anywhere and type the FQDN of the hostname which can be accessible publicly also has the hostname in the certificate subject alternative name. Click save and exit.

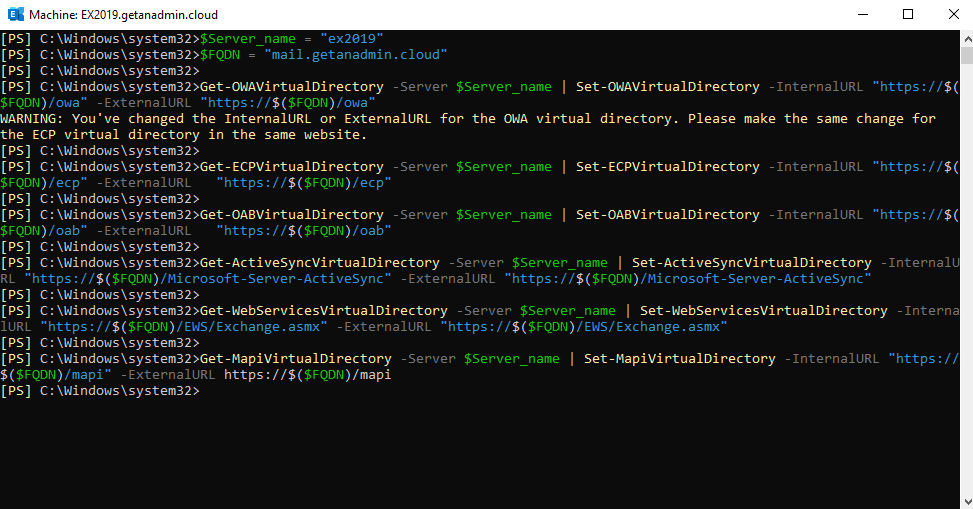
Configure Virtual Directories of Exchange 2019 Server
Server_name = "ex2019"

$FQDN = "mail.getanadmin.cloud"

Get-OWAVirtualDirectory -Server $Server_name | Set-OWAVirtualDirectory -InternalURL "https://$($FQDN)/owa" -ExternalURL "https://$($FQDN)/owa"

Get-ECPVirtualDirectory -Server $Server_name | Set-ECPVirtualDirectory -InternalURL "https://$($FQDN)/ecp" -ExternalURL   "https://$($FQDN)/ecp"

Get-OABVirtualDirectory -Server $Server_name | Set-OABVirtualDirectory -InternalURL "https://$($FQDN)/oab" -ExternalURL   "https://$($FQDN)/oab"

Get-ActiveSyncVirtualDirectory -Server $Server_name | Set-ActiveSyncVirtualDirectory -InternalURL "https://$($FQDN)/Microsoft-Server-ActiveSync" -ExternalURL "https://$($FQDN)/Microsoft-Server-ActiveSync"

Get-WebServicesVirtualDirectory -Server $Server_name | Set-WebServicesVirtualDirectory -InternalURL "https://$($FQDN)/EWS/Exchange.asmx" -ExternalURL "https://$($FQDN)/EWS/Exchange.asmx"

Get-MapiVirtualDirectory -Server $Server_name | Set-MapiVirtualDirectory -InternalURL "https://$($FQDN)/mapi" -ExternalURL https://$($FQDN)/mapi
Migrate Exchange Server 2016 to 2019
The commands must be returned with no errors in red text, and it has to be something similar to the screen capture below but with your exchange server name and server FQDN.
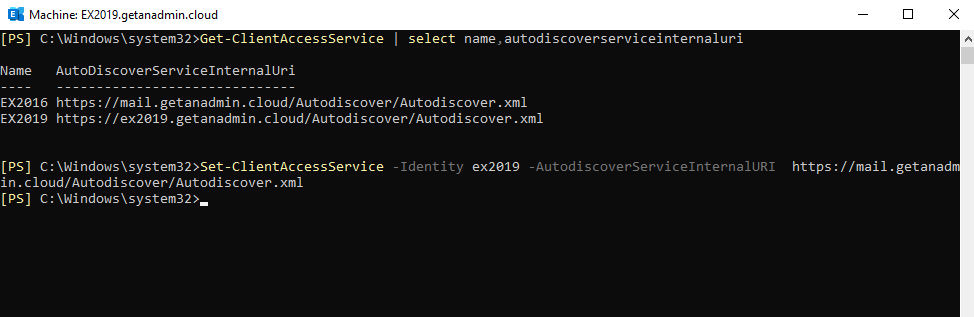
Service Connection Point or Internal Autodiscover service
The outlook clients connecting from the internal Active Directory would use the Service Connection Point, also called the internal Autodiscover service Uri to get the configuration details to configure it automatically. The command to set the internal Autodiscover service URI is given below.
Set-ClientAccessService -Identity EX2019 -AutodiscoverServiceInternalURI https://mail.getanadmin.cloud/Autodiscover/Autodiscover.xml
Import Certification Authority Certificate to Exchange 2019
The third-party certificate installed on Exchange Server 2016 will be usable for Exchange Server 2019 as the subject alternative names are the same ones with both servers. So, we are going to export the certificate from Exchange Server 2016 and import it to Exchange Server 2019. We need the certificate exported in pfx format with a security passcode from the Ex2016 server.
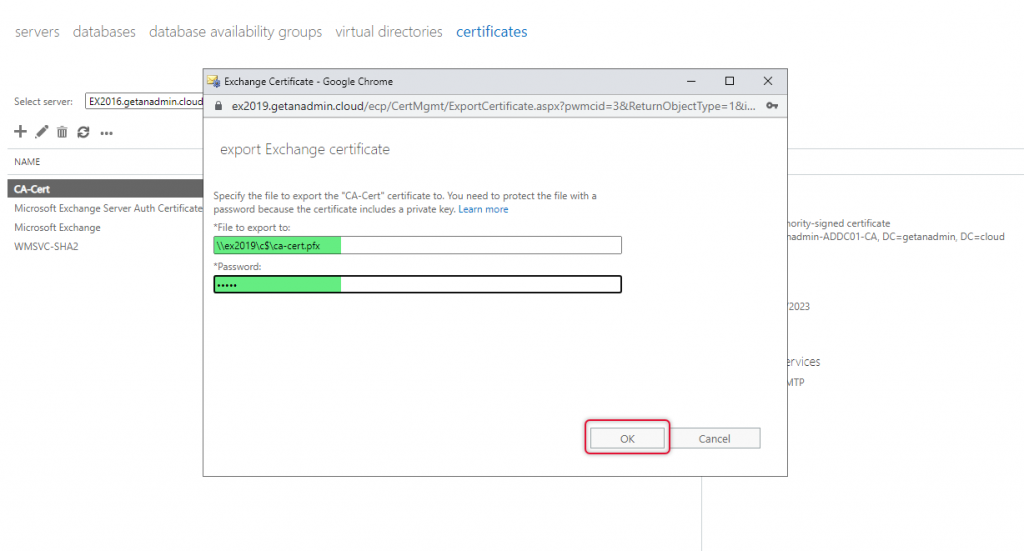
Navigate to the server section on the left side navigation and select the Certificates tab from the top navigation. Select the Exchange Server 2016 server name in the Server name drop-down and the Certificate name of the third-party certificate assigned with IIS. Then, from the more options with the triple dots click on export Exchange certificate.

Give a UNC path for the file to be saved on a network location with a certificate filename with the pfx format and a password. Click OK to complete the certificate export.
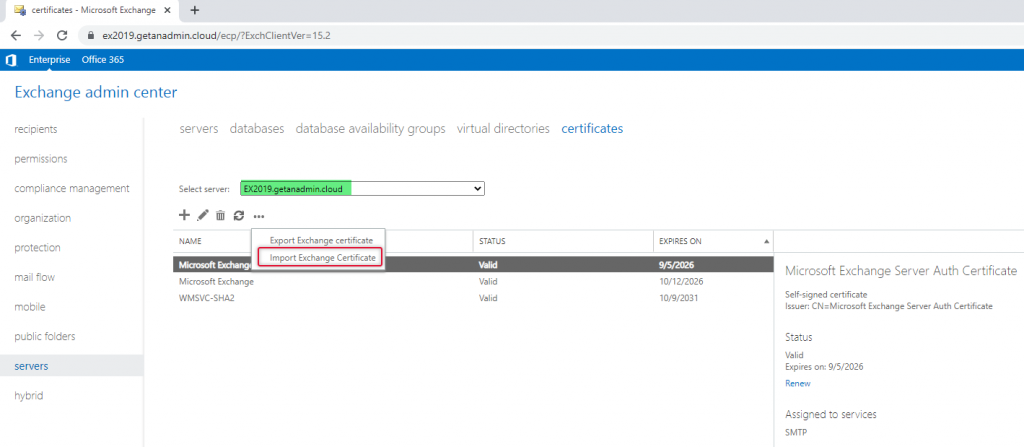
Now we are going to import the certificate to Exchange Server 2019, select more options with triple dots and click import Exchange Certificate.
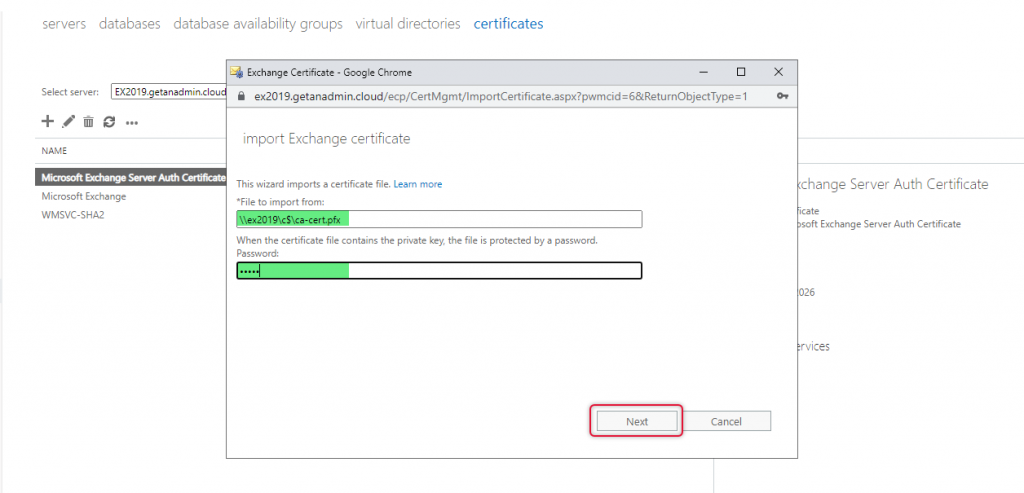
Give the same path that you have given while exporting the certificate and the password that you gave given earlier, click next to continue importing the certificate.
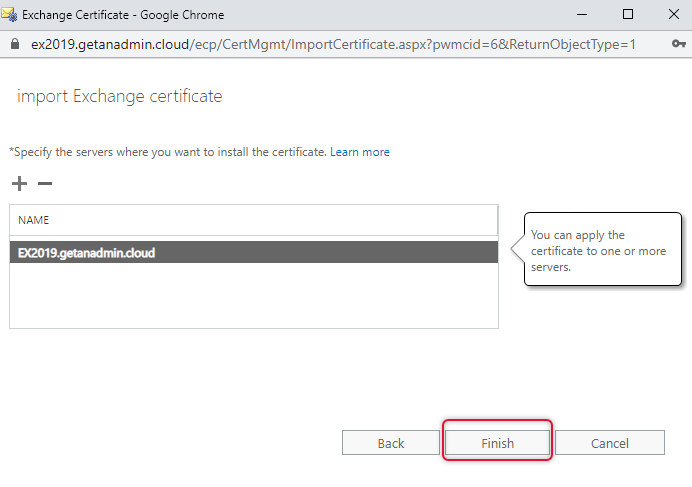
On the specify a server name, click add and select the EX2019 server and click add OK.
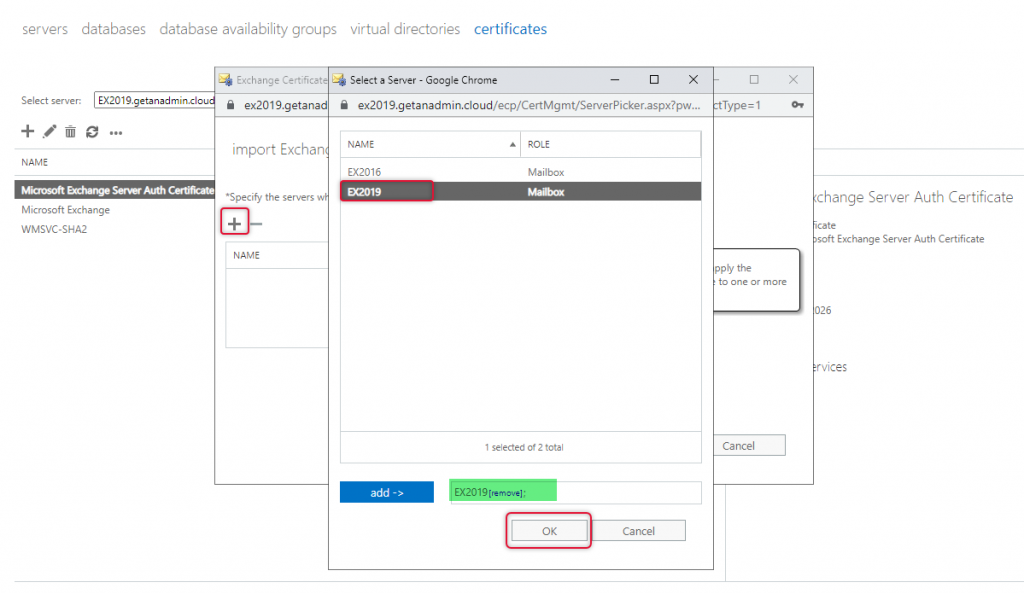
Click Finish to complete the certificate import.
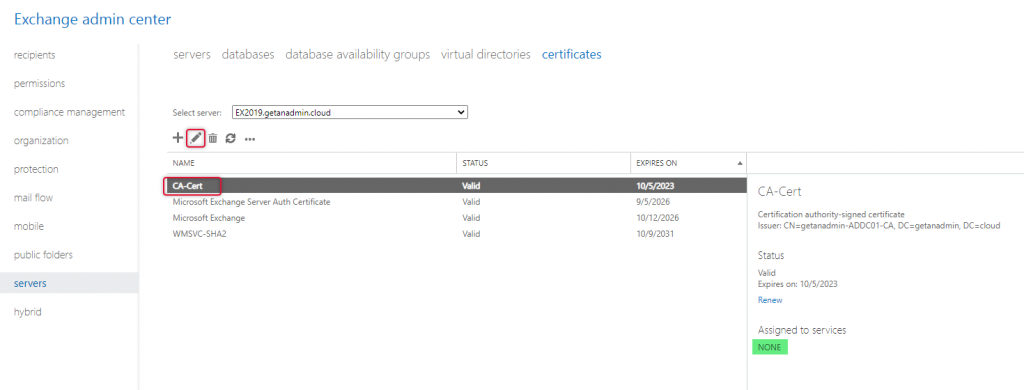
Now the next step is to assign services to the certificate, choose Exchange Server 2019 server name from the Select server drop down and click the Edit button to open the Exchange certificate properties of the certificate that we have just imported.
Select services from the left side navigation and click on SMTP and IIS checkboxes. If you are planning to use POP and IMAP, select them as well and click on save to assign services.
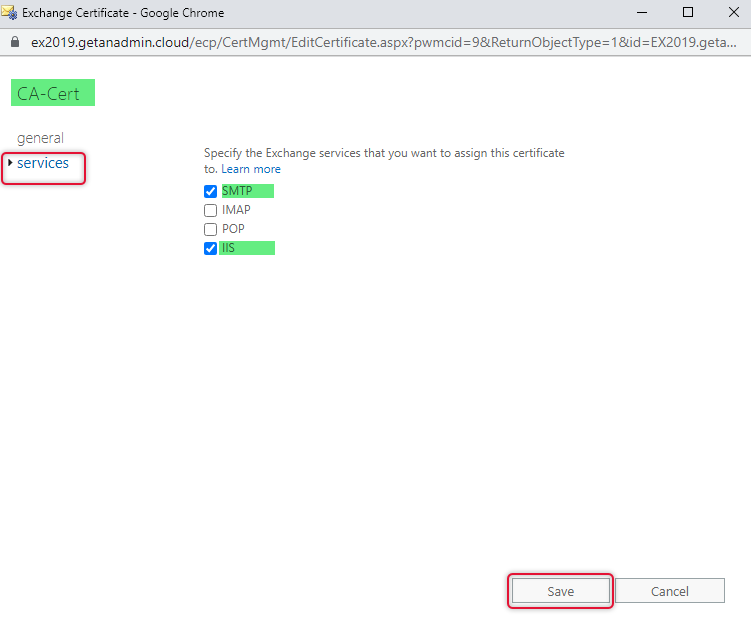
Click Yes to overwrite the default SMTP certificate.

Summary
In this article, we have gone through the configuration part of how to Migrate Exchange Server 2016 to 2019, and we have covered how to set the internal and external hostname of Outlook Anywhere. The Virtual Directories internal and external URLs have been set using a script and service connection point set for the internal Autodiscover service. In the end, we exported the third-party certificate from Exchange server 2016 and imported it to Exchange server 2019. This concludes part 2 of the article series, we are going to discuss mail flow cutover, mailbox migration, and Exchange Server 2016 decommission on the third and final part of this article series, so click the link below to go to part 3 of this article series.
Migrate Exchange Server 2016 to 2019 | Part 1
Migrate Exchange Server 2016 to 2019 | Part 2
Migrate Exchange Server 2016 to 2019 | Part 3